💼 Internship at Flashgroup XR
Flashgroup XR develops immersive XR training systems for emergency services, including firefighters, police, security personnel, and first-aid responders. Their portable XR systems combine multiplayer VR simulations, realistic training scenarios, and replicas of professional equipment, allowing instructors to run and review emergency-response training almost anywhere.
I worked at Flashgroup XR as a Programming Intern / Unity Tools Developer.
My main responsibility was researching and developing internal tools that improved the team’s production workflow.
My primary contribution was a custom Unity Collider Editor that helped artists and developers create physics colliders for 3D objects directly inside Unity.
👤 Zhangir Before the Project
Before this project, I was already comfortable with Unity, C#, editor scripting, VR development, and building technical prototypes. I could research algorithms, implement systems, and quickly turn ideas into working tools.
However, I was less experienced in designing tools around other people’s workflows. My instinct was to approach the problem from a programmer’s perspective: automate as much as possible, expose useful parameters, and give users technical control.
I assumed that if the system was powerful and technically correct, it would naturally be useful.
This project challenged that assumption. I had to learn that artists and programmers do not always think about tools in the same way. What feels logical to me as a programmer can feel confusing, intimidating, or slow to someone else. I entered the project thinking mainly about collider generation, but I still had to learn how to design a tool around how people actually work.
🔨 My Contributions
📦 The Collider Editor Tool
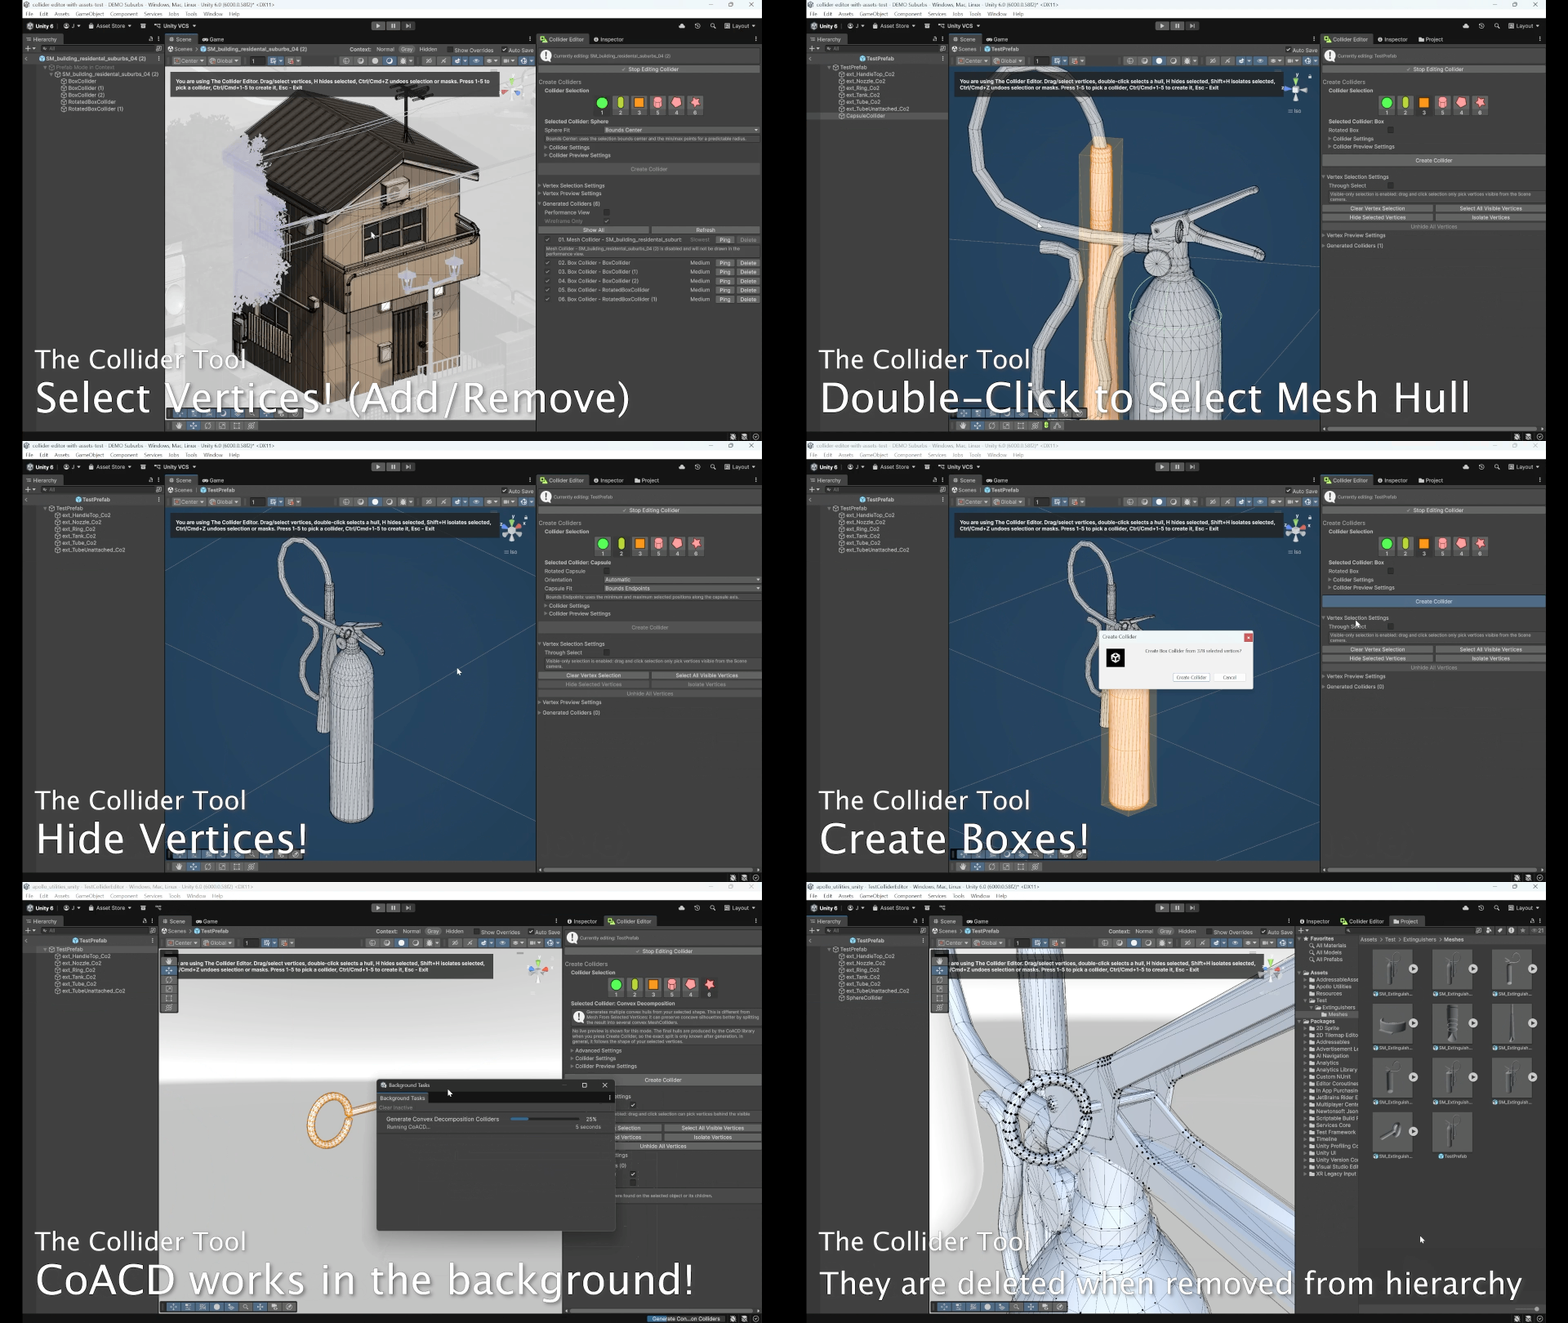
The Collider Editor is a custom Unity editor tool that lets artists and developers create accurate physics colliders directly from a mesh’s vertices.
Users can select parts of a model in the Scene view, preview the collider shape, and generate colliders such as:
- boxes;
- spheres;
- capsules;
- cylinders;
- convex hulls;
- CoACD-based convex decomposition collider sets.
My goal was to make collider creation as easy as possible.
Before this tool, an artist or programmer had to either leave Unity to edit collision meshes in Blender, or rely on Unity’s native collider tools. This process was slow, repetitive, and error-prone. Users had to manually add collider components, position them, scale them, test them, and repeat the process until the collider felt good enough.
After the Collider Editor, users could stay inside Unity and create colliders visually from the mesh itself. They could select the exact part of the model they wanted, preview the collider before creating it, and choose the collider type that best matched the shape.
🖥️ Challenge 1: Simple and Clear User Interface & User Experience
❓ What was the Problem?
One frequent problem I encountered while developing the Collider Editor was that what I considered “logical” as a programmer was not always logical or intuitive to the actual users of the tool.
The tool was mainly meant to be used by artists, and sometimes programmers, so the interface could not only make sense from a technical point of view. It had to match the way they already worked, thought, and understood tools.
The goal was not just to make the tool functional. It had to be easy to learn, fast to use, and familiar enough that artists could use their existing skills instead of learning a completely new workflow.
This became clear when I received feedback that the first version of the tool felt “scary” because it had too many parameters. From my perspective, those parameters gave control. From the user’s perspective, they created uncertainty.
🧩 Why Was it Hard?
The hardest part was understanding the difference between what users said they needed and what they actually needed while using the tool.
The original assignment was focused on automatically generating colliders. From a programmer’s perspective, this made sense: automation should save time. However, after testing the tool with artists, I realized that automatic generation was not always the best solution.
Artists could often create colliders manually in around one or two minutes. This meant that if my generator required several attempts, confusing settings, or long processing times, it was no longer saving time.
Another struggle was that users did not always explain the core problem directly. They might comment on a button, a setting, or a missing feature, but the deeper issue was often about workflow, clarity, or immediate visual feedback.
For example, artists needed to immediately see generated colliders, understand what settings did visually, and avoid being overwhelmed by technical labels such as “operator settings,” “CPDCD,” or “CoACD.”
This forced me to stop designing the tool only from my own perspective and instead observe how users behaved when they actually used it.
💡 Solution. How Did I Approach the Problem?
To solve this, I frequently tested the tool with artists and programmers. During these sessions, I wrote down both what they said out loud and what I observed while they used the tool.
This was important because spoken feedback and observed behavior were not always the same thing. A user might say that a setting was fine, but then hesitate before using it, randomly change values to see what happened, or get stuck because the tool gave no immediate visual response.
Those observations helped me understand what needed to change in the user experience.
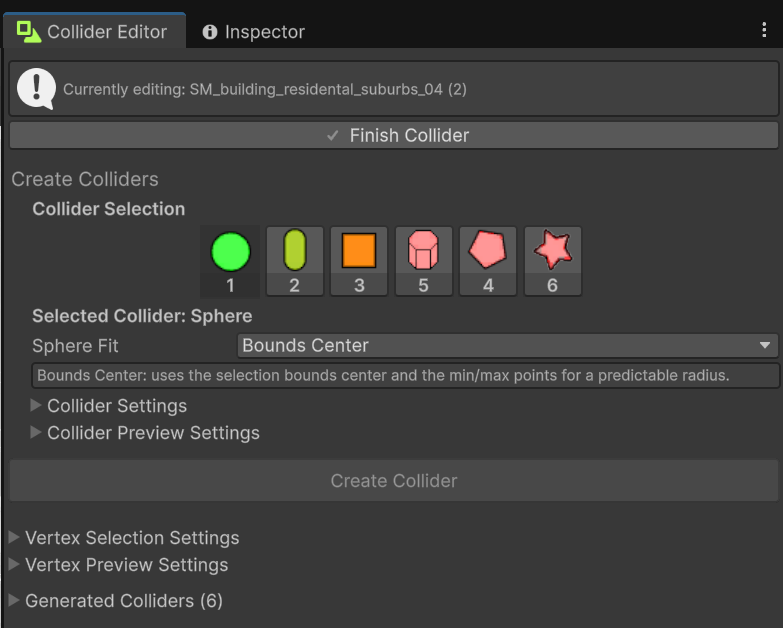
Based on the feedback, I simplified the interface and changed the focus of the tool. Instead of treating it as only an “automatic collider generator,” I redesigned it as a collider editor.
This meant supporting:
- manual collider creation when artists could work faster by hand;
- automatic generation when it actually saved time;
- convex mesh generation for more complex shapes;
- clearer names for features;
- visible presets instead of exposing too many advanced settings immediately;
- stronger visual feedback so users could understand what happened.
One important design decision was to hide technical complexity behind a simpler workflow. The common path had to be understandable first, while advanced settings could still exist for users who needed them.
✅ Problem Solved
The result was a much clearer and easier-to-use collider editor.
The workflow became:
- Select an object.
- Select vertices or a part of the mesh.
- Choose a collider shape.
- Preview the result.
- Finalize it.
The tool also allowed automatic generators to be applied to selected parts of a mesh instead of only the entire object, which made the workflow more flexible.
Eventually, after showing the tool to my supervisor and the director, they said the tool was useful and close to production-ready. The director even mentioned that it would have saved him a lot of time in the past.
This challenge taught me that good UX is not just about making a tool look clean. It is about reducing uncertainty, matching the user’s existing workflow, and making sure the tool solves the real problem instead of only the problem I assumed existed.
📉 Cost / Limitations / Tradeoffs
The main cost was time. Iterating with artists and programmers required repeated feedback sessions, and sometimes the people I needed feedback from were busy.
I also spent time on usability, naming, presets, previews, and workflow design instead of only improving the underlying algorithm. However, this was worth it because the tool became more useful for the people who actually had to use it.
🖱️ Challenge 2: Selection
❓ What was the Problem?
The Collider Editor needed a reliable way to let users select mesh vertices directly in the Unity Scene view and then use that selection to generate colliders.
The selection workflow had to feel similar to a lightweight mesh-editing mode. Users needed to be able to:
- click individual vertices;
- drag-select groups of vertices;
- add or remove from the current selection;
- select all visible vertices;
- double-click to select a connected hull;
- hide or isolate parts of the mesh.
The main goal was to let users work visually on the original model instead of manually entering points or creating colliders through trial and error.
🧩 Why Was it Hard?
Unity does not provide a built-in “select mesh vertices in the Scene view” workflow for custom editor tools, so I had to build most of the interaction layer myself.
The tool had to claim Scene view input, distinguish clicks from drag selections, handle double-clicks, and respect modifier keys for adding and removing vertices from the selection.
The difficult part was that selection happens in 2D screen space, but the data is 3D mesh data. A vertex may appear inside the drag rectangle but still be hidden behind the mesh. Because of this, selection needed two modes:
- Through Select, which selects front and back vertices;
- Visible-Only Selection, which only selects vertices visible from the Scene camera.
Performance was also a concern. Dense meshes can contain thousands of vertices, and visible-only selection can require ray checks. To keep the tool responsive, I first used cheap screen-space checks, then only ran more expensive visibility checks on possible candidates.
Another challenge was keeping selection stable across child meshes and repeated vertices. The tool needed to work across multiple MeshFilter components while still knowing which object-space vertex had been selected.
💡 Solution. How Did I Approach the Problem?
I implemented selection as a custom Scene view editing mode.
The tool converts mesh vertices into GUI screen space using Unity editor utilities. For single-click selection, it finds the closest selectable vertex. For drag selection, it checks which vertices are inside the selection rectangle.
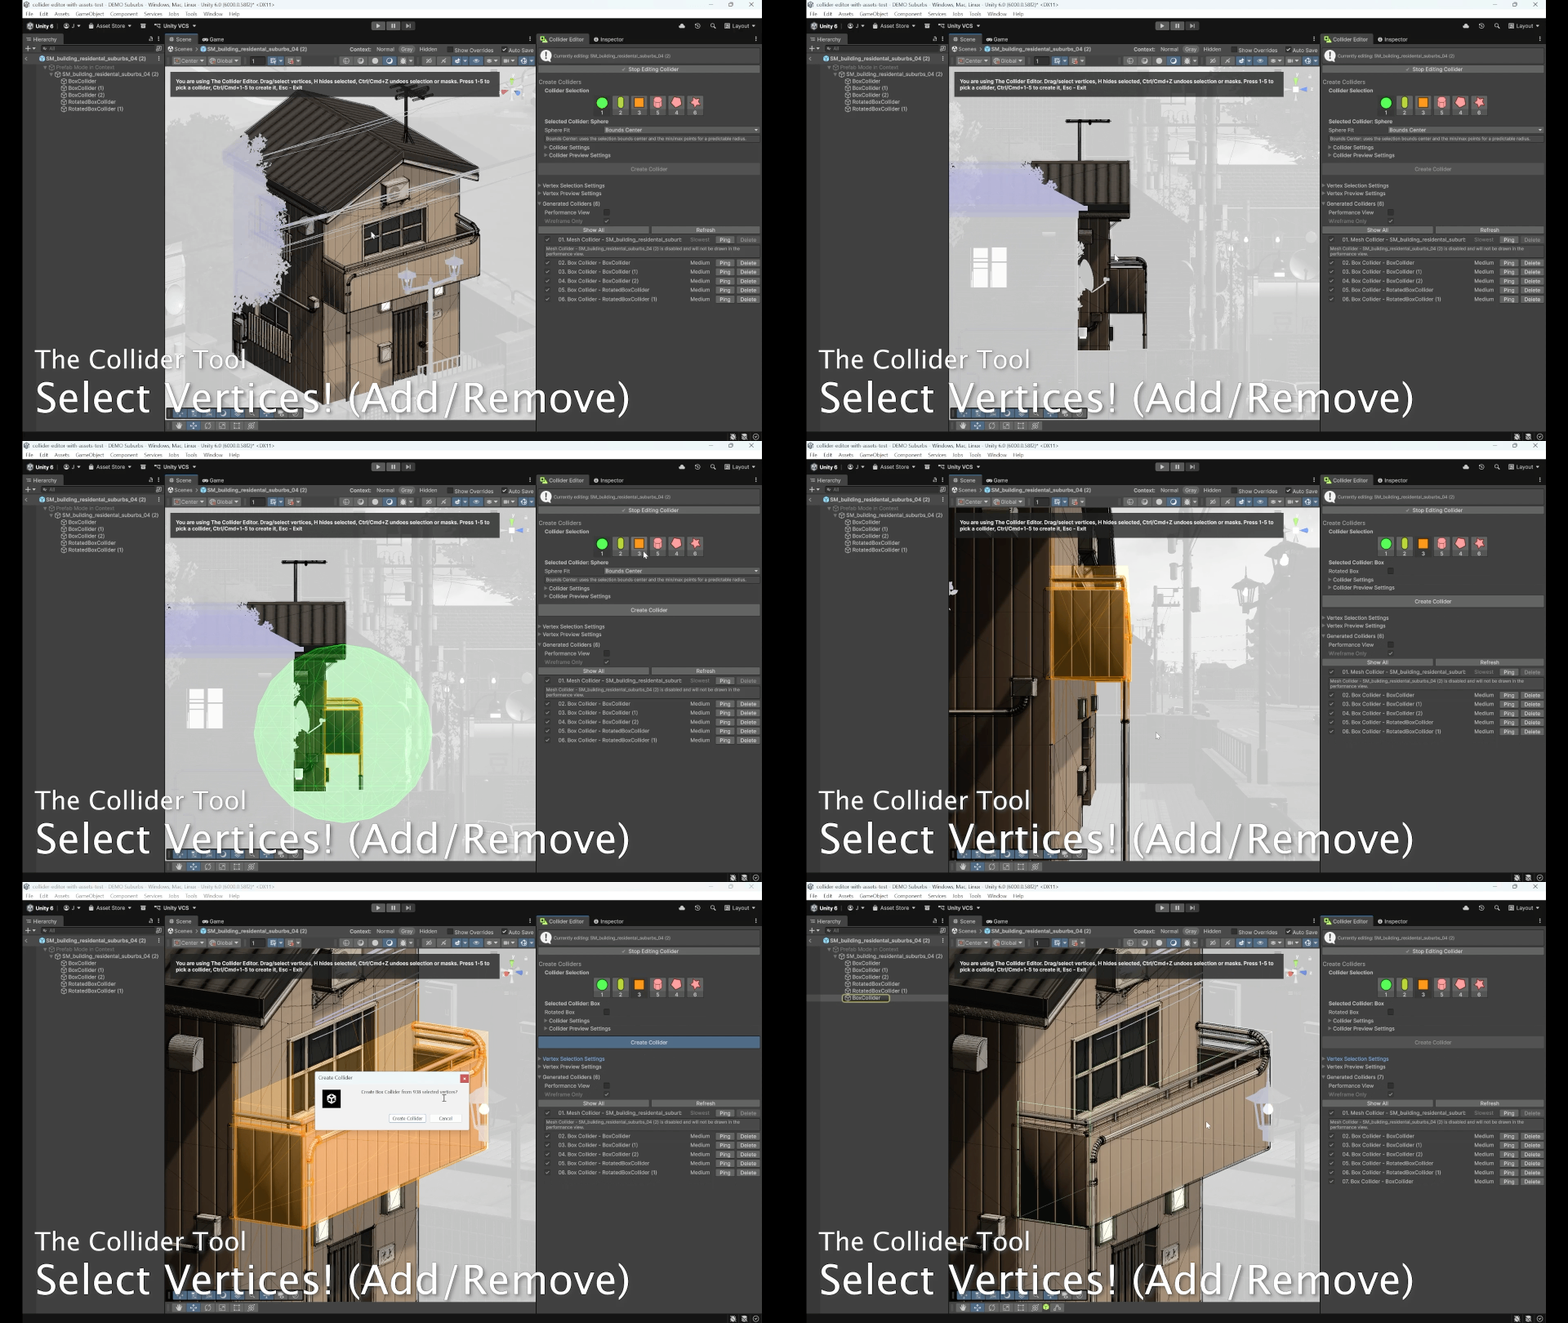
The same selection system supports replacing, adding, and removing vertices from the current selection. This made the workflow feel closer to other editor tools that artists were already familiar with.
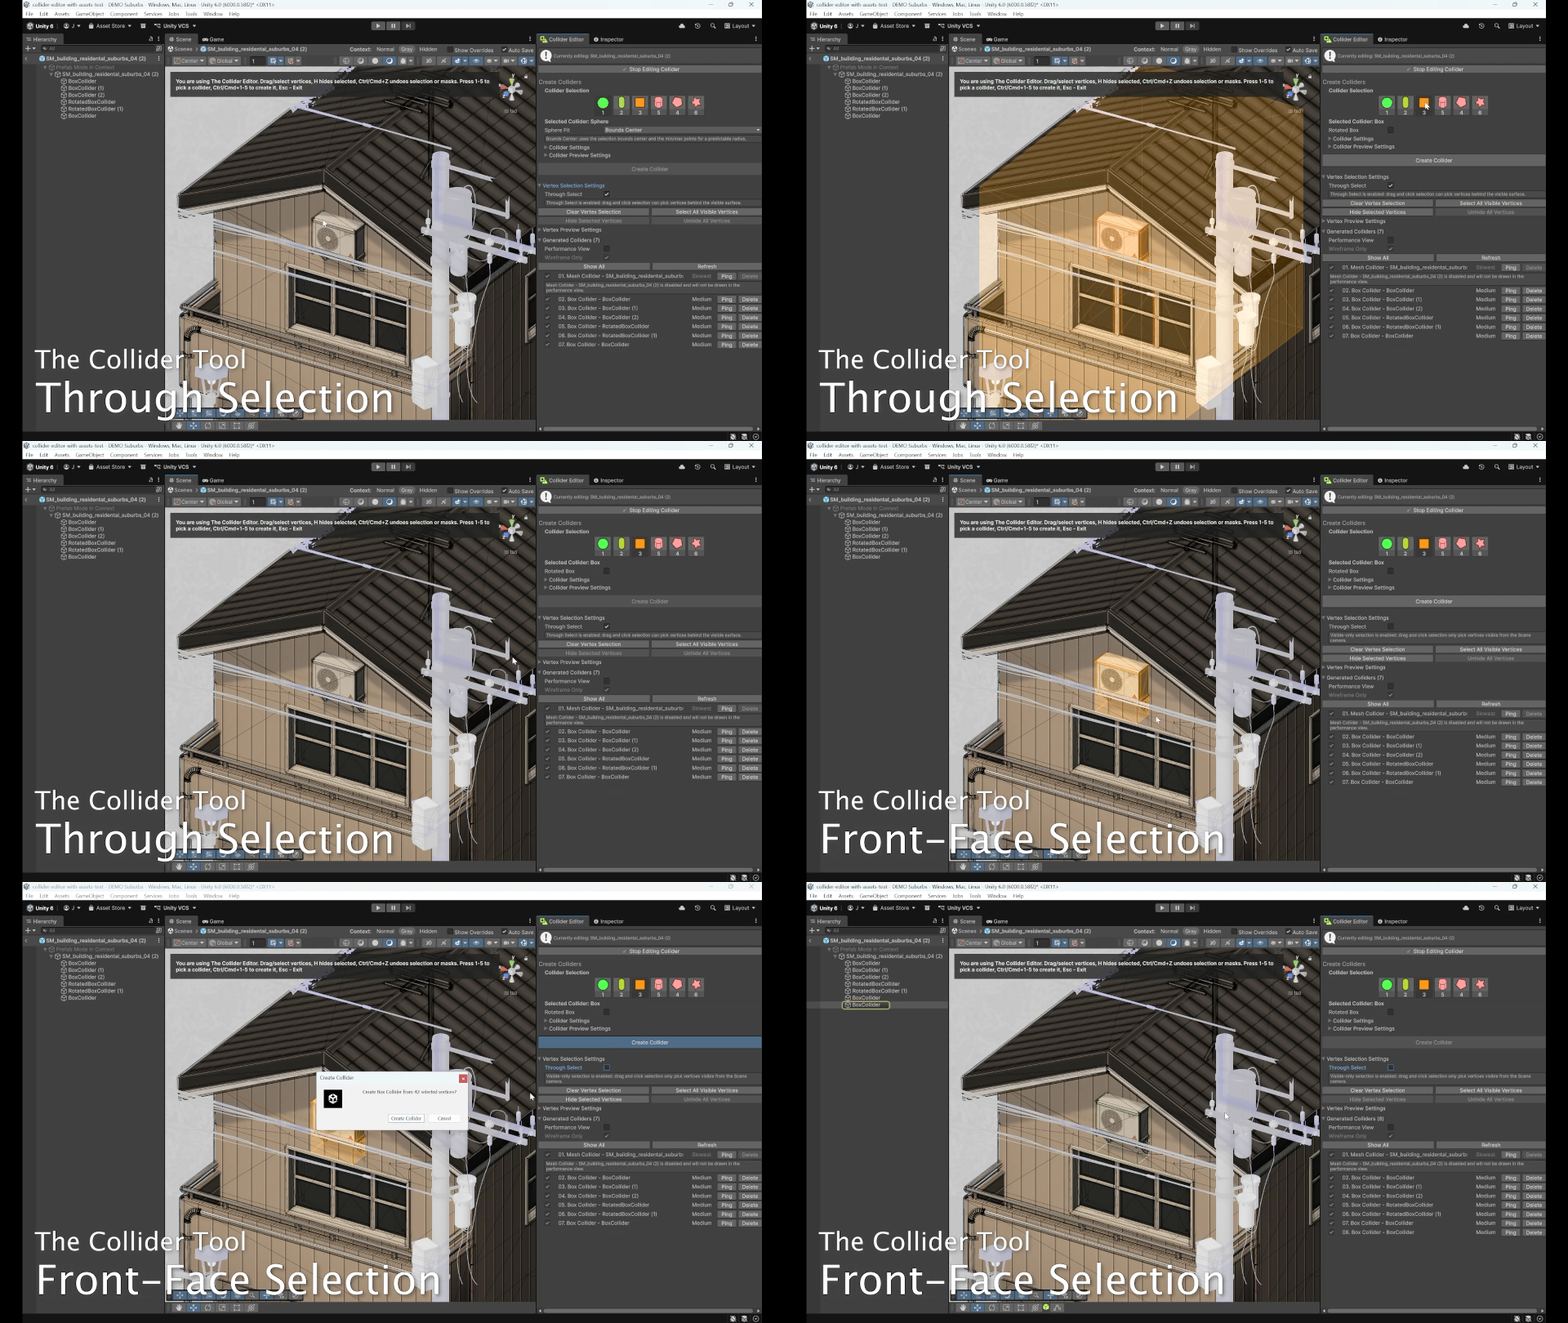
For visible-only selection, I added a visibility check from the Scene camera. When Through Select is enabled, the tool accepts all candidate vertices. When it is disabled, the tool checks whether another part of the mesh is in front of the vertex.
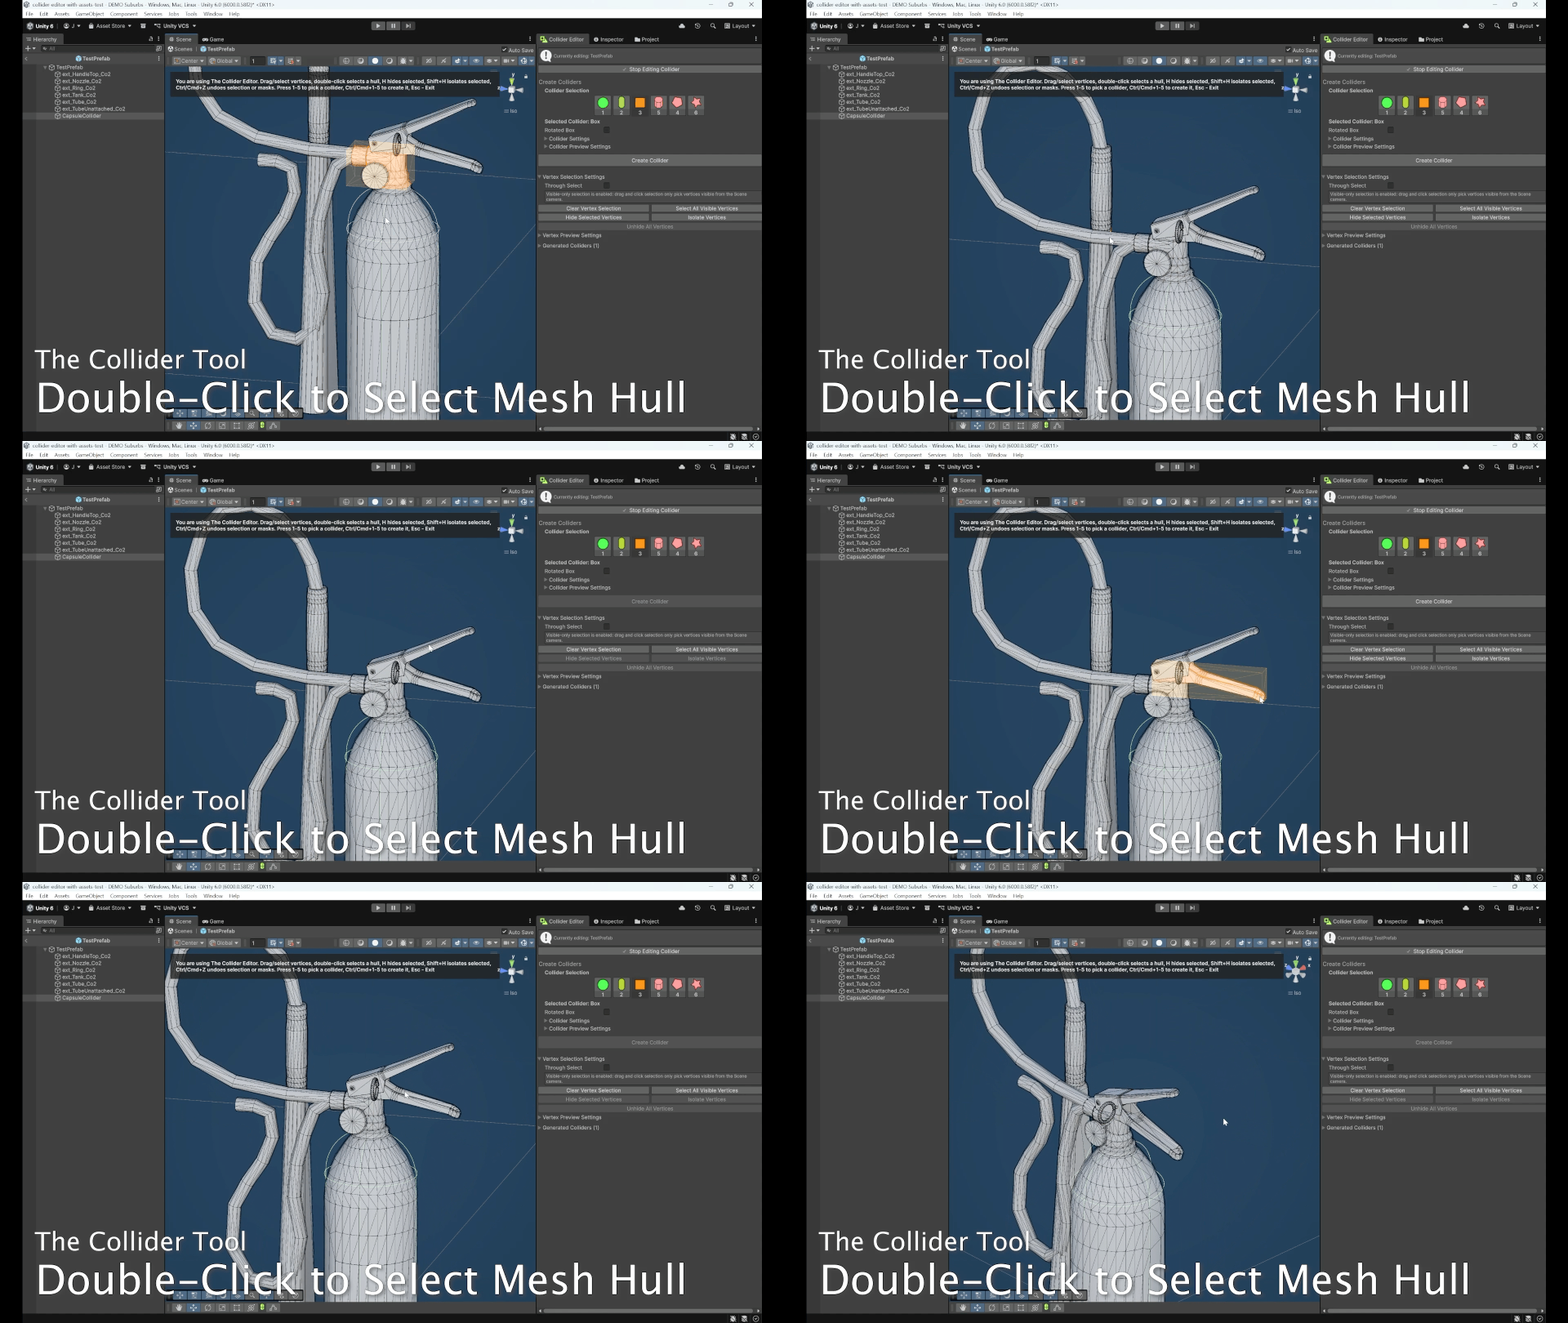
For connected hull selection, I treated the mesh as a graph. Triangle edges create vertex adjacency, and double-clicking a vertex runs a traversal to collect every vertex connected to that mesh island. I also accounted for shared-position vertices, so split vertices at the same local position could still be treated as connected.
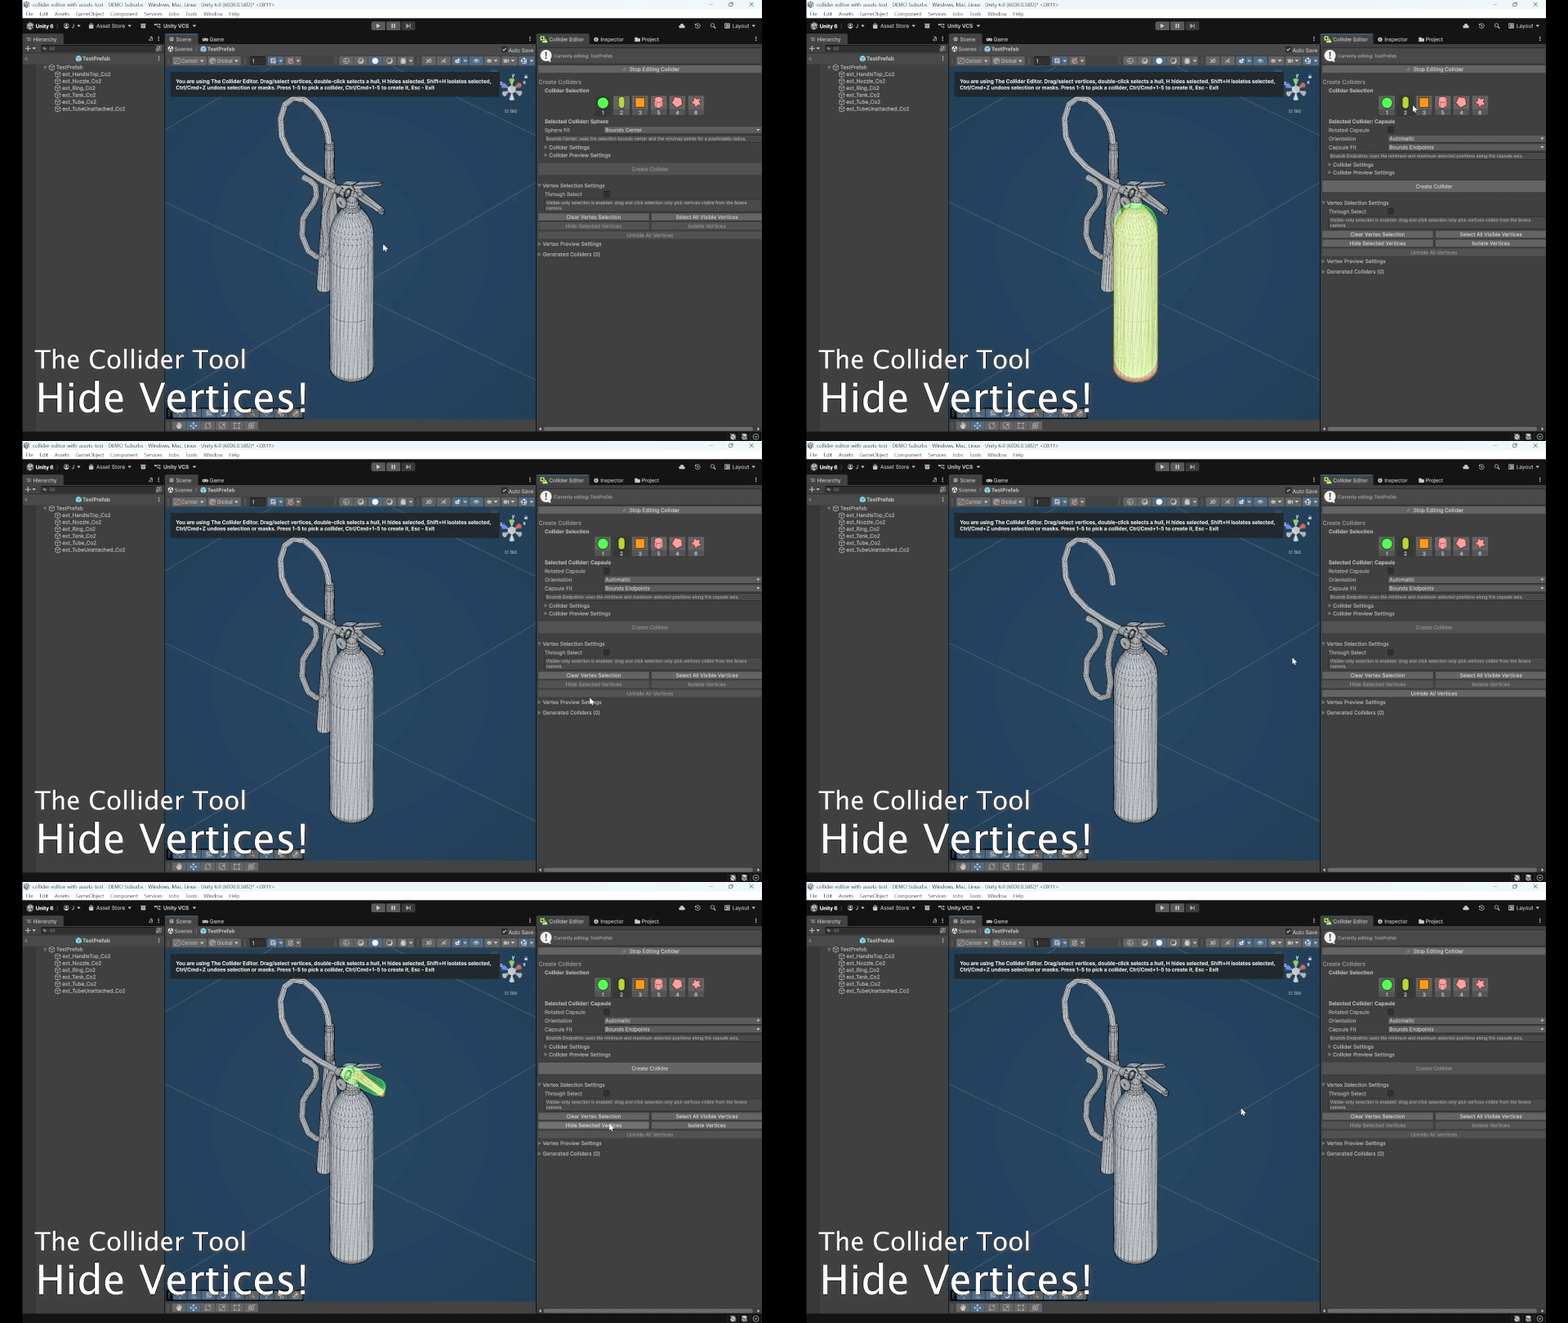
I also added vertex masking. Hiding selected vertices moves them into a hidden list and clears the active selection. This is useful when noisy mesh regions get in the way.
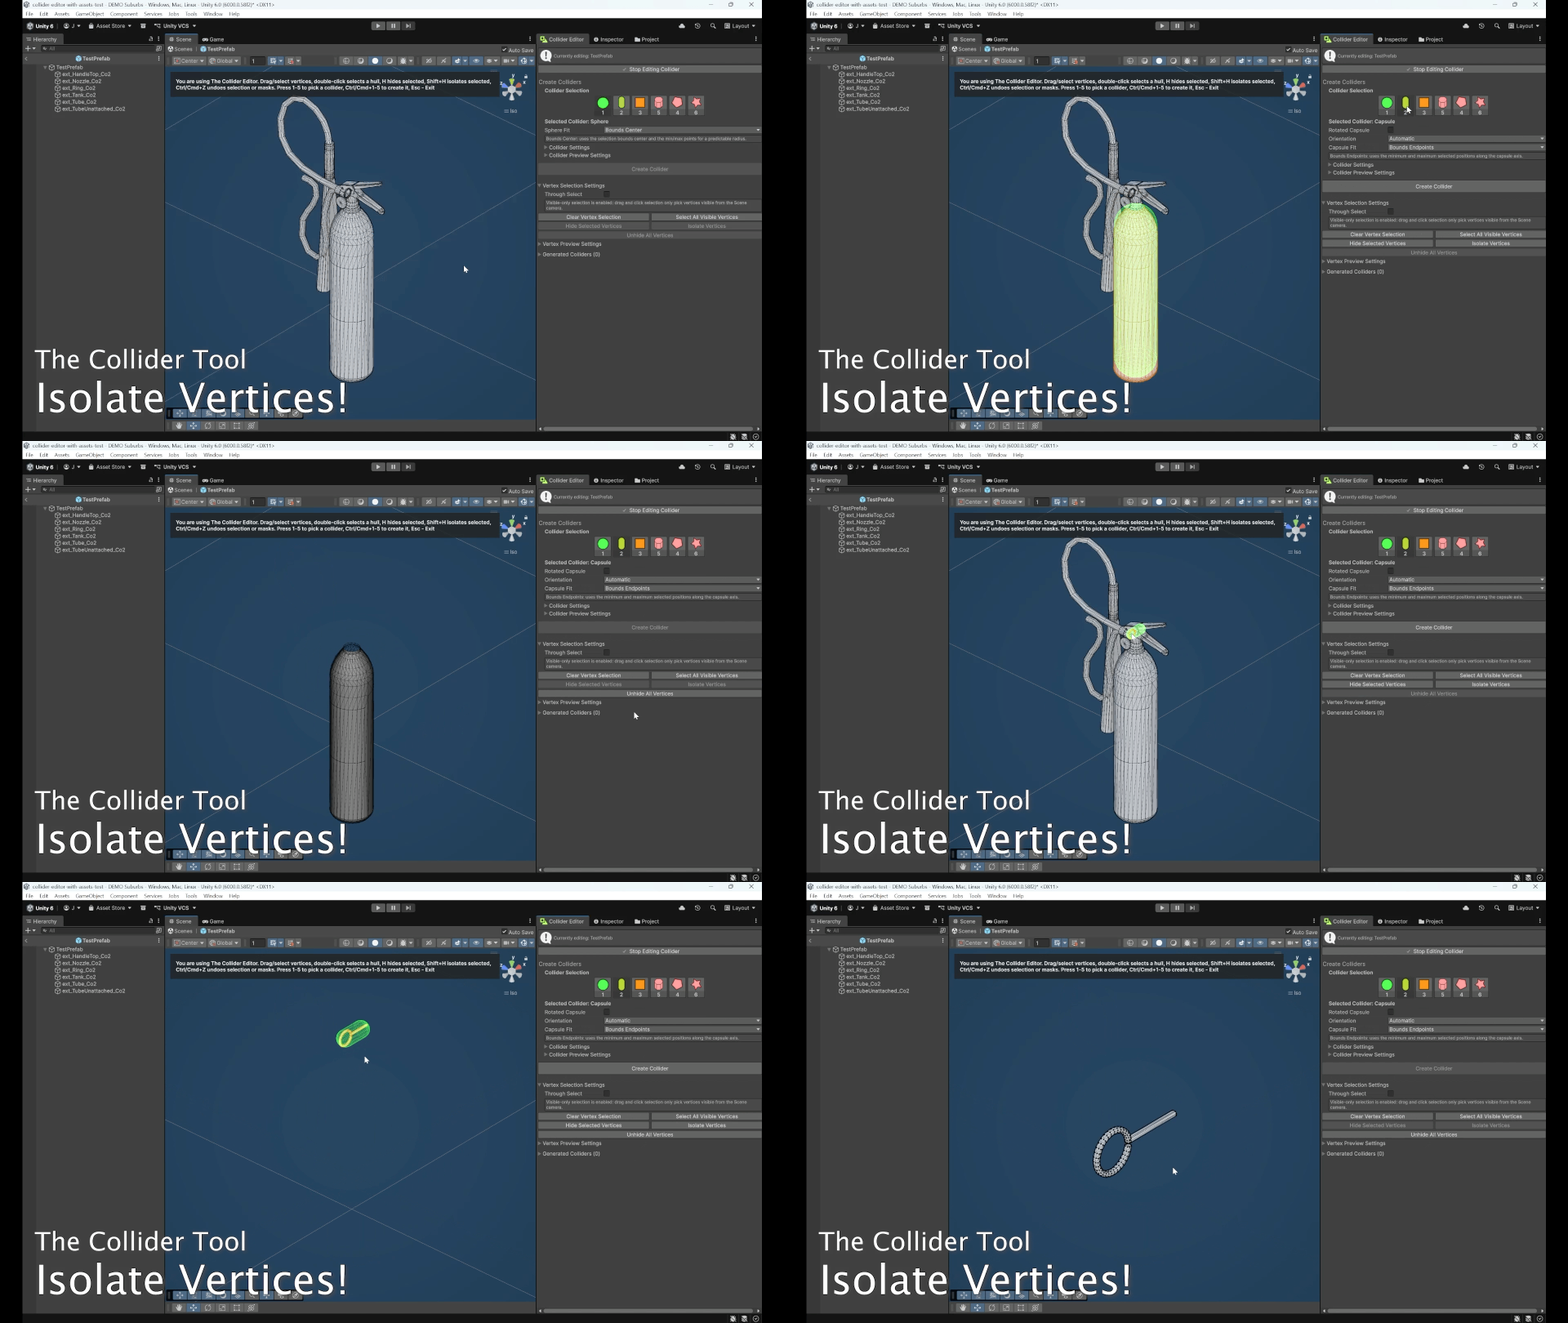
Vertex isolation does the opposite. It hides everything except the current selection, allowing the user to focus only on the part of the mesh they want to create a collider for.
To make hidden vertices feel real in the Scene view, I created a temporary filtered mesh preview. The original mesh asset is not modified. Instead, the preview hides triangles that contain hidden vertices.
✅ Problem Solved
The final result is a Scene view selection system that supports the core workflows needed for collider authoring.
Users can click individual vertices, drag-select groups of vertices, add with Shift, remove with Ctrl/Cmd, select connected hulls, switch between through-selection and visible-only selection, hide noisy vertices, and isolate the region they want to work on.
This made collider creation much faster because users could visually select only the relevant part of a model and immediately generate a collider from that region.
📉 Cost / Limitations / Tradeoffs
The biggest tradeoff is that selection is still largely linear over the mesh vertices. Click and rectangle selection iterate through available vertices, and visible-only mode can perform ray checks on candidates.
This is acceptable for many meshes, but very dense meshes could still benefit from a spatial acceleration structure such as a BVH, octree, or cached screen-space lookup.
Connected hull selection also rebuilds adjacency from mesh triangles. This is simple and reliable, but it can become expensive on very dense meshes.
The masking system is intentionally non-destructive, which is safer for artists, but it removes whole triangles from the preview when one of their vertices is hidden. This is clear and fast, but it is not as precise as a true mesh-editing application.
👀 Challenge 3: Preview
❓ What was the Problem?
The Collider Editor needed a strong Scene view preview system so users could understand what they were selecting and what collider would be created before committing to it.
The tool had to show multiple kinds of information at the same time:
- editable source mesh overlay;
- visible vertices;
- selected vertices;
- selected faces;
- selected edges;
- live collider preview;
- existing generated colliders;
- collider performance cost.
The preview also needed to communicate expected physics cost visually. Users needed to immediately see whether they were creating a cheap primitive collider or a more expensive mesh-based collider.
🧩 Why Was it Hard?
Scene view previews repaint constantly. A simple implementation could easily become expensive if every repaint recalculated mesh topology, rebuilt vertex meshes, or drew every point and edge one by one.
Dense meshes can contain thousands of vertices, edges, and faces. Because of that, I had to cache mesh data, edge lists, selected faces, point meshes, and world-space line data.
Another challenge was visual clarity. The overlay sits directly on top of the original mesh, which can cause z-fighting. Wireframes, selected faces, and collider previews need to be readable without becoming visually noisy.
The live preview also had to support different collider types with different fitting logic. A box, sphere, capsule, cylinder, convex hull, and convex decomposition do not all preview in the same way.
💡 Solution. How Did I Approach the Problem?
I separated preview drawing into a dedicated preview system. The editor window decides when to draw, while the preview system handles Scene view rendering for mesh overlays, primitive previews, existing collider previews, and cached preview meshes.
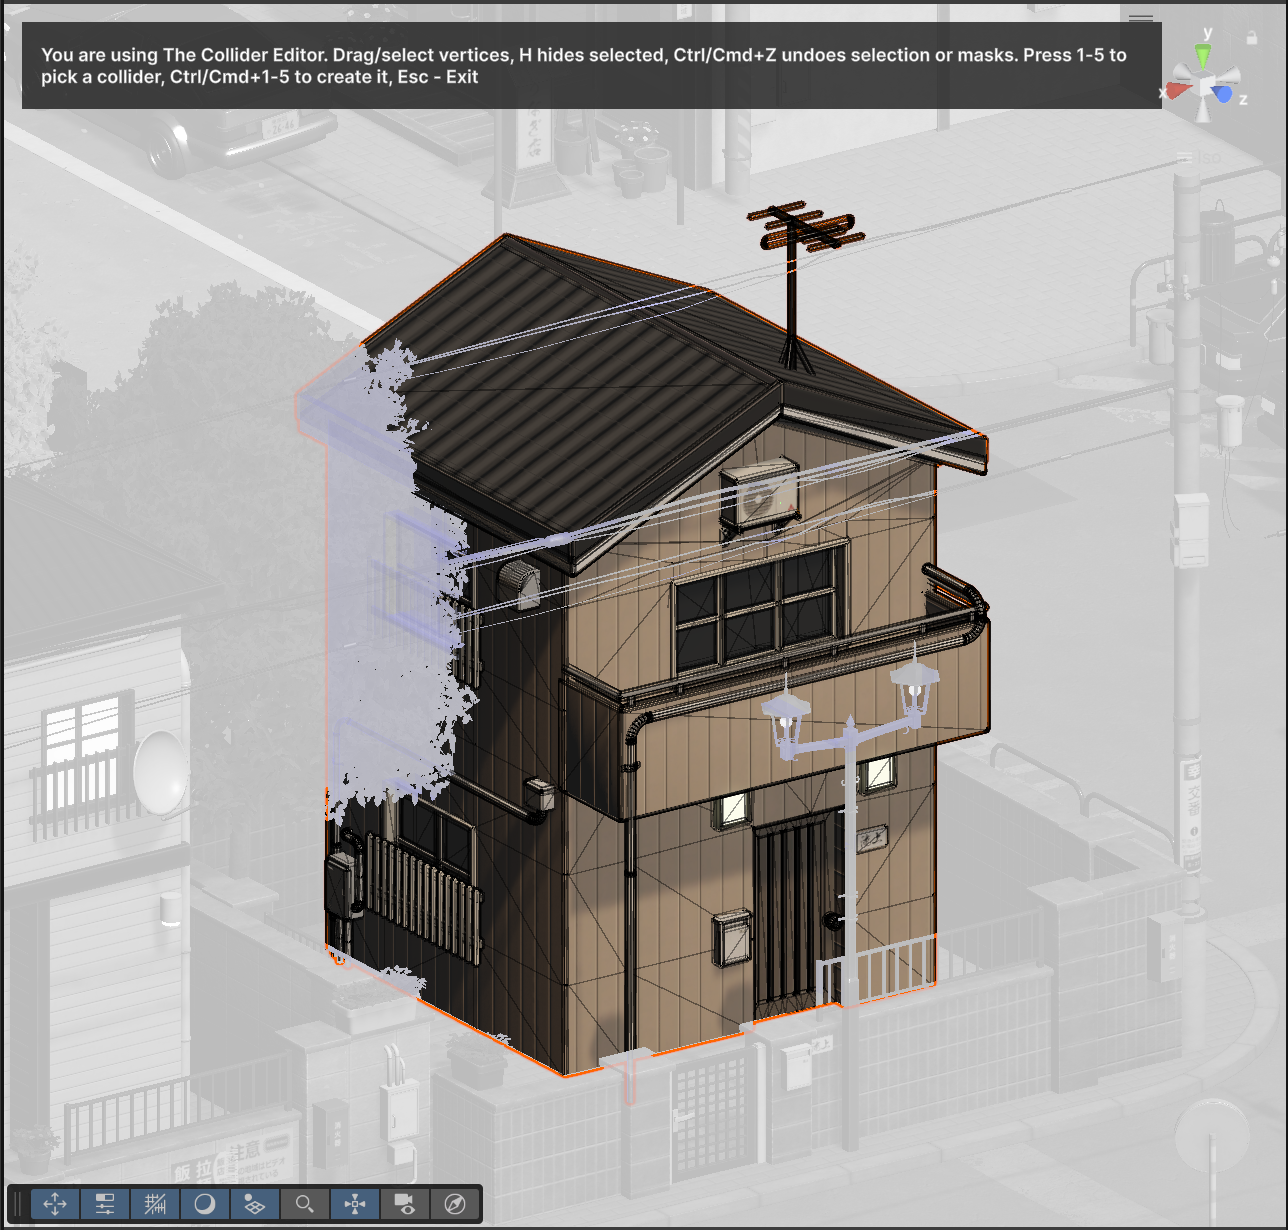
For the editable mesh overlay, I cached expensive mesh data once and only rebuilt selection-dependent parts when the selected or hidden vertex sets changed. This kept the Scene view more responsive while still showing wireframes, selected faces, selected edges, and vertex points.
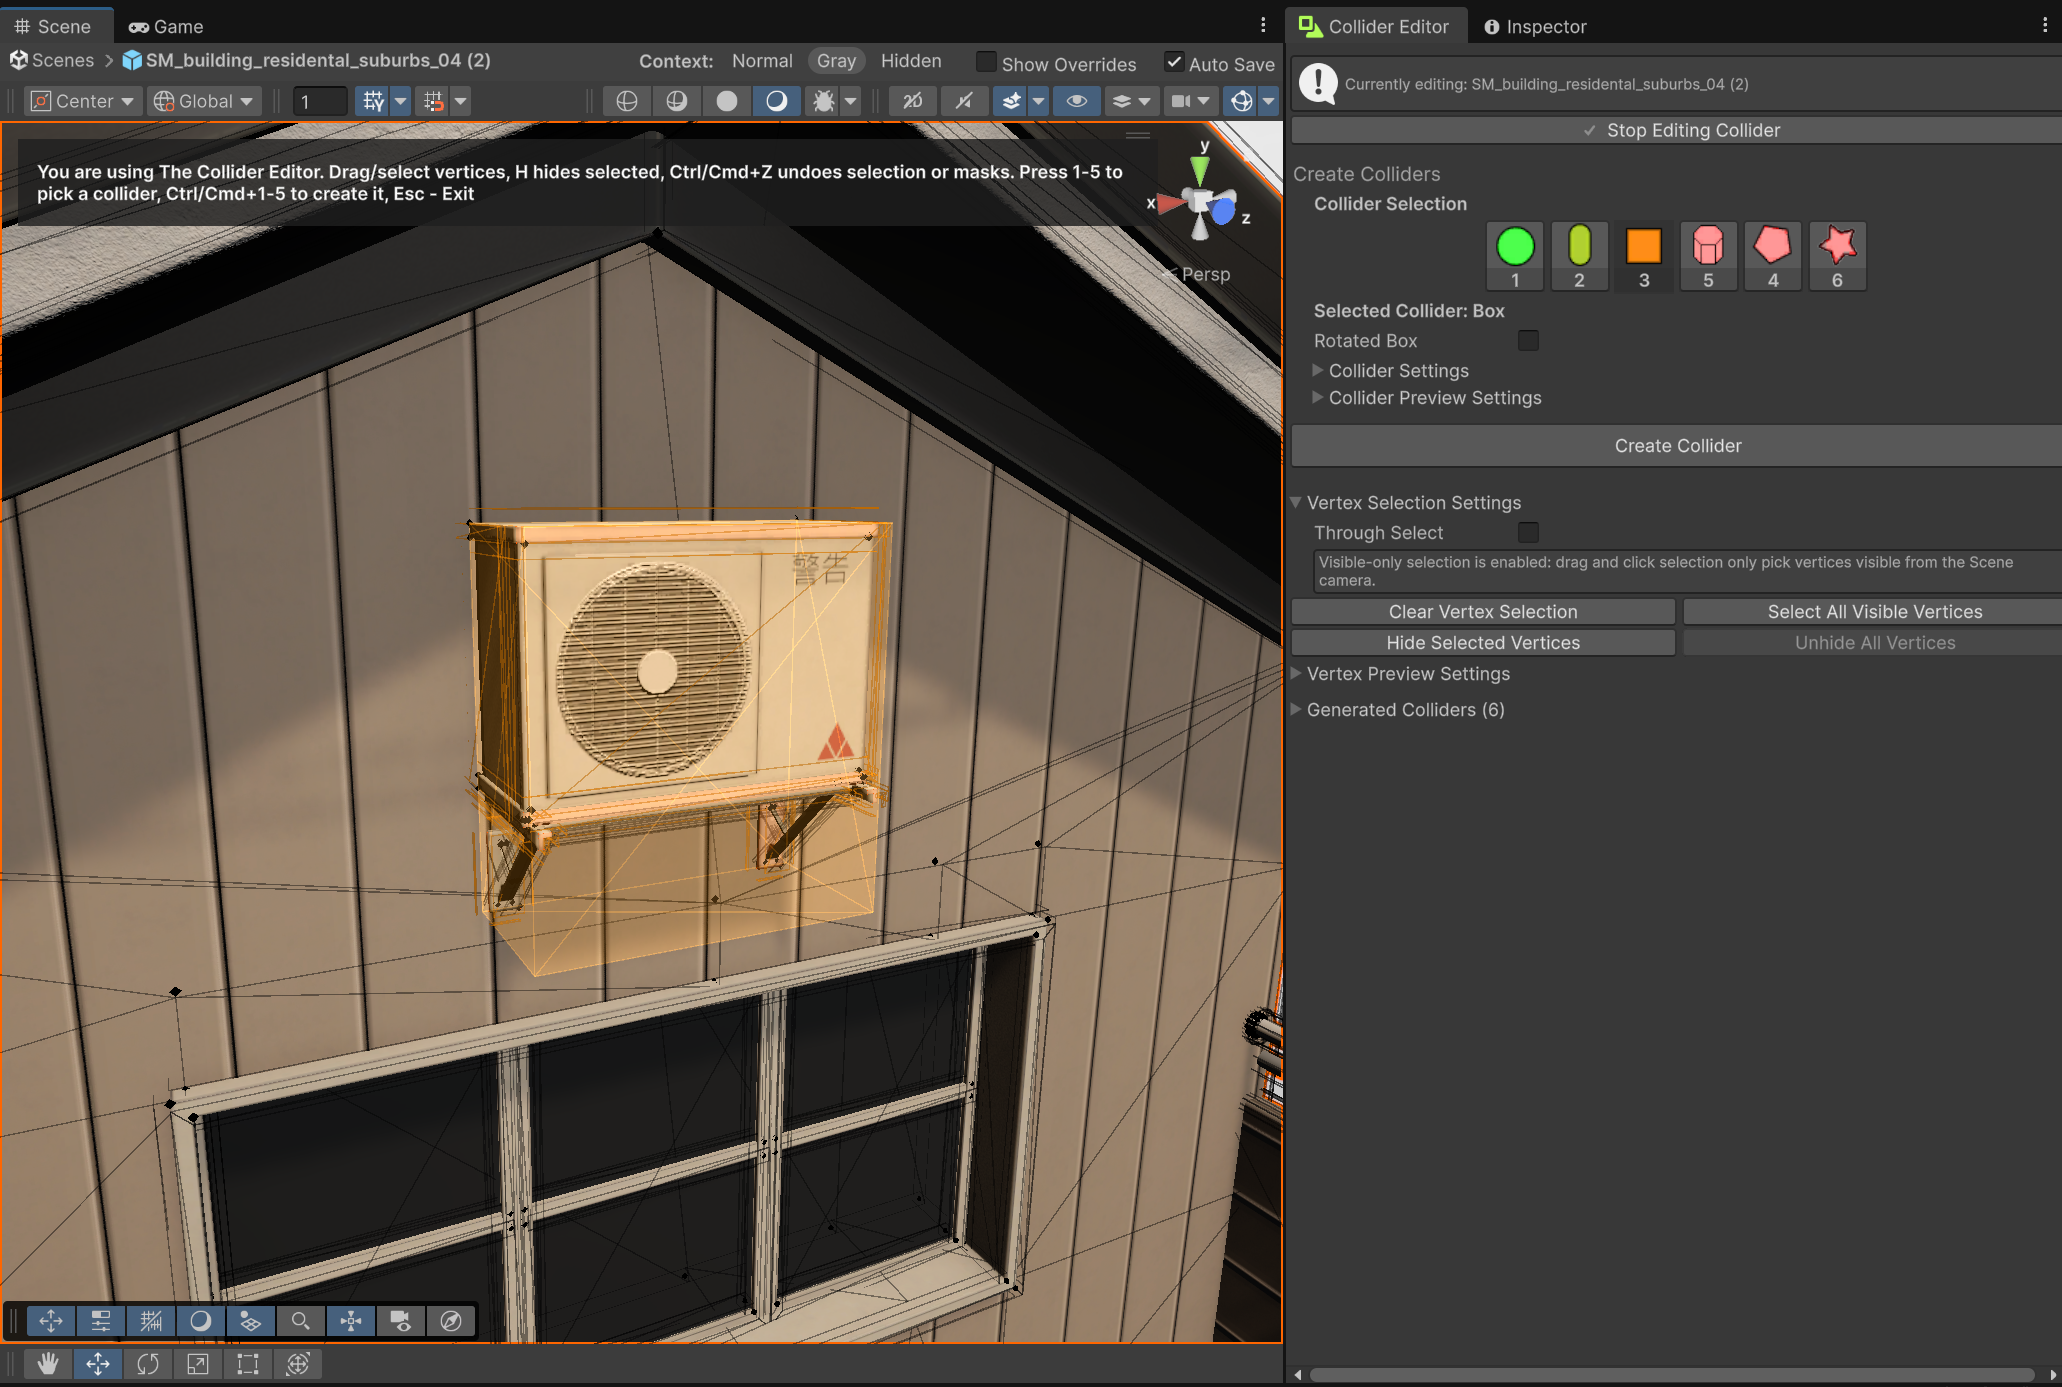
The live collider preview is driven by the selected collider type. The selected vertices are converted into a point cloud, then each collider type uses its own preview logic.
For example:
- boxes preview as fitted bounds;
- spheres preview as a fitted radius;
- capsules preview with height, radius, and axis;
- cylinders preview as generated convex meshes;
- convex hulls preview as generated mesh shapes.
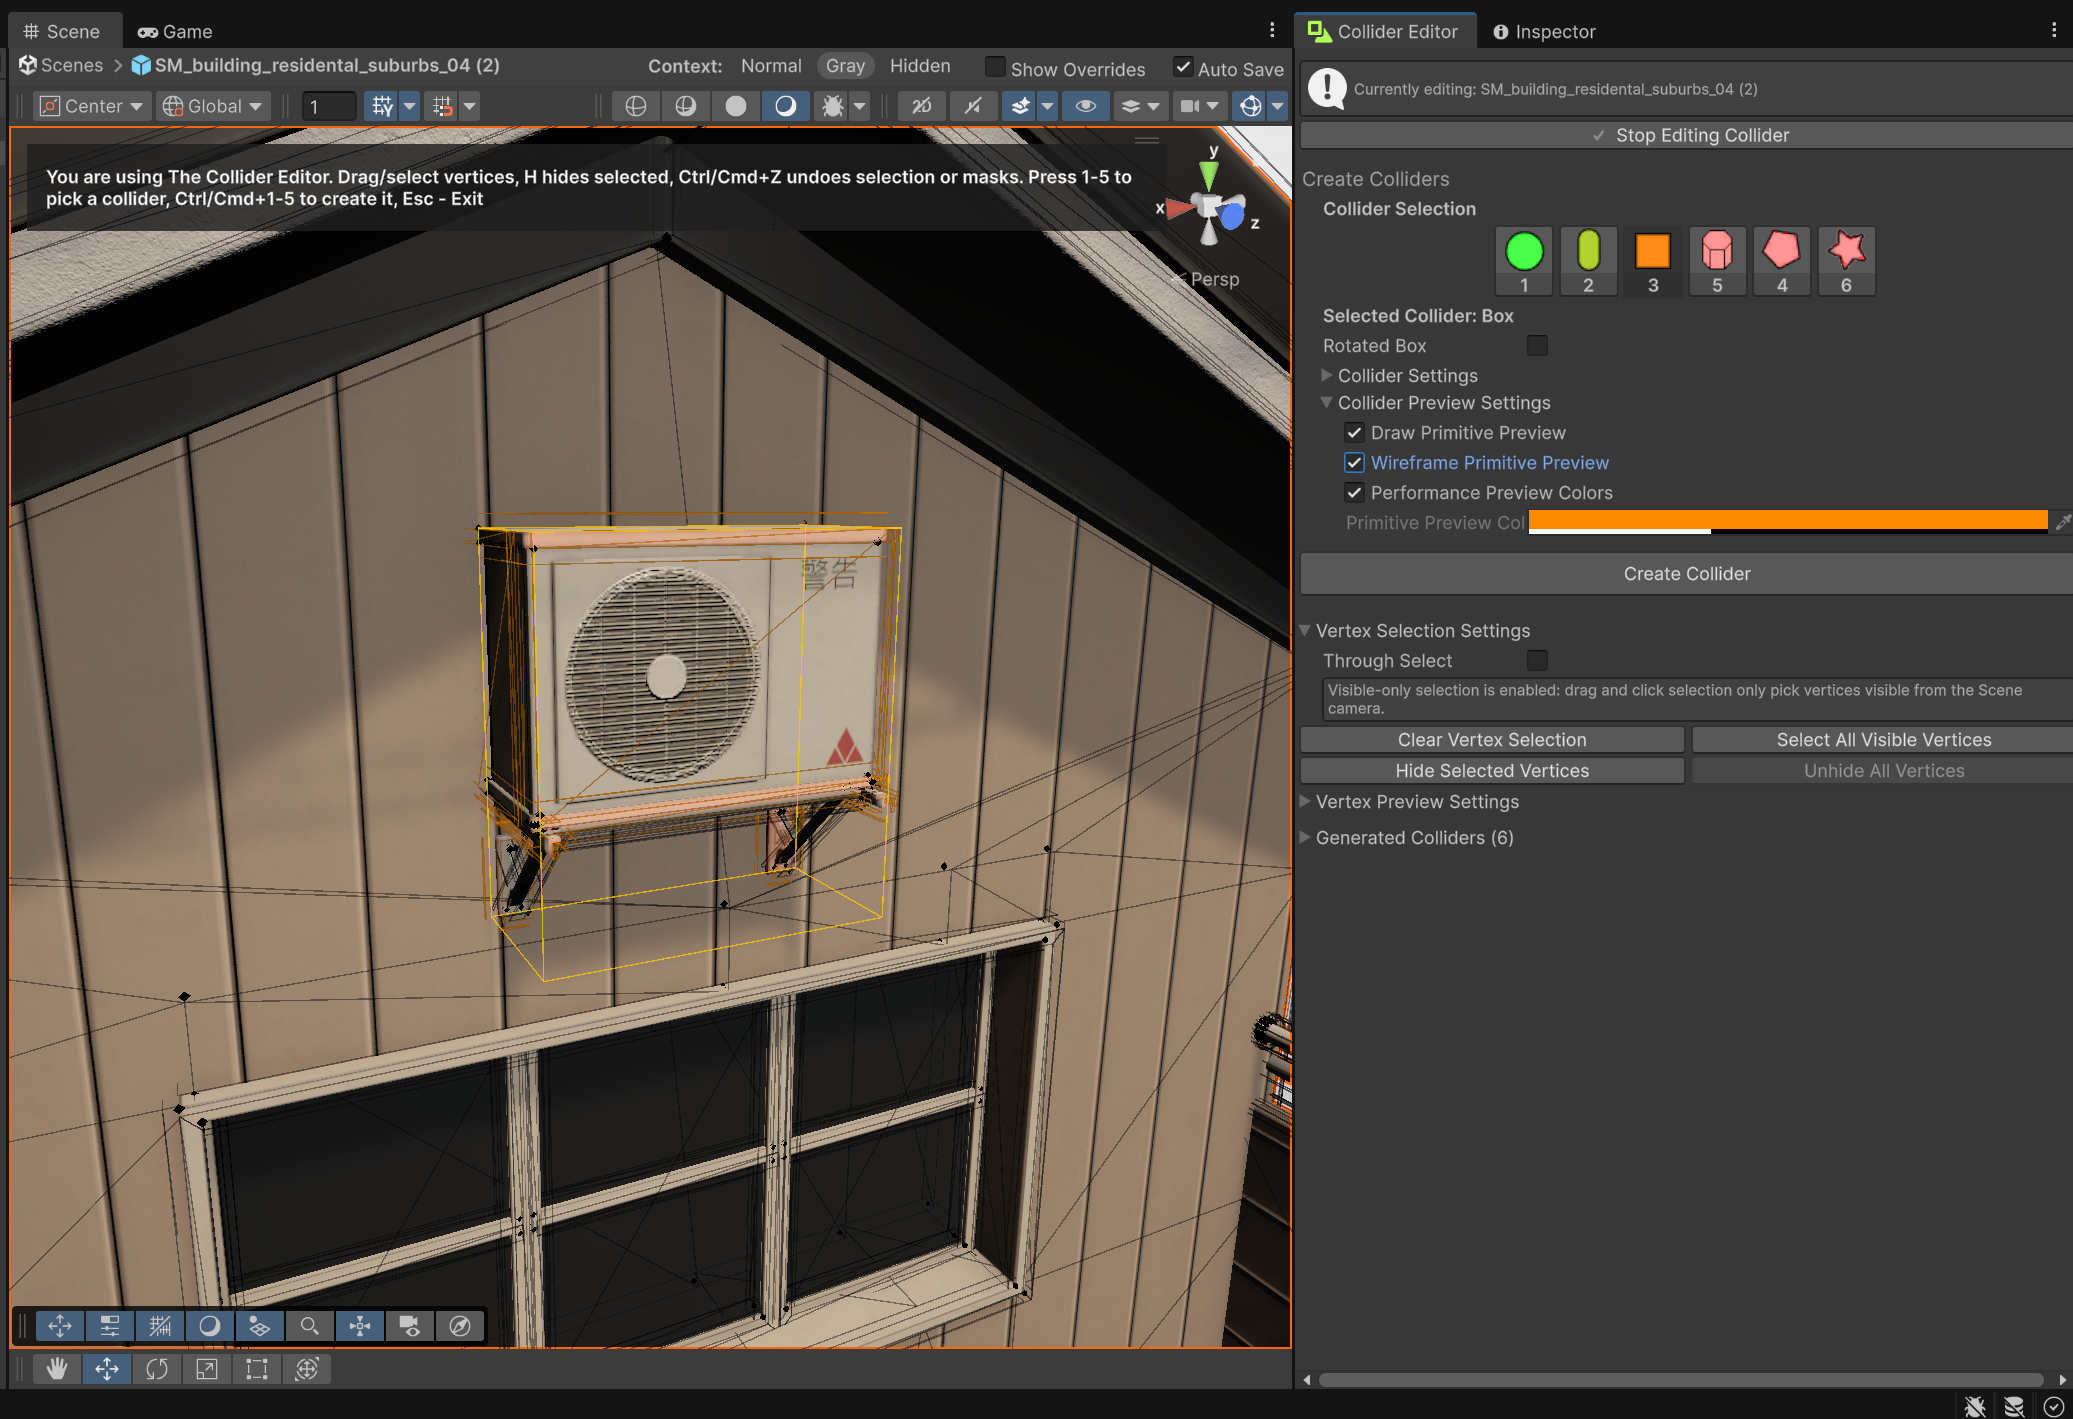
I also added a wireframe preview mode. This made it easier to inspect collider coverage without the preview mesh blocking the object underneath.
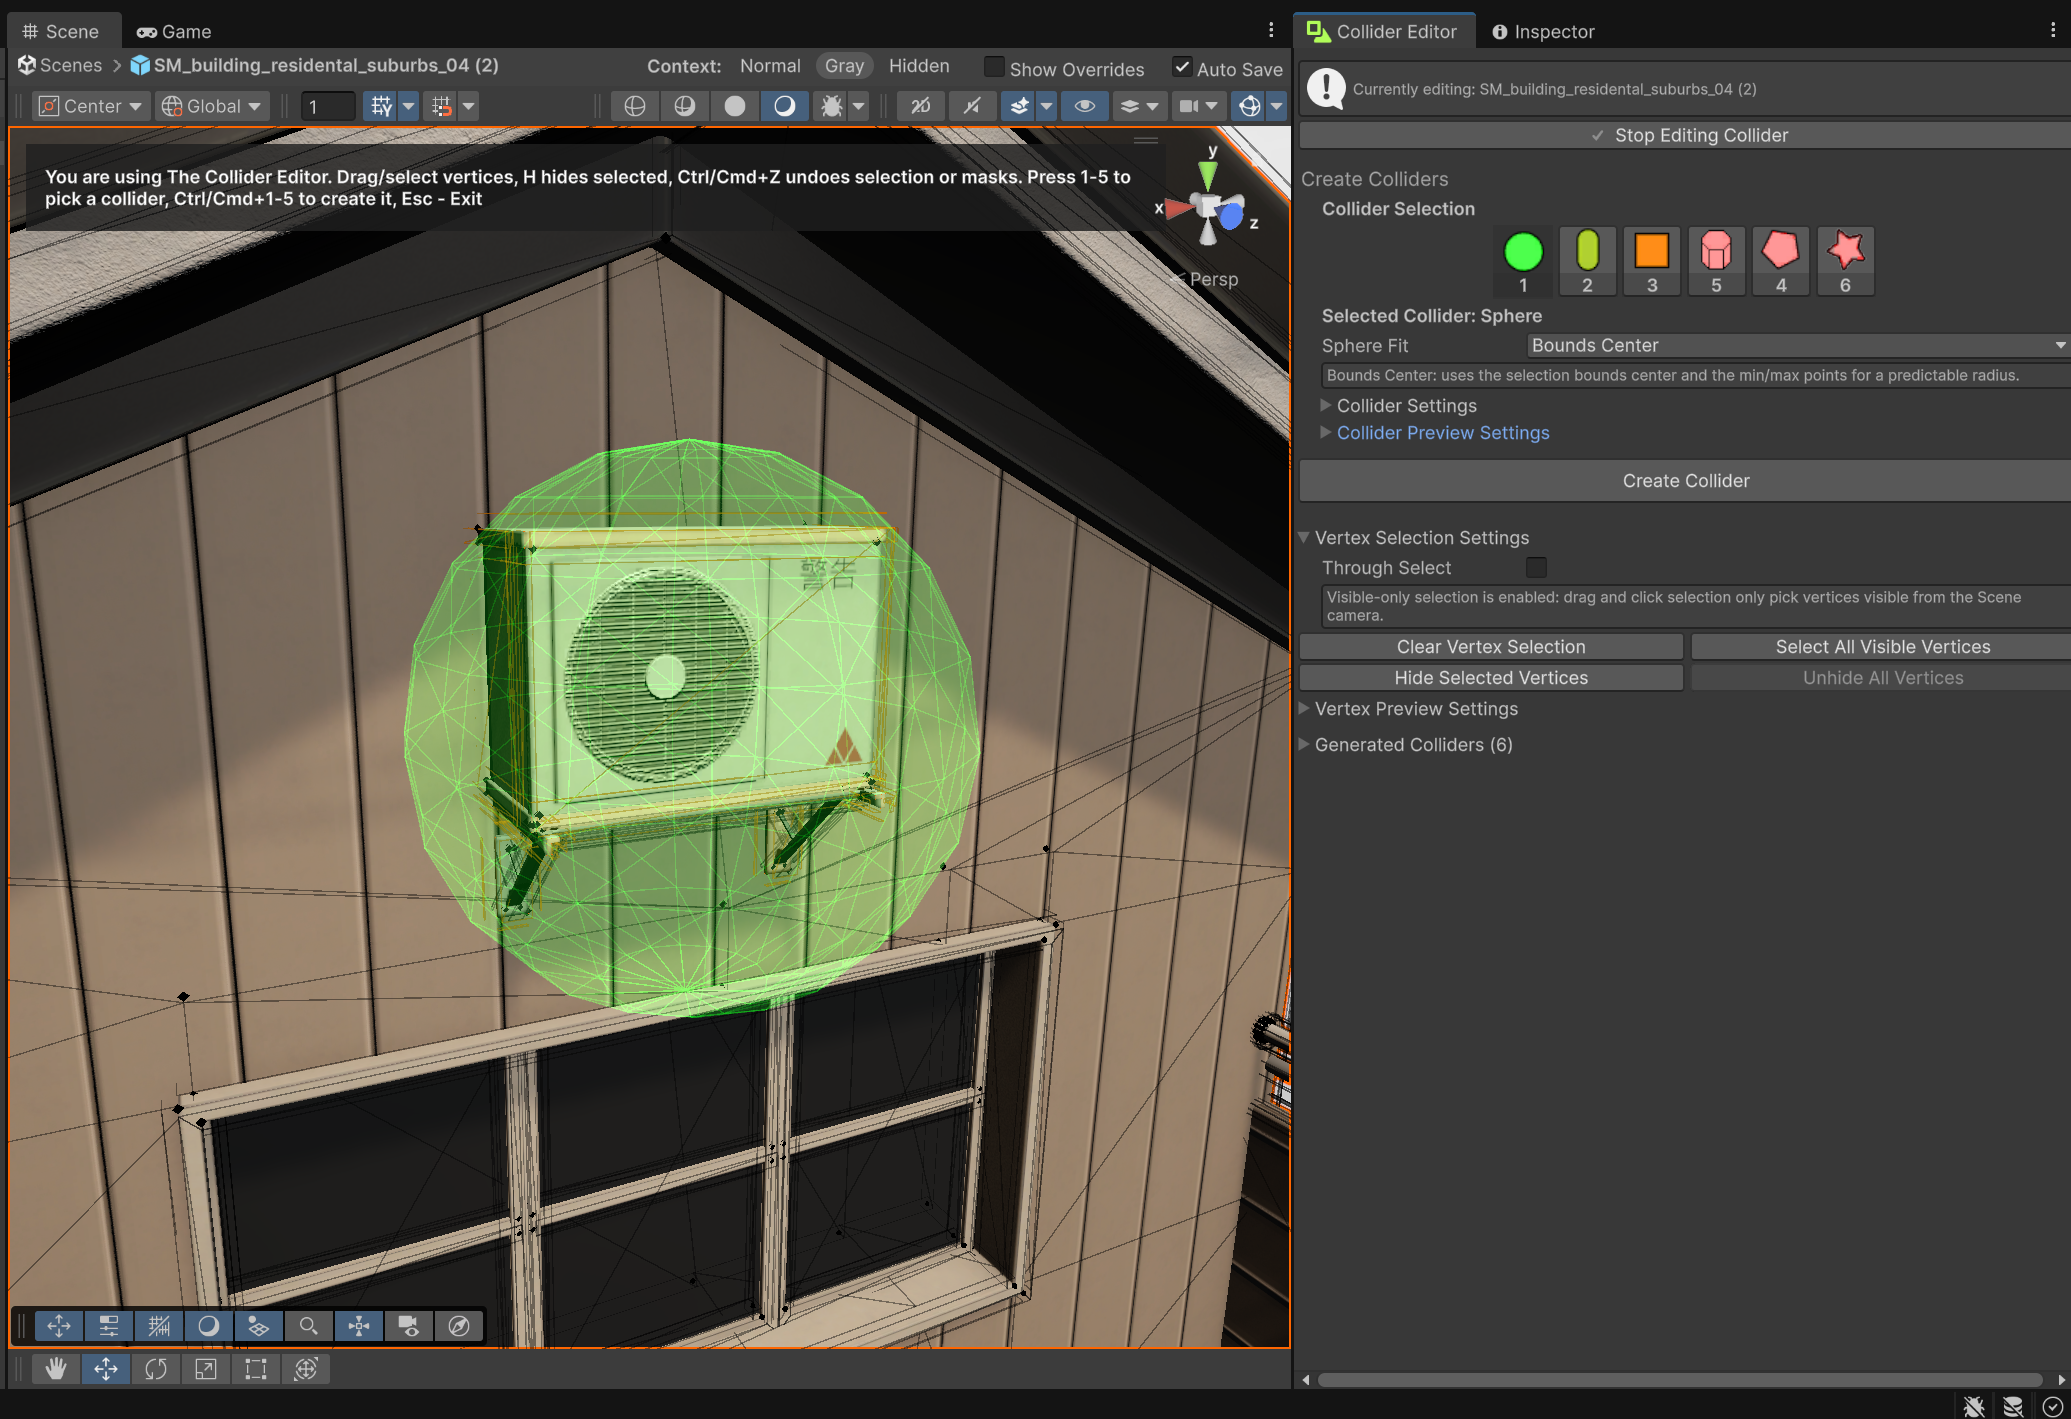
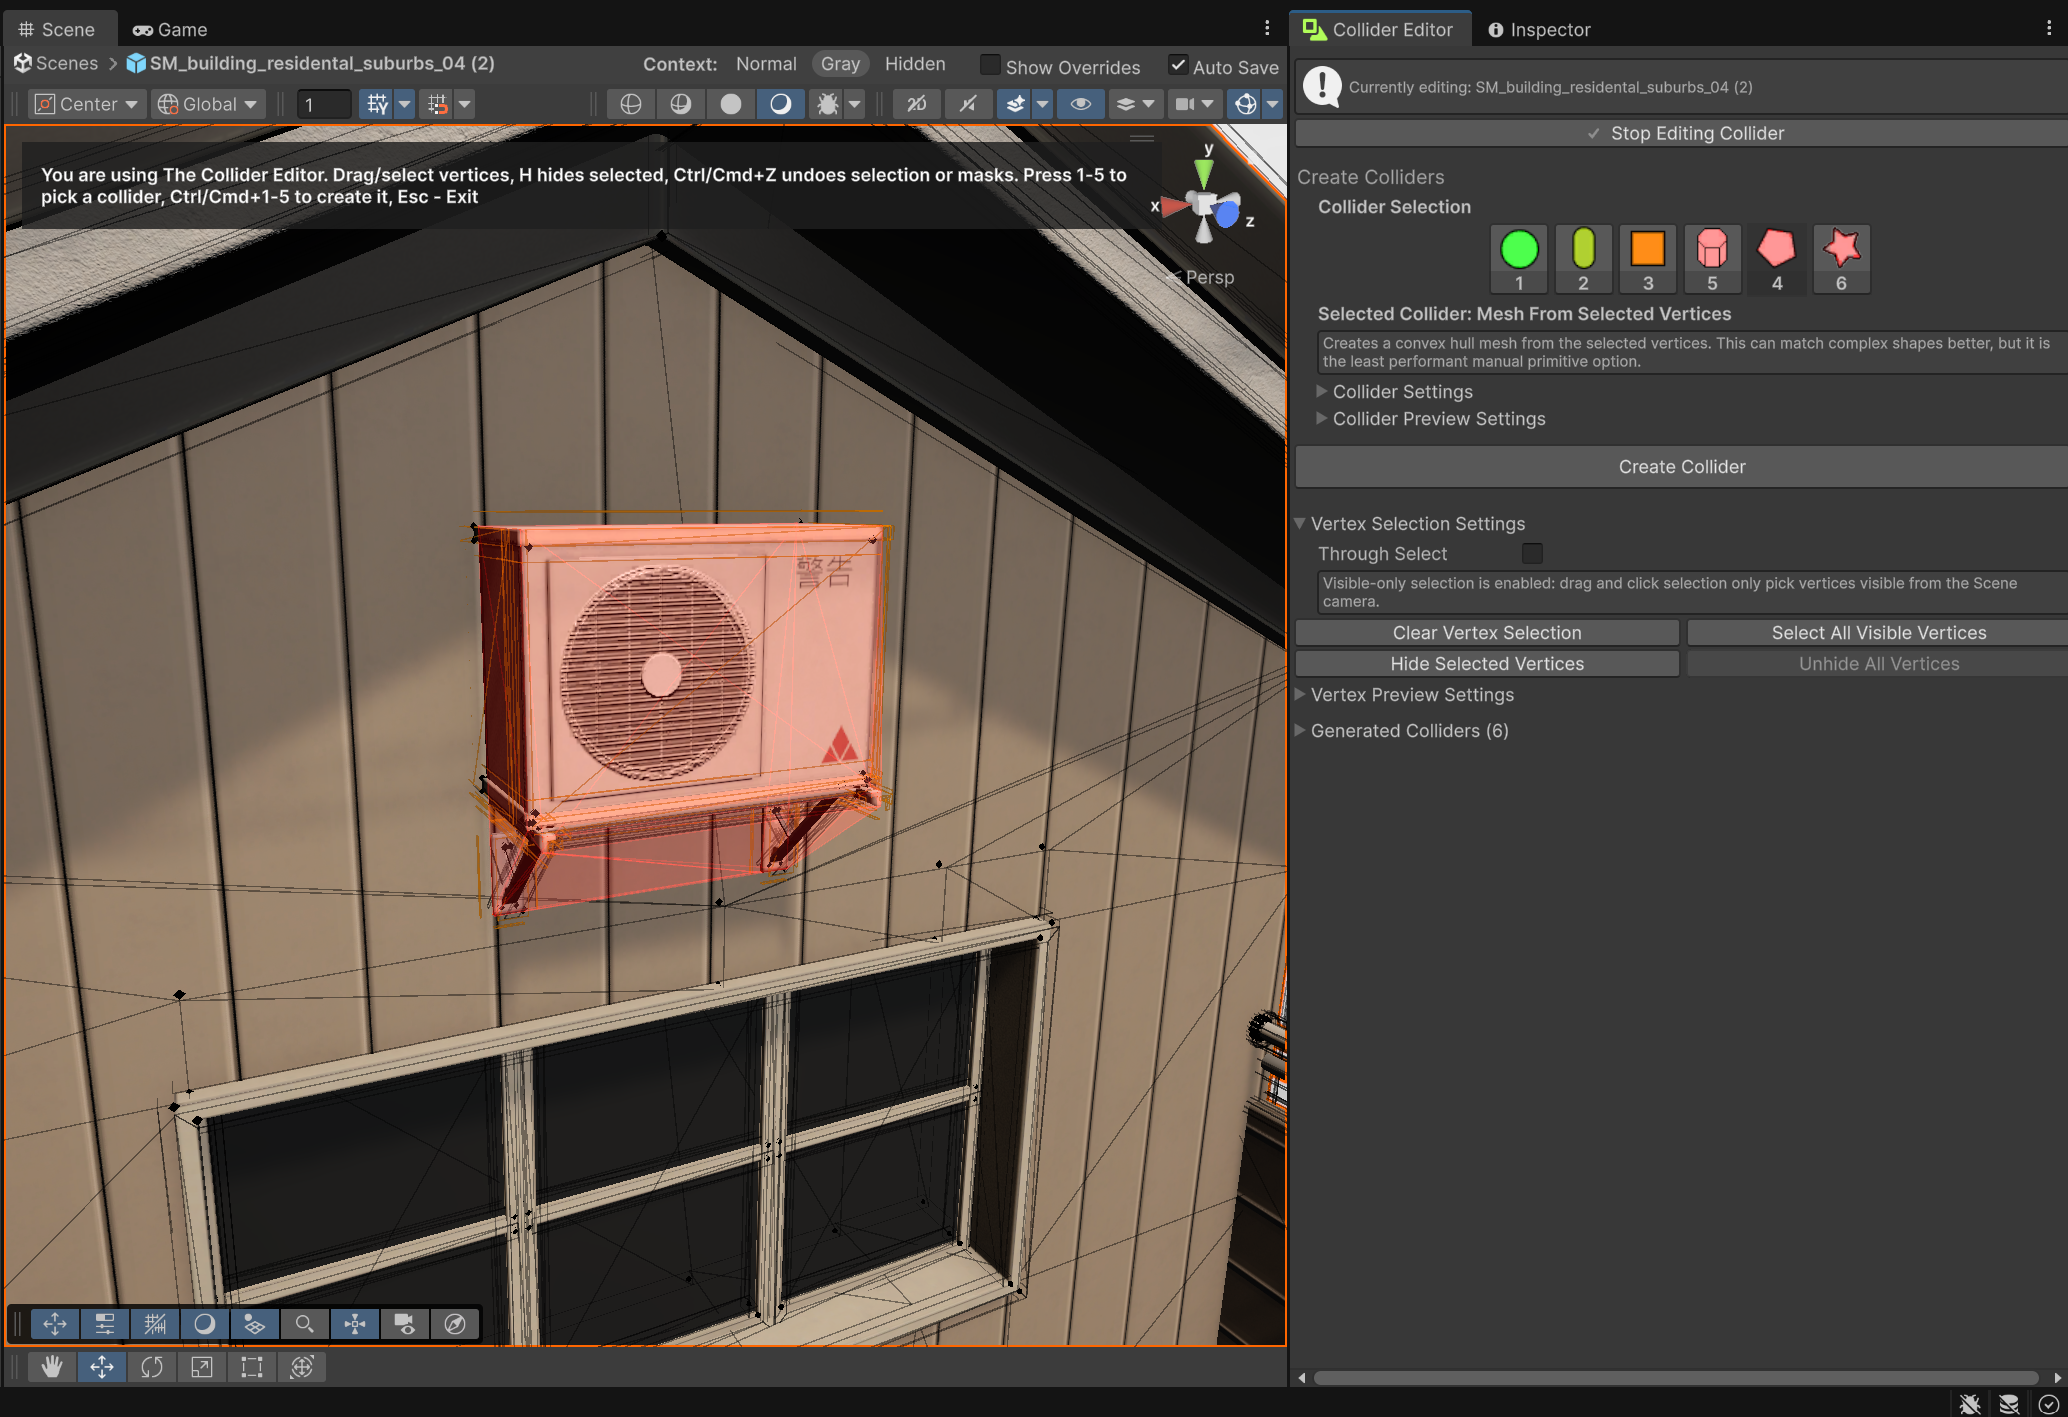
Performance coloring maps collider types to different cost categories. The exact runtime cost depends on context, but the preview gives users a practical visual guide:
- sphere: fastest;
- capsule: fast;
- box: medium;
- mesh-based collider: slowest.
This helped turn a technical physics concept into something artists and programmers could understand at a glance.
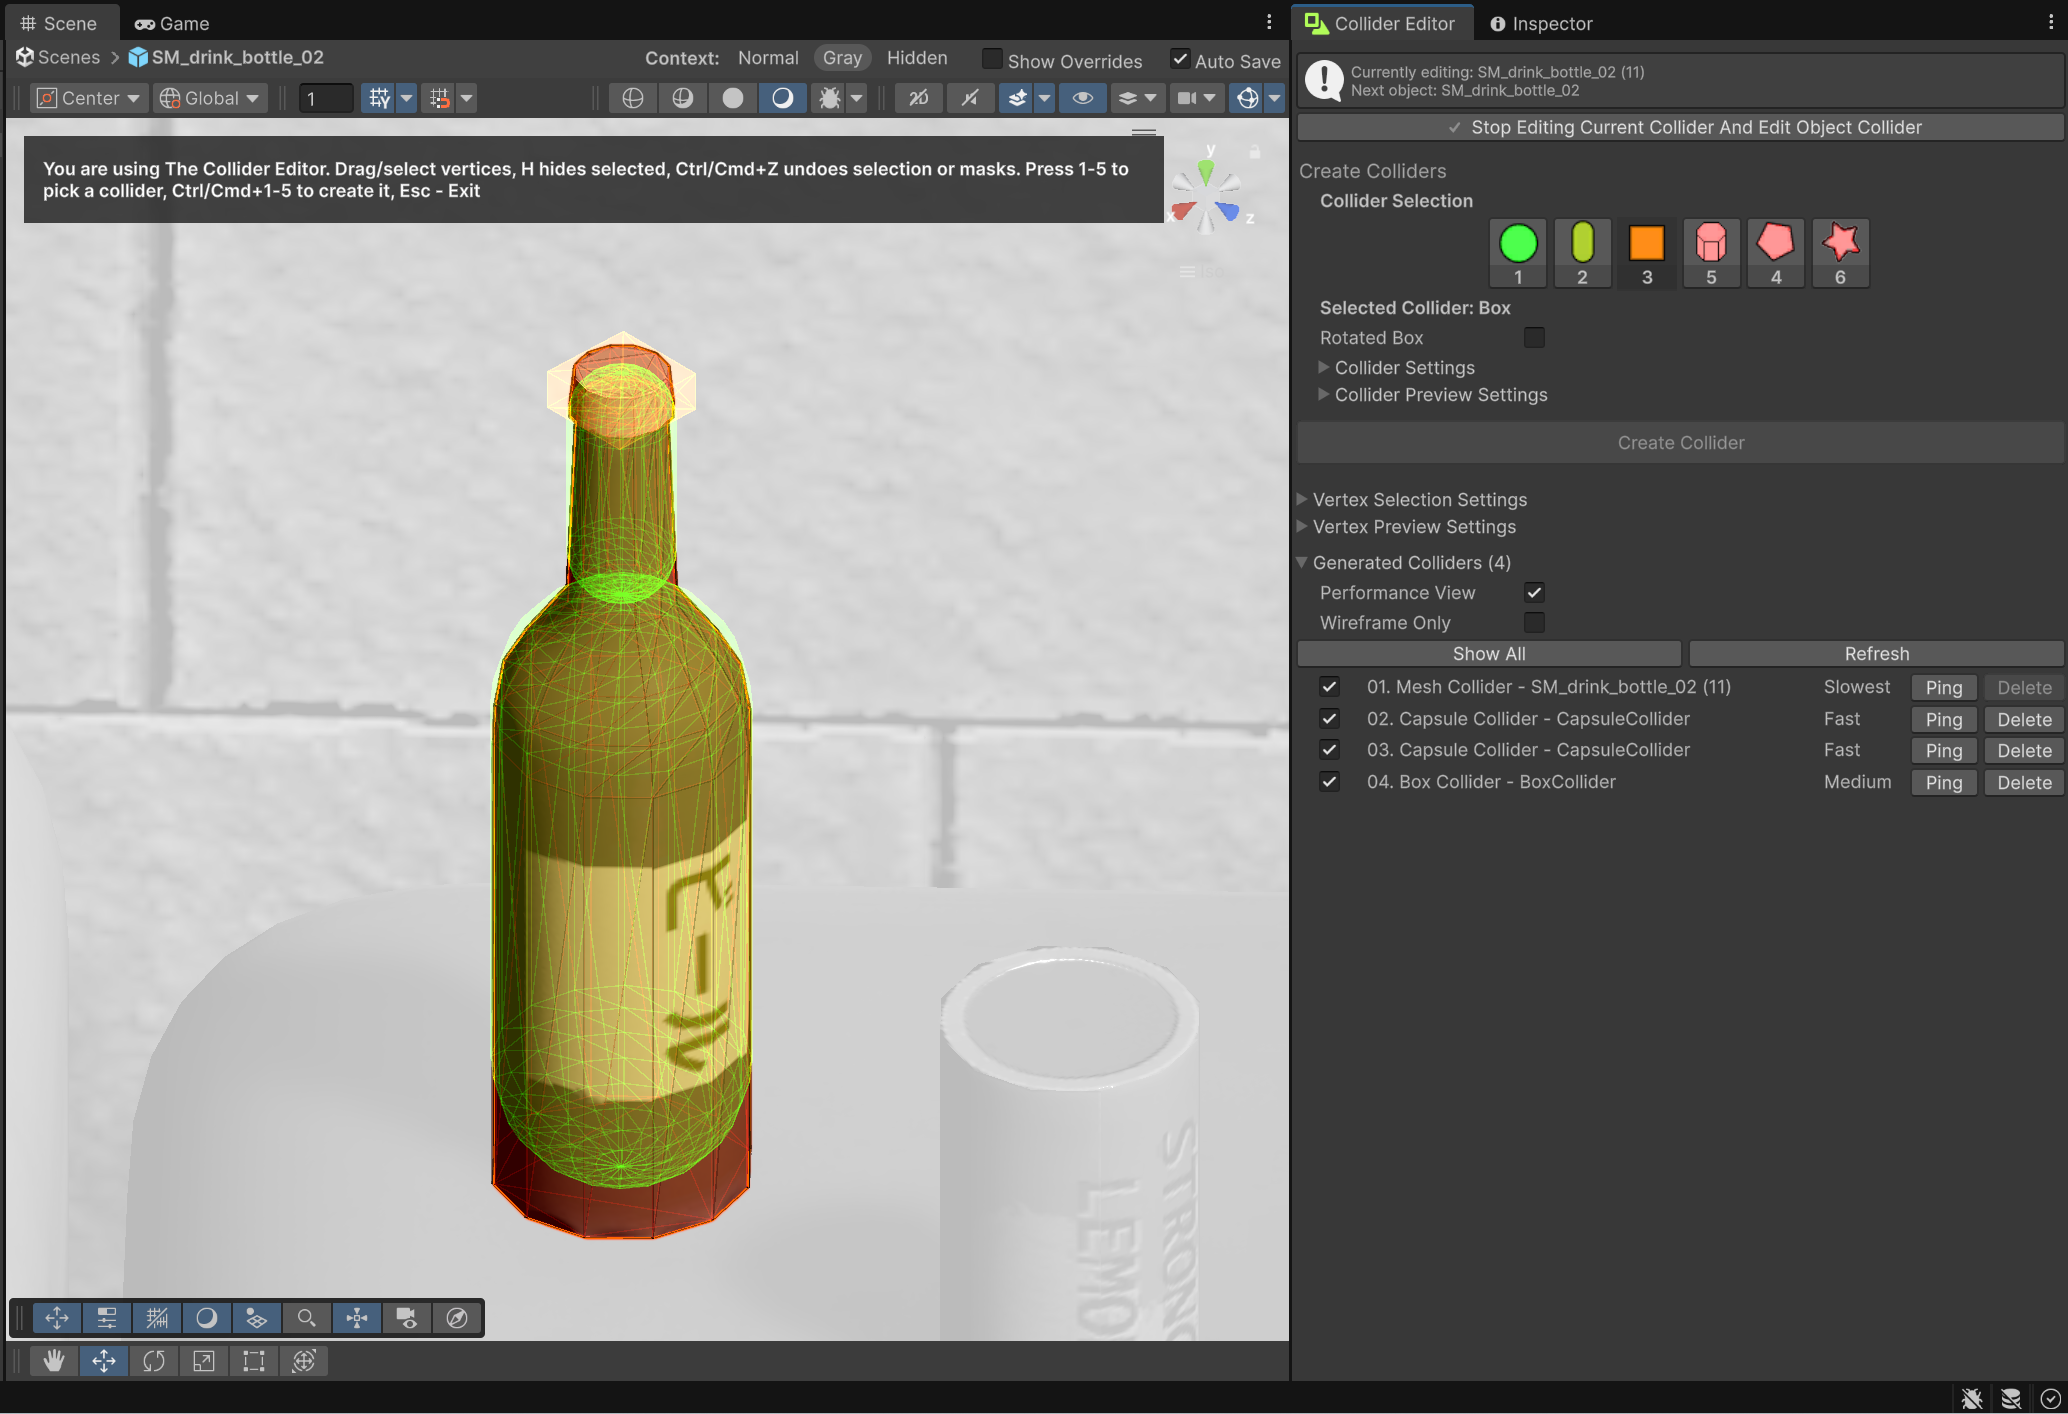
Existing colliders are also drawn in the Scene view. This makes it possible to inspect generated colliders after creation without manually selecting every collider object.
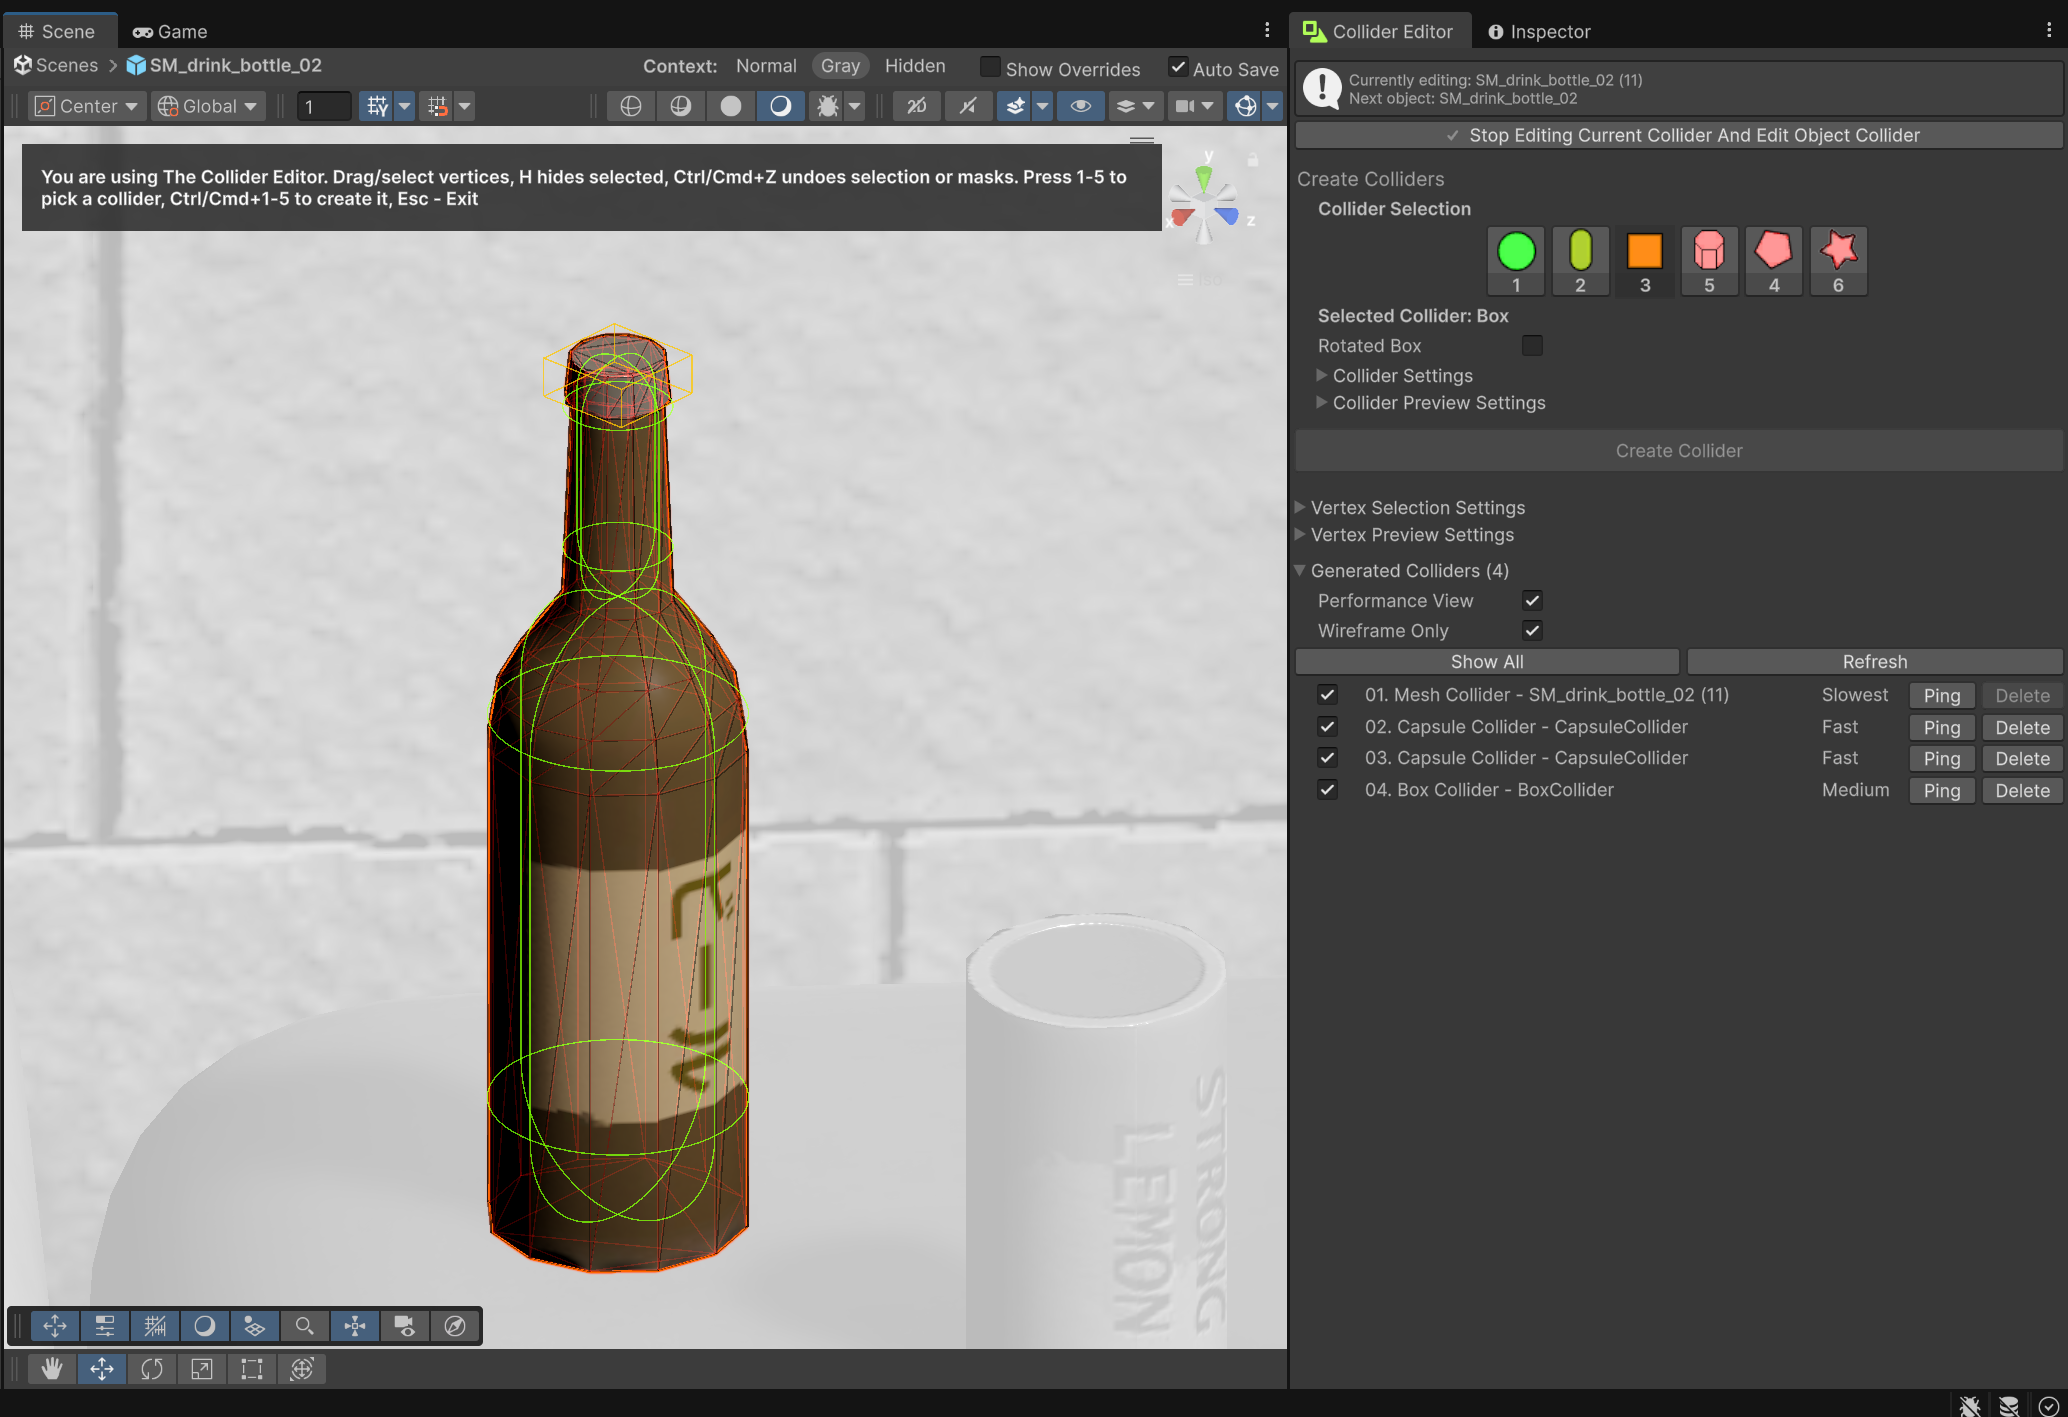
The existing collider preview also supports wireframe mode, which makes it easier to inspect overlapping colliders and compare coverage.
✅ Problem Solved
The final preview system gives users immediate visual feedback while authoring colliders.
They can see the editable mesh overlay, selected vertices, selected faces, selected edges, and the collider that will be created from the current selection.
The tool also makes it easier to inspect colliders after creation. Existing colliders can be drawn in the Scene view with performance colors and optional wireframe mode, so users can review collider coverage and cost without opening each collider manually.
The result is a much more interactive workflow:
select vertices → choose collider type → preview result → compare cost → create collider with confidence.
📉 Cost / Limitations / Tradeoffs
The preview system is optimized, but it is still tied to Scene view repaint. Very dense meshes can still be expensive because the tool may need to cache large edge arrays, selected face meshes, point meshes, and line data.
The performance colors are also a simplified heuristic. Real physics cost can depend on collider count, scale, Rigidbody setup, mesh complexity, collision layers, and runtime usage. However, the color system still gives users a useful first-level understanding of collider cost.
Existing collider preview support focuses on Unity’s common collider types: BoxCollider, SphereCollider, CapsuleCollider, and MeshCollider. Custom collider types or third-party physics shapes would need extra preview support.
🧱 Challenge 4: Create Colliders
❓ What was the Problem?
The Collider Editor needed to turn a Scene view vertex selection into real Unity colliders.
The tool had to support simple primitive colliders such as boxes, spheres, and capsules, but also more flexible shapes like cylinders, convex hull mesh colliders, and convex decomposition.
The main goal was to let users select part of a model and quickly create the best collider type for that shape without manually adding, positioning, scaling, and tuning Unity collider components.
🧩 Why Was it Hard?
Each collider type needed a different creation strategy.
A BoxCollider, SphereCollider, and CapsuleCollider are Unity components with their own center, size, radius, height, and direction properties.
A cylinder does not exist as a built-in Unity collider, so it had to be generated as a convex MeshCollider.
A mesh-from-selected-vertices collider needed a generated convex hull mesh.
Convex decomposition was even more complex because it creates multiple convex mesh colliders from one selected region.
This meant the creation pipeline could not be one generic “make collider” function. It needed a system that routed the current selection to the correct fitting or generation path.
Another difficult part was coordinate spaces. The user selects vertices in world space, but generated colliders need to be placed relative to the selected object or to a rotated child object.
Mesh generation also added asset-management complexity. Generated MeshCollider meshes need to survive editor reloads, scene saves, and prefab saves. Because of that, I had to create persistent generated mesh assets instead of assigning temporary meshes directly.
💡 Solution. How Did I Approach the Problem?
I split collider creation into two layers.
The editor window handles user intent: which collider type is selected, whether the action is confirmed, Undo recording, and clearing the selection afterward.
The geometry utility handles the actual fitting, mesh generation, and collider creation.
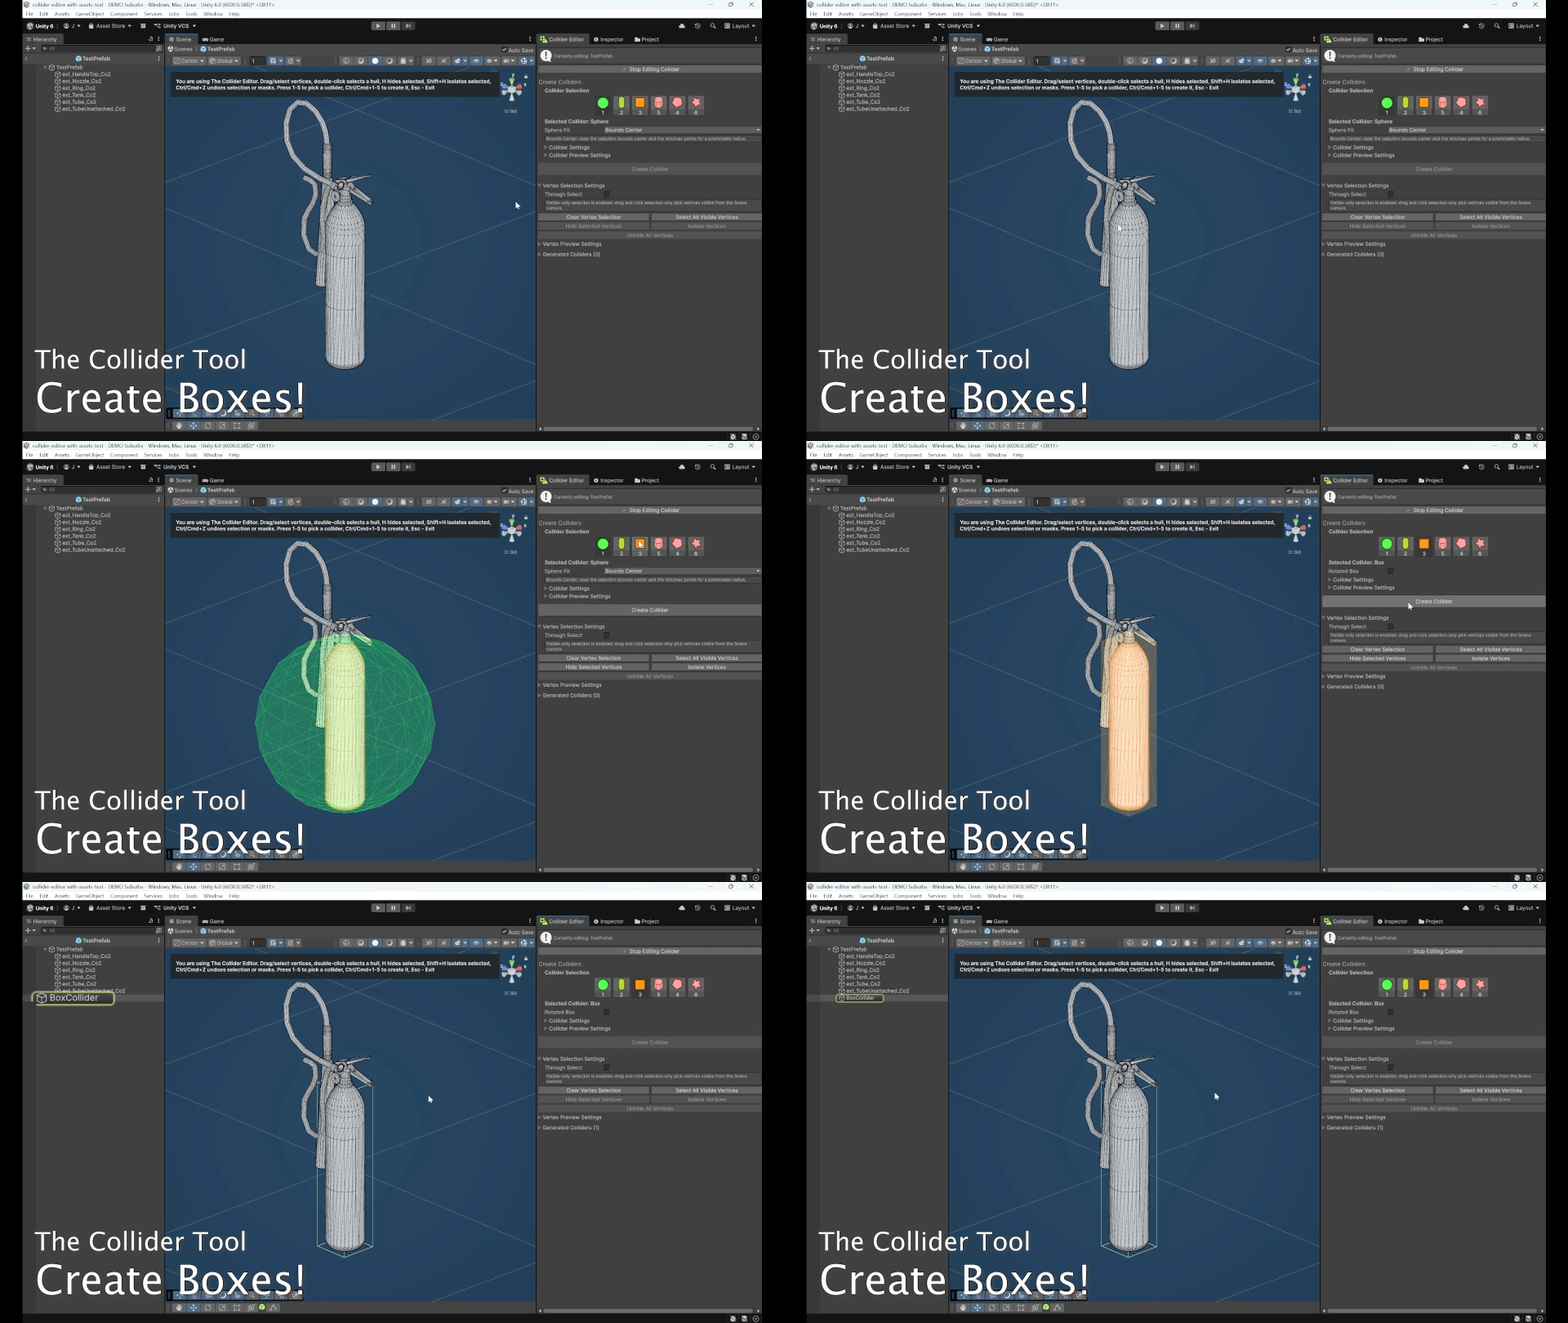
For boxes, I supported both normal axis-aligned boxes and rotated boxes. A normal box is simple and predictable, while a rotated box can fit angled geometry more closely.
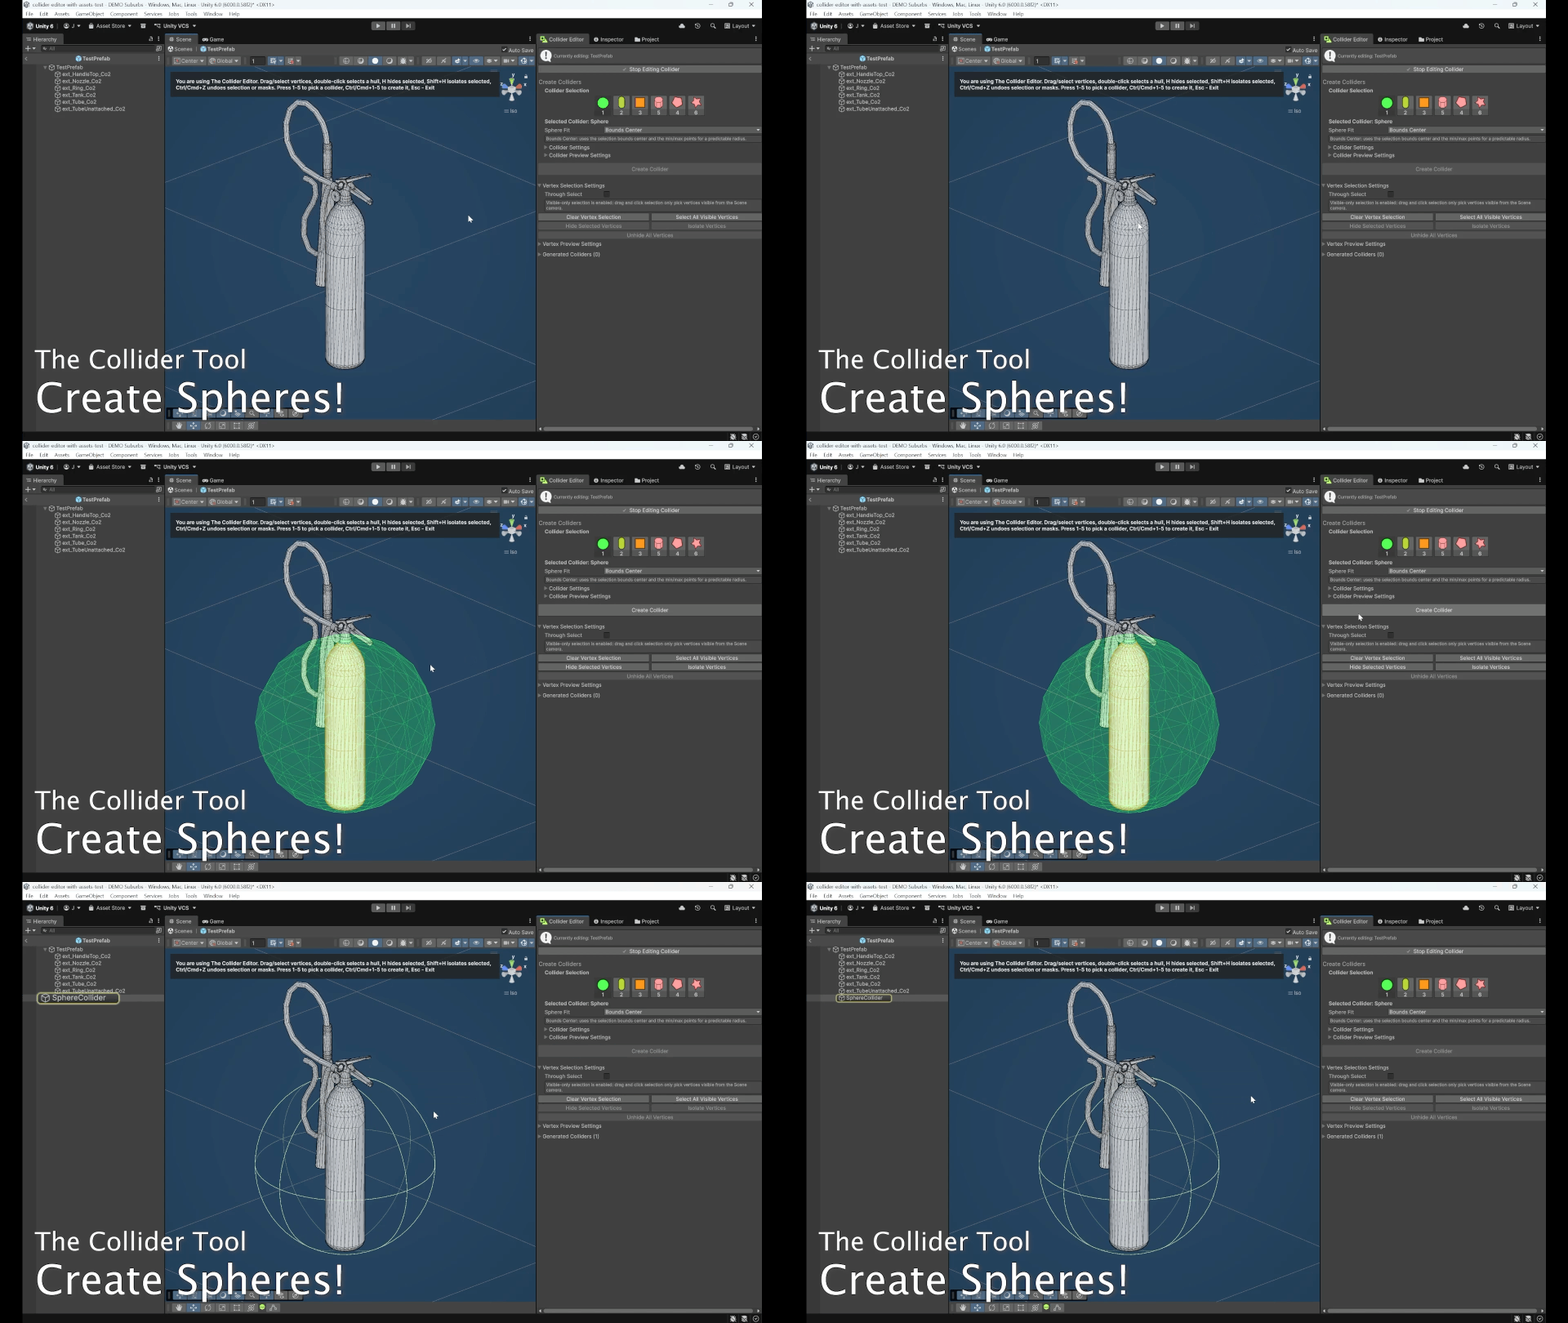
For spheres, the tool fits a radius around the selected points. This is useful for rounded objects or parts of objects where a sphere is the cheapest practical collider.
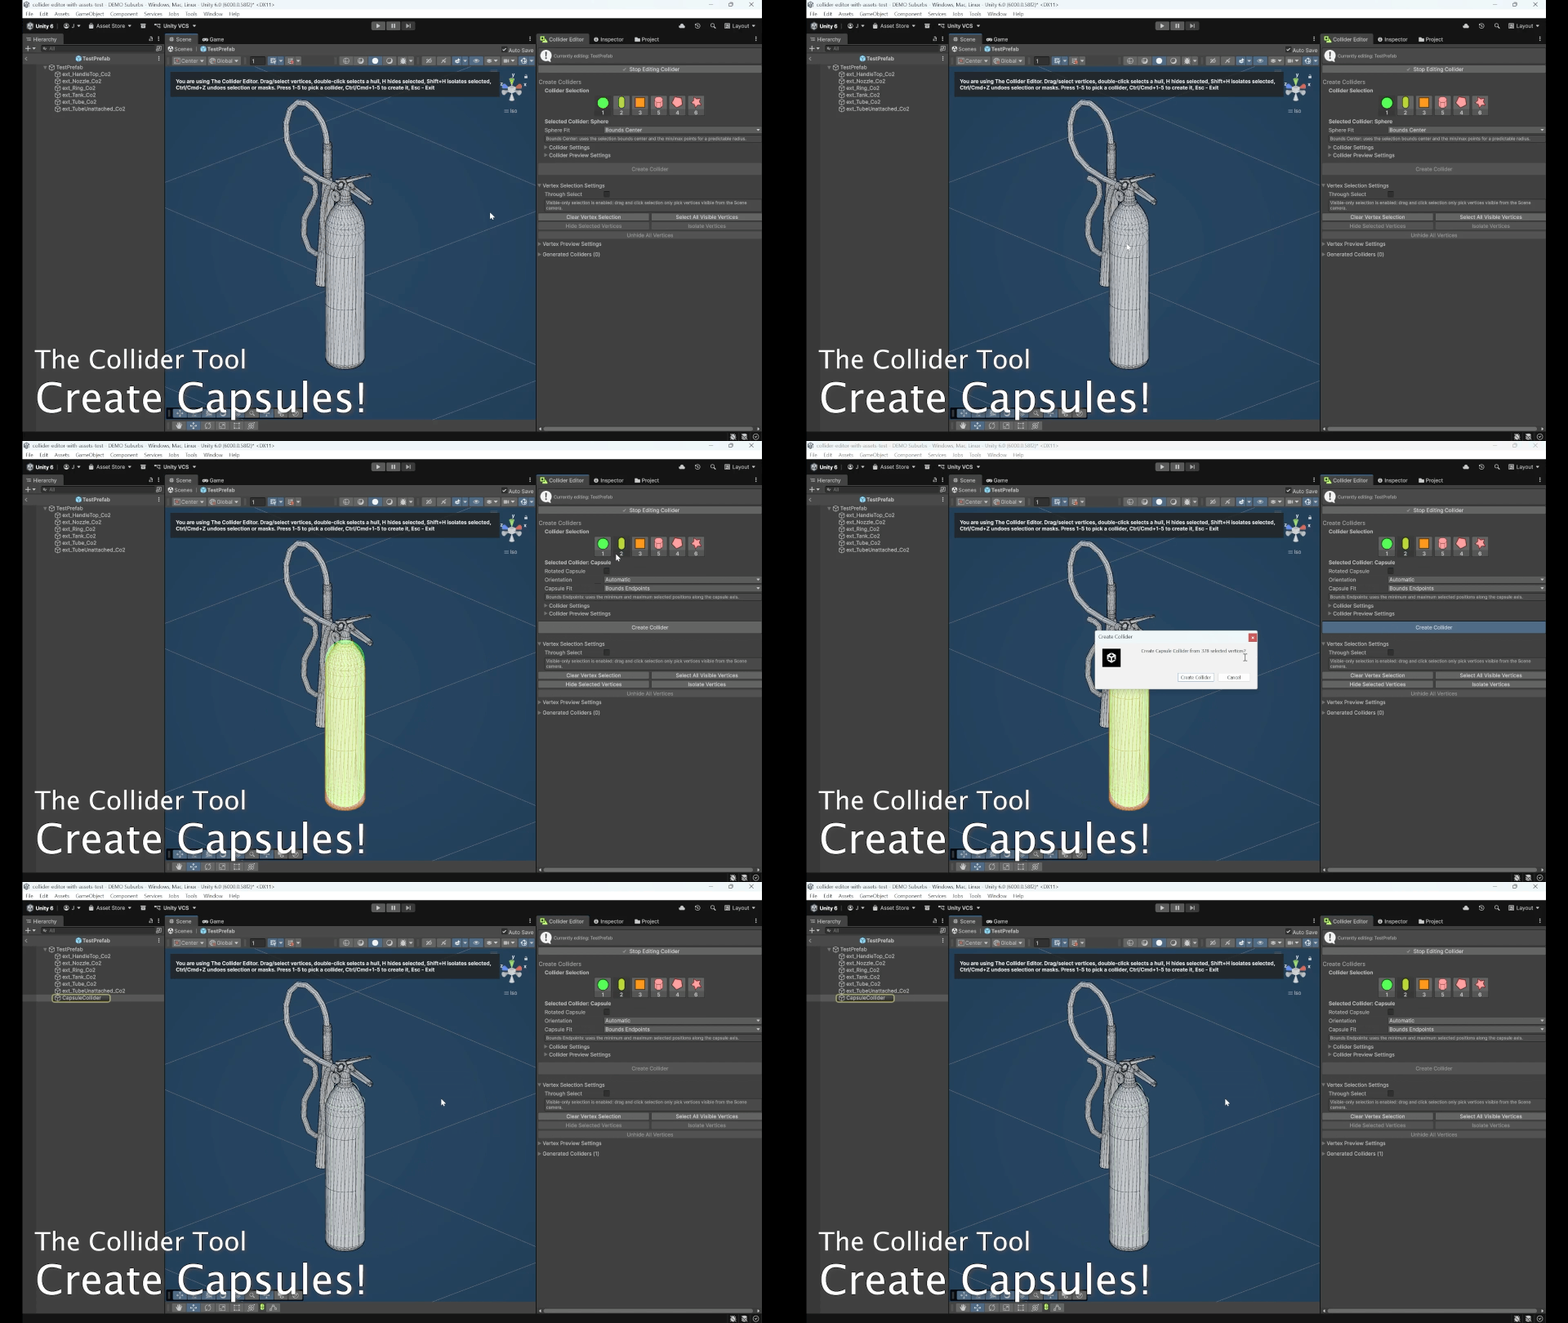
For capsules, the tool calculates the capsule height, radius, and axis from the selected points. Capsules are especially useful for long rounded shapes such as handles, rods, and tools.
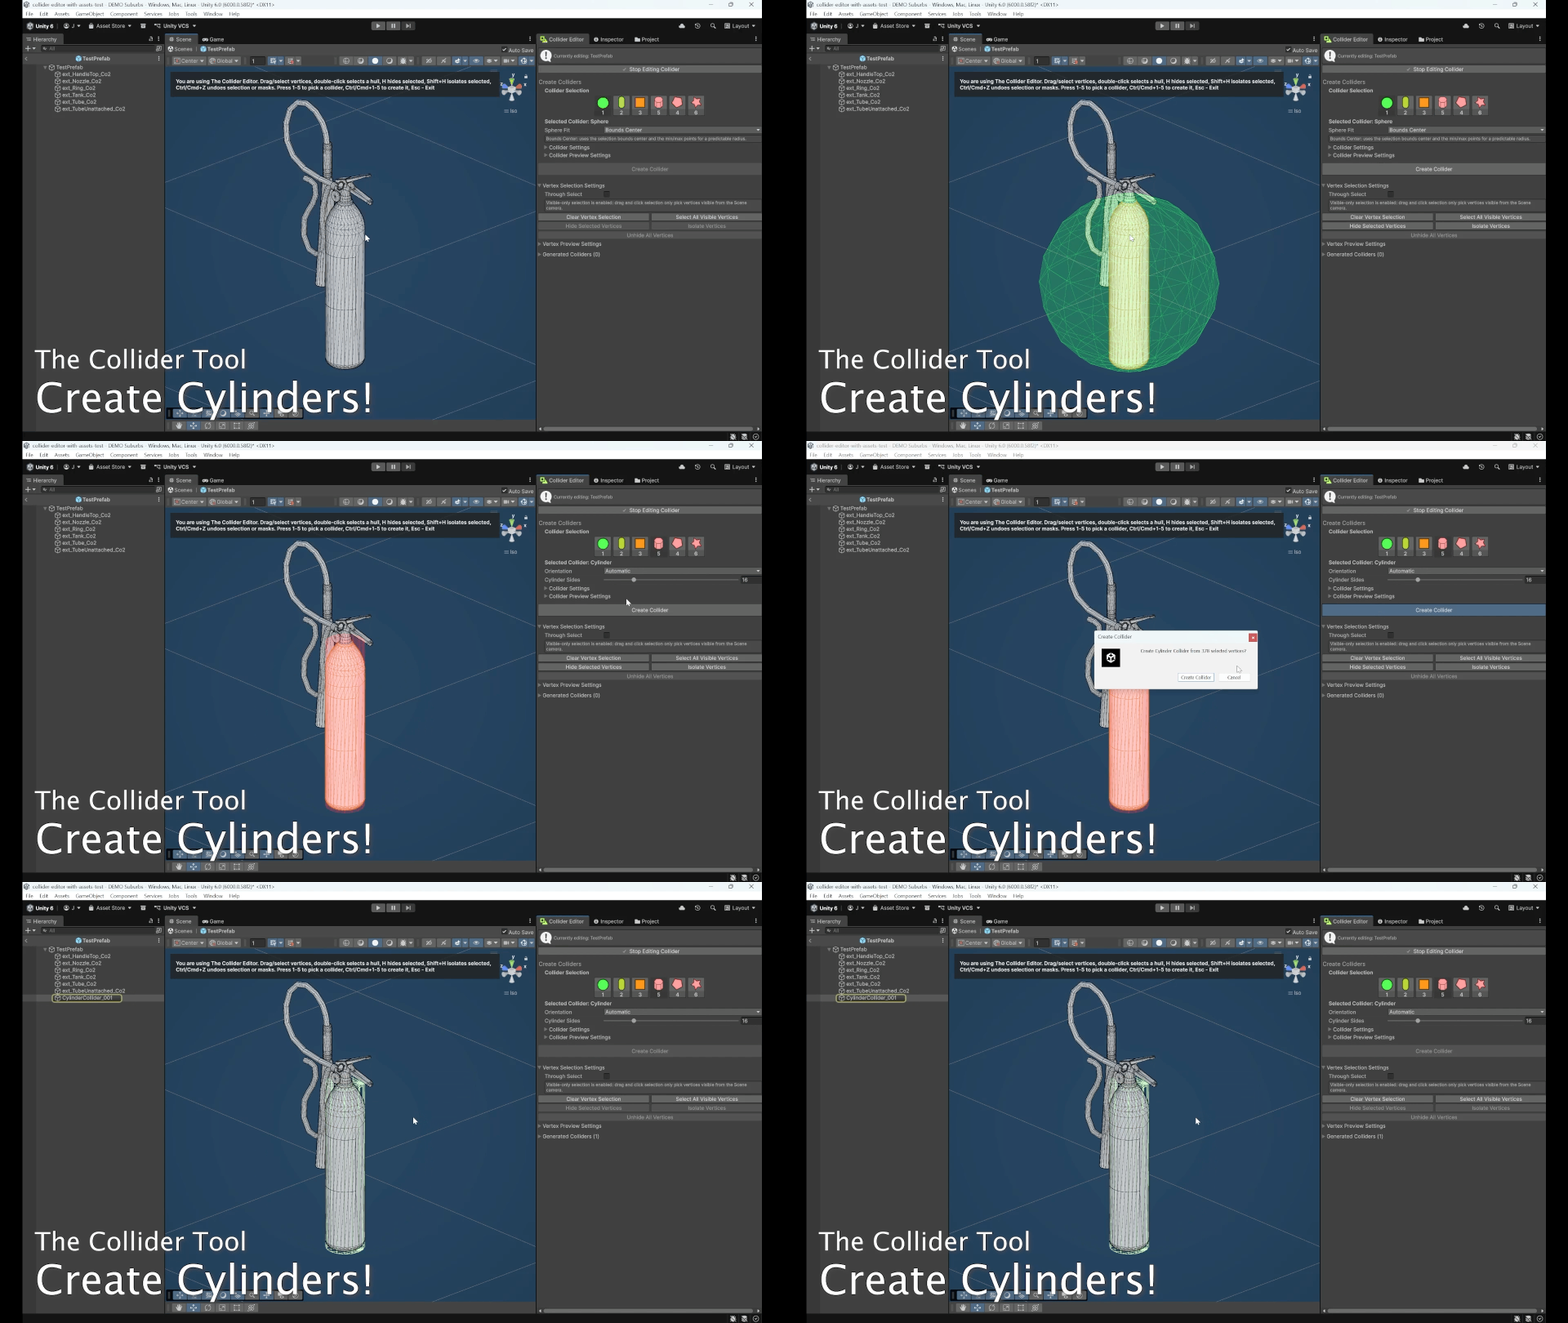
For cylinders, I generated a convex mesh collider because Unity does not have a built-in CylinderCollider. The user can adjust the number of sides, which controls how round the generated cylinder looks.
This gives artists a useful shape that Unity does not provide by default, while still keeping it inside the same workflow.
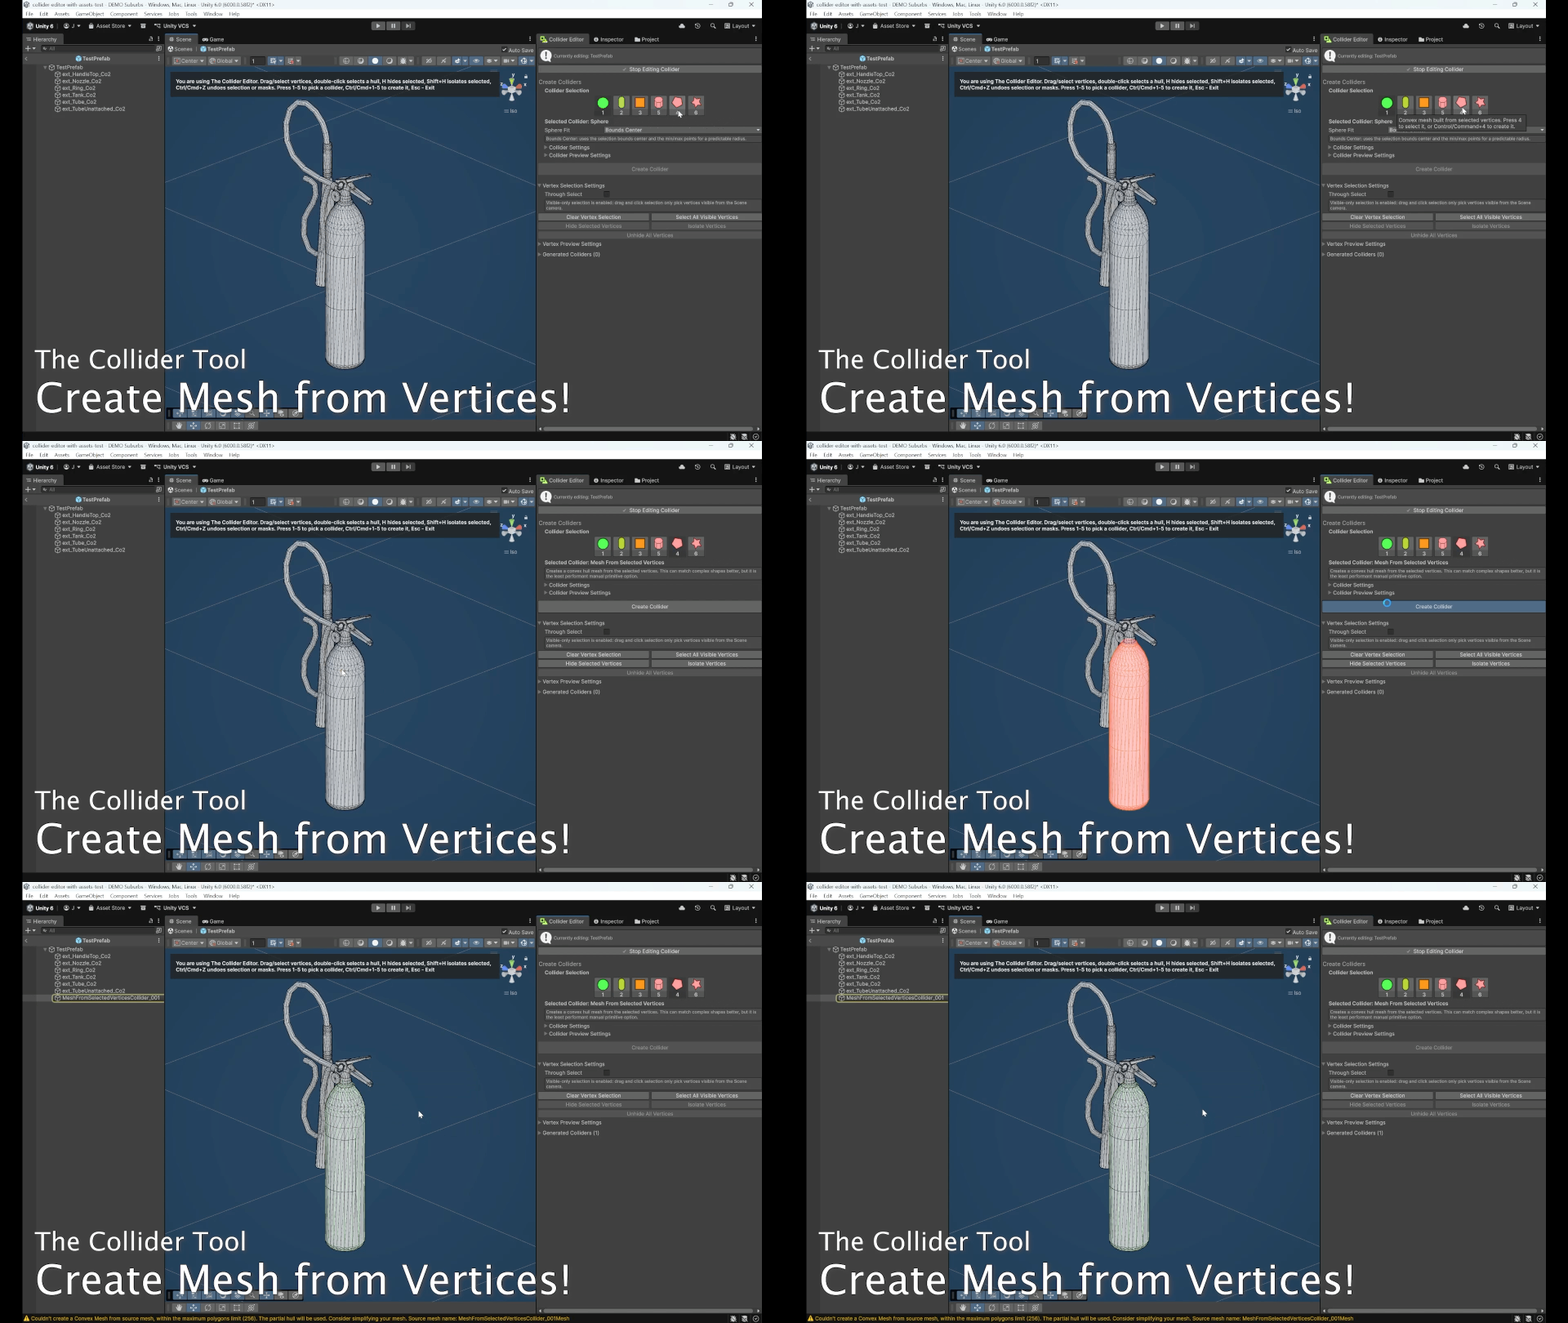
For Mesh from Selected Vertices, I used QuickHull to create a convex mesh from the selected point cloud. This is useful when a box, sphere, capsule, or cylinder is too simple, but the user still wants one convex physics collider.
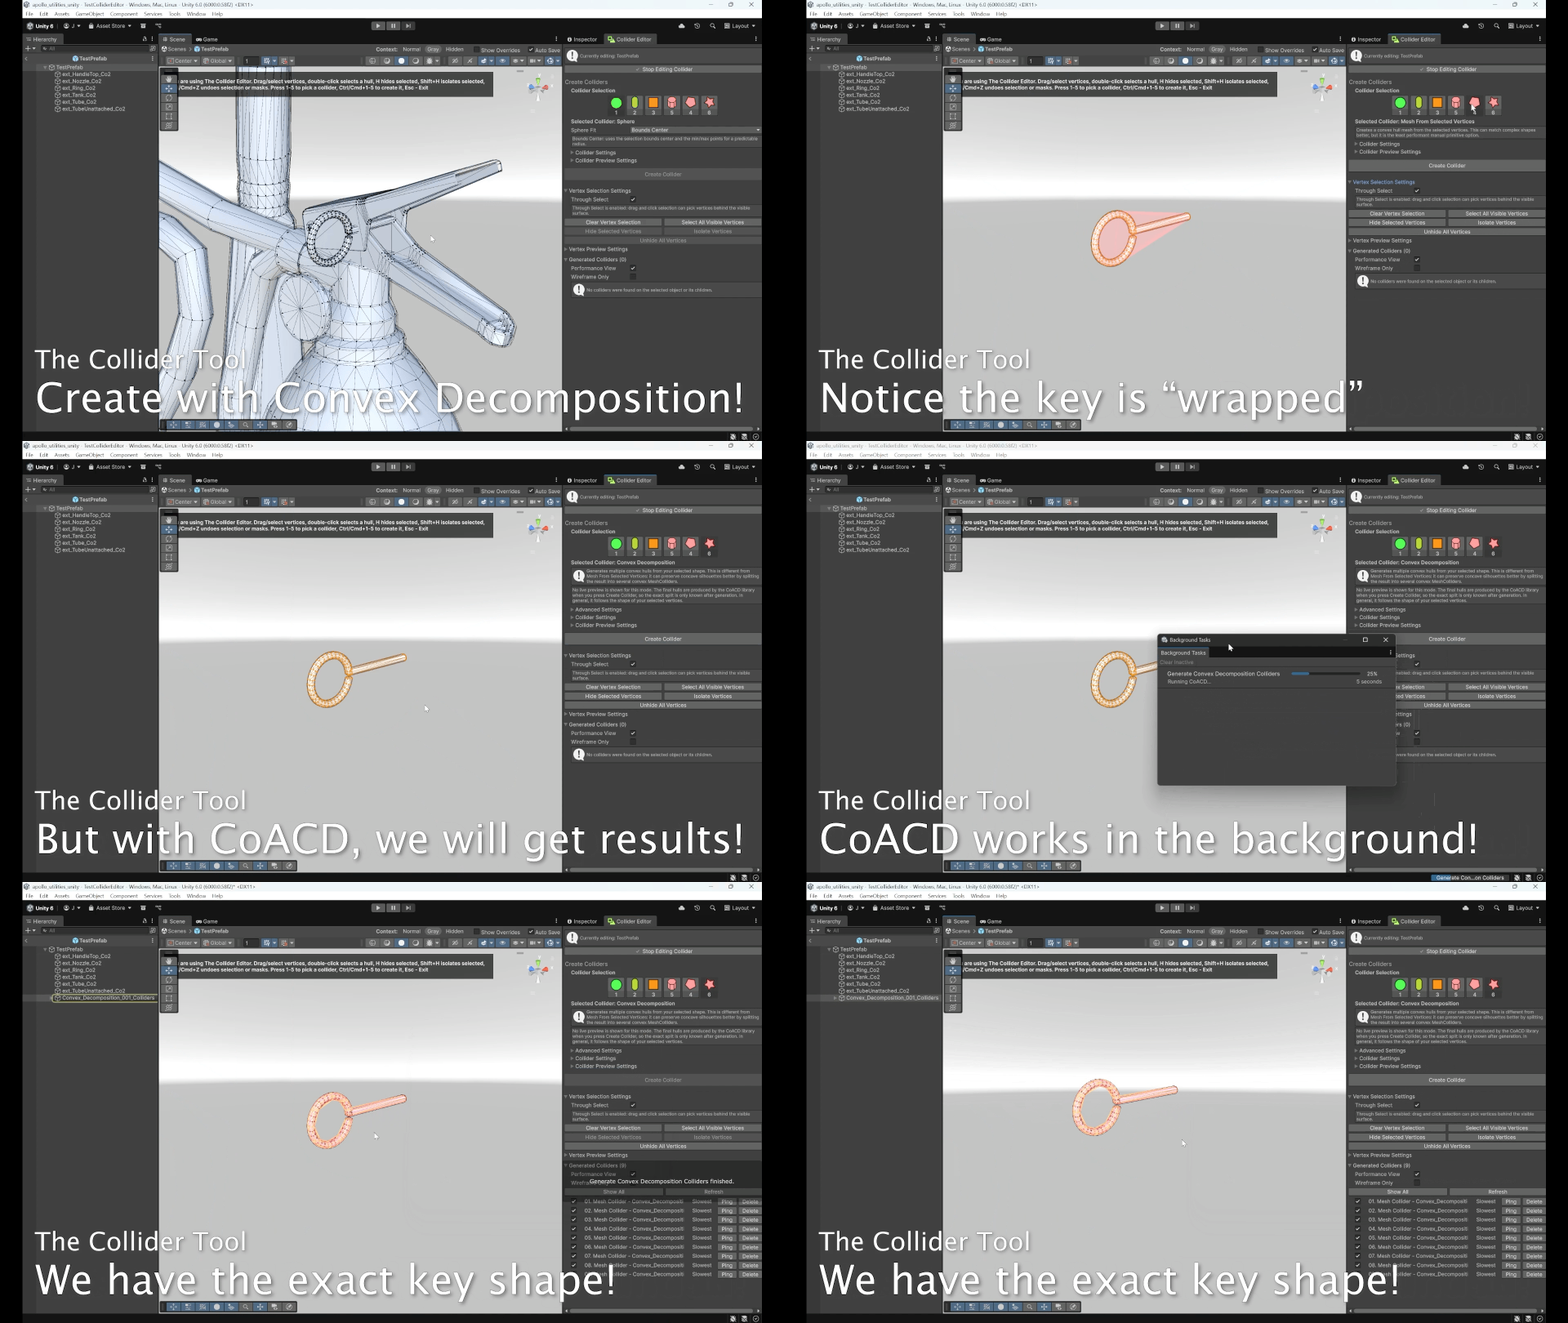
For Convex Decomposition, I integrated CoACD to split a selected region into multiple convex hulls. Instead of only passing a point cloud, the tool tries to rebuild the selected source triangles so CoACD receives real mesh topology.
This made it possible to decompose only part of a model instead of always processing the entire mesh.
Because CoACD can be slow, I moved the heavy decomposition work into a background task. The native solver runs in the background, and the final Unity objects are created afterward on the main thread.
✅ Problem Solved
The final system lets users create several collider types from the same vertex-selection workflow.
Simple shapes can become efficient Unity primitives like BoxCollider, SphereCollider, and CapsuleCollider.
More complex selected shapes can become convex mesh colliders through QuickHull.
Cylinders are supported through generated convex mesh colliders with configurable side counts.
Concave-looking regions can be approximated with multiple convex MeshCollider hulls using CoACD.
The workflow also supports shared collider settings such as trigger mode and physics material, Undo support, generated child objects, persistent generated meshes, and selection clearing after creation.
📉 Cost / Limitations / Tradeoffs
Primitive fitting is approximate. Axis-aligned boxes are fast and predictable, but they can waste space around rotated geometry. Rotated boxes fit better in some cases, but they are not guaranteed to be mathematically perfect minimum-volume boxes.
The cylinder collider is not a true primitive collider. It is a convex MeshCollider, so it is heavier than a box, sphere, or capsule. Increasing the side count makes it look rounder, but also increases mesh complexity.
QuickHull requires a valid 3D point cloud. If the selected points are too flat, too few, or degenerate, the hull may fail or produce a weak result.
CoACD gives better results for concave shapes, but it has tradeoffs. It depends on a native plugin, has more settings, and does not currently have a live preview before generation. Cancellation is also limited once the native solver has started.
Generated mesh colliders also create persistent mesh assets on disk. This is necessary so they survive reloads and prefab saves, but it adds asset-management complexity compared with simple primitive colliders.
🧰 Challenge 5: Other Features
❓ What was the Problem?
The Collider Editor was not only about selecting vertices and creating colliders. It also needed to behave like a proper Unity editor tool.
That meant the tool needed:
- Undo support;
- persistent generated mesh assets;
- safe generated asset cleanup;
- keyboard shortcuts;
- background collider generation;
- reliable editor-state handling.
Without these supporting systems, the main collider workflow would technically work, but it would feel unsafe and unfinished for production use.
🧩 Why Was it Hard?
The tool works across several different kinds of data at once.
Selection and masking live inside the editor state.
Collider GameObjects live in the scene hierarchy.
Generated mesh collider meshes live as Unity assets on disk.
Prefab editing has its own isolated prefab stage.
CoACD runs native-heavy mesh processing that can take time and cannot safely create Unity objects from a background thread.
This made the supporting systems more complicated than they first appeared.
For example, undoing a selection change is not the same as undoing a created collider GameObject. Deleting a generated collider is not the same as cleaning up the generated mesh asset it used. Running CoACD in the background is not the same as creating Unity objects in the background, because Unity objects still need to be created on the main thread.
💡 Solution. How Did I Approach the Problem?
I added Undo support around both editor-state changes and scene-object creation.
Selection changes, hiding, isolation, and editing actions record the editor state. Collider creation records the selected hierarchy, creates the collider, clears the selection, selects the created object, and collapses the whole action into one clean Undo step.
For generated mesh assets, I made mesh collider assets persistent. Instead of assigning temporary runtime meshes, the tool saves generated meshes as .asset files in organized folders. This allows generated mesh colliders to survive editor reloads, scene saves, and prefab saves.
To make cleanup safer, generated colliders receive a marker component. This lets the tool identify which colliders were created by the Collider Editor and which colliders were created manually by the user.
The tool only enables generated-collider deletion for colliders marked as generated. This prevents the cleanup system from accidentally deleting user-authored colliders or mesh assets.
I also added a cleanup watcher that handles cases where generated collider hierarchies are deleted outside the tool. It checks whether generated mesh assets are still used and deletes unused ones only when it is safe.
For keyboard shortcuts, I routed Scene view key input into the editor workflow. This made the tool faster to use during repeated editing.
Examples include:
- Escape to exit editing;
- Ctrl/Cmd + Z for Undo;
- Ctrl/Cmd + A to select all vertices;
- H to hide selected vertices;
- Shift + H to isolate selected vertices;
- Ctrl/Cmd + Enter to create the selected collider;
- number keys to switch collider type.
For heavy convex decomposition, I added a background task system. CoACD can take time to run, so the expensive mesh-processing step runs in the background while Unity shows progress feedback. The final collider GameObjects are created afterward on the main thread.
✅ Problem Solved
The tool became much safer and more production-friendly.
Users can undo selection changes, masking actions, collider creation, and generated collider deletion.
Generated mesh colliders are saved as real Unity assets instead of temporary runtime meshes, so they survive reloads and scene or prefab saves.
Generated mesh assets are cleaned up when they are no longer used, which reduces asset-folder clutter.
Keyboard shortcuts make the main workflow faster, especially when repeatedly selecting vertices, hiding noisy areas, switching collider types, and creating colliders.
Heavy CoACD convex decomposition no longer blocks the editor in the same way because the expensive part runs in the background with progress feedback.
📉 Cost / Limitations / Tradeoffs
The biggest tradeoff is that Undo and asset deletion are not the same system. Scene objects are handled through Unity Undo, but generated mesh assets are deleted through the Asset Database. This keeps the project cleaner, but it is more complex than a scene-only workflow.
The cleanup system is intentionally conservative. It only deletes assets that live inside known generated-mesh folders. This avoids deleting user-authored assets, but it also means manually moved generated assets may not be cleaned up automatically.
Background generation supports cancellation, but cancellation is cooperative. Once a heavy native CoACD call has started, the task may not stop immediately until that call returns.
The tool also only allows one background collider-generation task at a time. This prevents multiple heavy jobs from conflicting with editor state, but it also means users cannot queue several decompositions at once.
The shortcut system is useful, but not complete. For example, Redo support and fully configurable key bindings would be good future improvements.
💥 Impact of Contribution
Before this contribution, creating colliders at Flashgroup was mostly a manual and repetitive process.
Artists and developers had to add Unity collider components by hand, manually position and scale them, and judge through trial-and-error whether a primitive collider, convex mesh, or multiple hulls would produce the best result.
This became especially difficult on complex objects, where selecting the right part of a mesh or dealing with disconnected mesh islands could quickly become tedious.
After developing the Collider Editor, collider authoring became a much more visual and streamlined Scene view workflow.
Users can now select vertices directly on the mesh, preview the collider before committing to it, and generate boxes, spheres, capsules, cylinders, convex hulls, or CoACD-based convex decompositions from the same selection system.
Existing colliders can also be inspected more easily through performance-colored previews, making collider cost visible directly in the editor.
This reduced a significant amount of trial-and-error. Artists and developers can now create more accurate colliders faster, isolate or hide noisy mesh regions, inspect collider complexity at a glance, and safely undo most editing actions.
More advanced setups, such as decomposing only a selected concave region into multiple convex hulls, also became possible without leaving Unity or relying on external manual setup.
Overall, the tool improved both productivity and usability. Instead of forcing users to choose between fully manual collider creation or unpredictable automatic generation, the Collider Editor gave them a flexible workflow where they could visually control the result, use automation when helpful, and fall back to manual precision when needed.
📚 What I Learned
I learned that a tool is only “fast” if it is fast in the user’s real workflow, not just in the algorithm.
My first instinct was to improve automatic generation, but testing showed that artists could often make good colliders manually in one or two minutes. That changed my thinking from:
“How do I automate everything?”
to:
“How do I reduce the number of decisions and actions the user has to take?”
I also learned to design editor tools around feedback loops. Immediate visual previews, clear selection, and undo support mattered more than exposing every technical parameter.
A powerful system can still feel unusable if the user cannot quickly see what changed or why.
I also improved my mental model for tool design. Instead of thinking only in terms of features, I started thinking in terms of the user’s full workflow:
- What are they trying to achieve?
- What slows them down?
- What decisions are they forced to make?
- What information do they need immediately?
- What can be hidden until it is actually needed?
Next time, I would test the workflow with artists earlier, before building too much around my own assumptions. I would start with the smallest usable editor flow first, then add automation only where it clearly saves time.
🔄 Future Improvements
There are several ways I would improve the tool further.
I would add a stronger selection acceleration system, such as spatial partitioning or cached screen-space lookup, so dense meshes can be selected faster without iterating over every vertex each time.
I would improve preview cache invalidation by centralizing the rules for when mesh overlays, selected faces, hidden meshes, and collider previews need to rebuild. This would make the system easier to maintain and reduce the chance of stale preview data.
I would add a live CoACD preview or at least a low-resolution preview mode, so users can understand the convex decomposition result before committing to generation.
I would improve generated mesh asset management by making cleanup more transparent, with a small audit or repair tool that shows which generated meshes are used, unused, or missing.
I would also expand the shortcut system with Redo support, configurable key bindings, and direct shortcuts for every collider type, including Convex Decomposition.
Architecturally, I would separate the tool further into clear services:
- selection;
- preview;
- collider generation;
- asset persistence;
- cleanup.
This would make future features easier to add without increasing coupling inside the editor window.
👤 Zhangir After the Project
By the end of the project, I achieved the original goal, but not in the way I first expected.
I started by trying to create an automatic collider generation tool. Through testing and feedback, I realized the real need was a fast, visual, and flexible collider editor.
What I am most proud of is that I did not stay attached to my first solution.
When I saw that artists could often create colliders manually faster than my automatic generator could reliably produce them, I changed direction. I turned the project into a tool that supports manual collider creation, visual mesh selection, previews, and automatic generation when it is actually useful.
I grew as an engineer by learning to think beyond the code. A good tool is not just about the algorithm behind it; it is about how quickly users understand it, trust it, and fit it into their existing workflow.
I became better at observing users, separating what they say from what they actually need, and making design decisions based on real usage instead of assumptions.
This project shows that I work iteratively and practically. I can research complex technical solutions, implement them, test them with real users, and change direction when the evidence shows a better path.