💼 Internship at SportsImproVR
SportsImproVR is a virtual reality training company focused on sports training for baseball, softball, tennis and umpire practice. Their VR systems make it possible to train technique, tactics, observation, reaction speed and mental preparation in controlled virtual environments, without always needing a full playing field, perfect weather, a coach or another player. Because the training is computer-controlled, drills can be repeated under consistent conditions and player actions can be measured for feedback and progress tracking.
I worked at SportsImproVR as a Programming Intern / Unity Tools Programmer.
My main responsibility was researching, prototyping and developing Unity-based tools and XR systems that improved the company’s VR sports-training workflow.
My projects were research & development of a full-body tracking pipeline for VR sports training and Unity Video-to-FBX converter tool that automated the process of turning sports footage into FBX motion data.
👤 Zhangir Before the Project
Before this internship, I had never worked in a professional game development environment before.
I had programming experience from university projects, and I already knew that I was interested in engine and tools programming, but most of that experience was still academic. I had built tools before in a university context, but I had never made a tool for a real company, with real users, real workflow problems, and real production constraints.
I also had no prior experience with VR development. I had never worked with a Meta Quest headset, Android builds, standalone VR deployment, Bluetooth trackers, OSC networking, full-body tracking, or VR interaction systems. Even basic things like setting up the headset, building to the device, testing on hardware, and debugging Android logs were completely new to me.
At the start, my mindset was mostly: “I can probably figure this out if I keep digging.”
That was both a strength and a weakness. It helped me jump into unfamiliar problems without being afraid of them, but I also underestimated how many layers professional XR development has. A VR system is not just Unity code. It involves hardware, device permissions, build settings, networking, calibration, performance limitations, user comfort, and the physical reality of how people move.
So my starting point was simple:
I was a motivated programming student with a strong interest in tools, but no professional experience, no VR experience, and no proven track record of building production tools for a real team.
🔨 My Contributions
🏃♂️ VR Full-Body Tracking
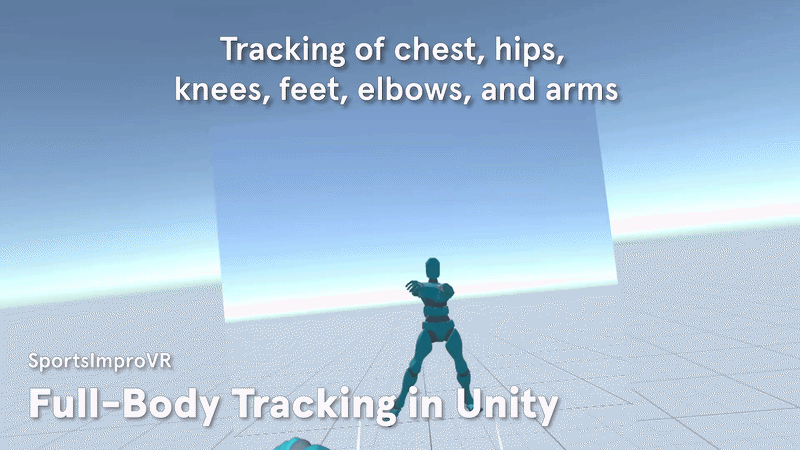
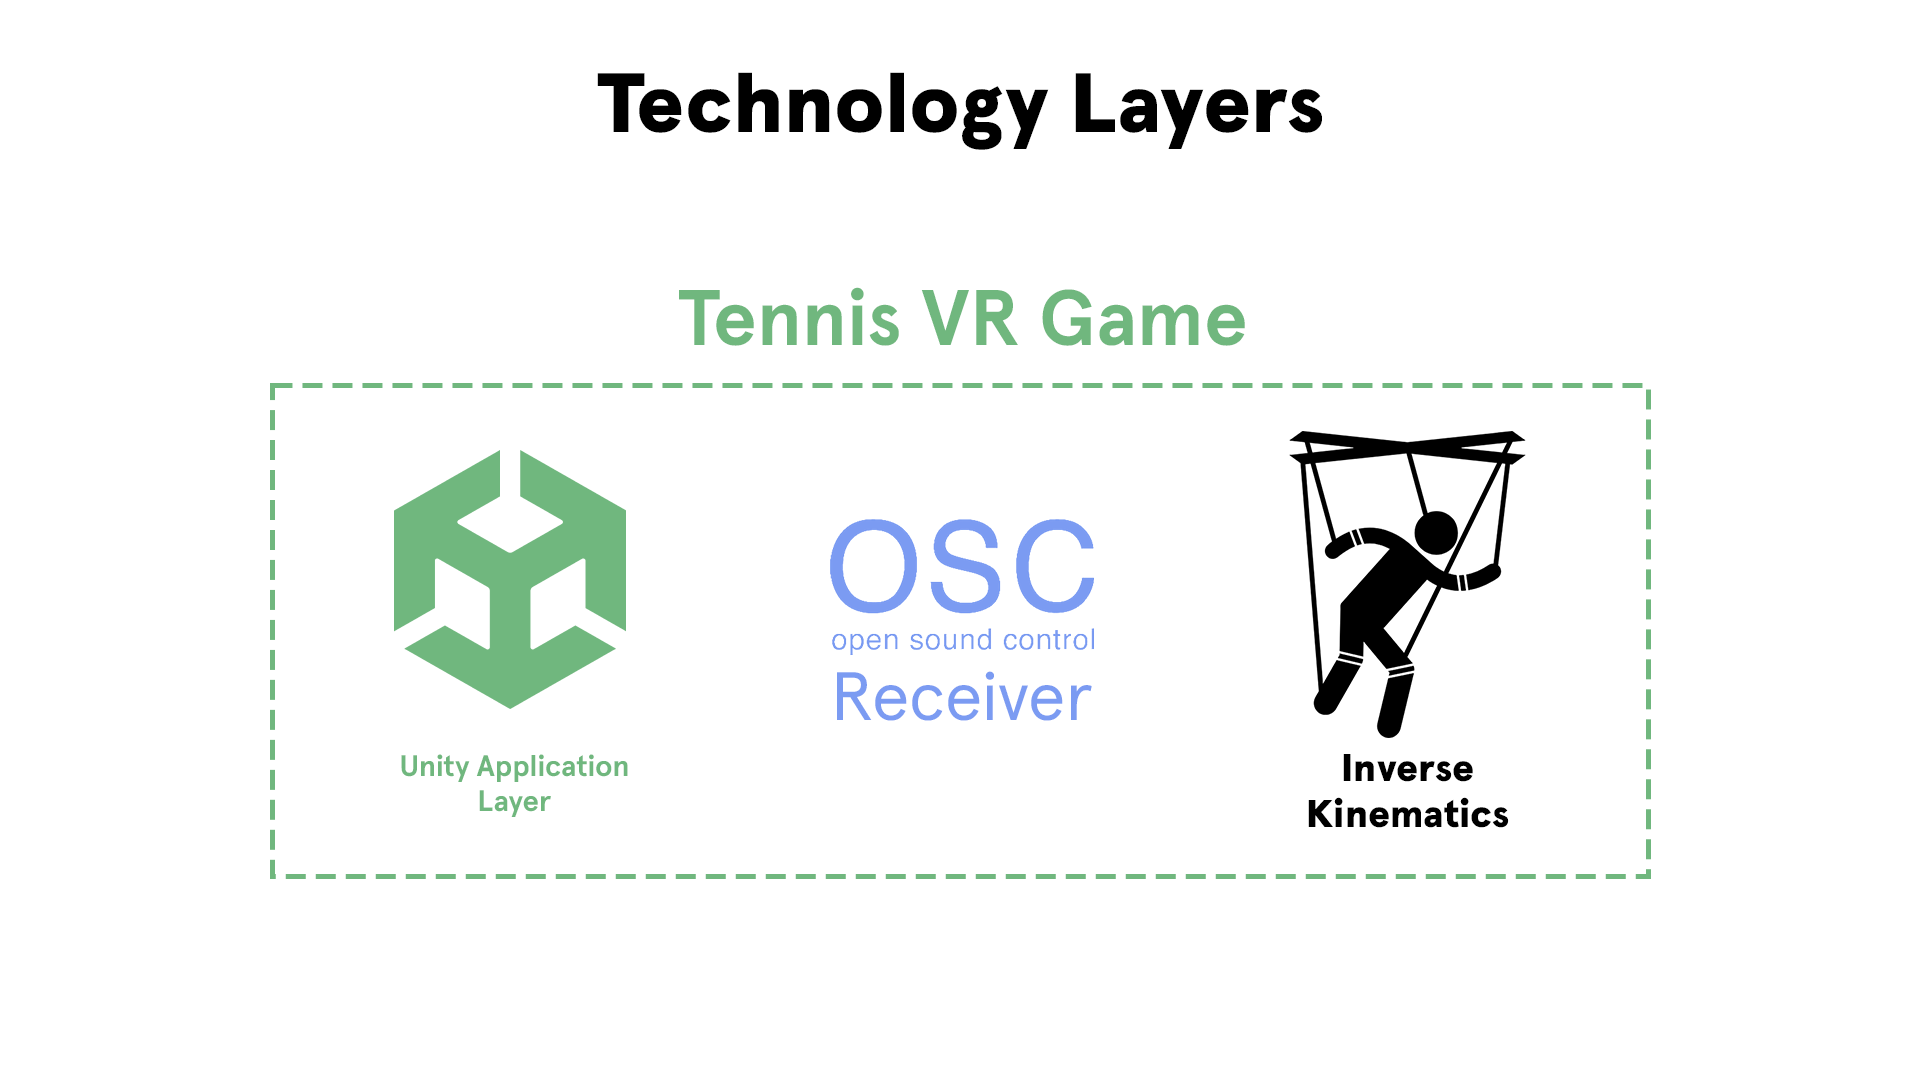
VR Full-Body Tracking is a Unity-based tracking solution that connects real body trackers to a Meta Quest VR application and uses them to drive a player avatar in real time.
The system receives position and rotation data from HaritoraX2 trackers through OSC, updates tracker target objects inside Unity, and applies those targets to a humanoid character using Unity’s Animator IK system. This allowed the player’s legs and body movement to be represented inside the SportsImproVR tennis application.
My goal was to bring the player’s real full-body movement into VR sports training.
This solution was made for SportsImproVR’s VR tennis training application.
Before, the player avatar was mainly driven by the headset and controllers, which meant that lower-body movement such as stepping, crouching, jumping, and leg positioning was not properly visible in VR.
Now, the application can receive real tracker data, map it to an avatar, and make the virtual body follow the player’s real movement, making the training experience more accurate and opening the door for future movement-based performance analysis.
⚙️ Challenge 1: Research of Existing Trackers
❓ What was the Problem?
The original goal of the project was to bring full-body tracking into the SportsImproVR tennis application.
![]()
At first, I experimented with XSens DOT trackers. I was actually very successful with them, I managed to get them connected and be able to rotate a cube with it.
But I discovered a major limitation: they were useful for orientation, but not reliable enough for positional full-body tracking. The trackers could report movement even while lying still, which made them unsuitable for accurately tracking body position during fast sports movements. After contacting XSens support, I learned that this behavior was expected because the trackers were not intended for this kind of positional tracking, and their acceleration data would drift over time.
The second issue was that XSens by itself just provides the raw tracking data (such as raw rotations). In order to turns this raw rotation into usable position data. I learned that other IMU systems usually have an “pose estimation layer” where the rotations of trackers are applied to respective joints. A custom pose estimation layer would require significant development effort and long-term maintenance.
And even if we did make the “pose estimation layer”, it would tightly couple the system to the speicfic trackers, creating a closed ecosystem with no interoperability.
This meant I had to stop treating XSens as the final solution and instead research the full-body tracking market properly. The replacement solution had to work for a standalone Meta Quest VR sports application, be accurate enough for body movement, be affordable enough for the company, and be technically possible to integrate into Unity.
💡 Solution. How Did I Approach the Problem?
I approached the problem as a technology selection challenge. Instead of immediately picking another tracker, I compared the main categories of full-body tracking systems: IMU-based trackers, electromagnetic field tracking, Lighthouse tracking, and camera-based tracking. I evaluated them based on cost, hardware requirements, tracking quality, strengths, weaknesses, and how realistic they were for SportsImproVR’s use case.
Inertial Measurement Units — SlimeVR, HaritoraX2, Mocopi
IMU-based trackers estimate body motion using sensors such as accelerometers and gyroscopes. Those can be commonly found in smartphones, such as when you rotate your phone to make a video go full-screen.
Now imagine that we take each gyroscope and attach it to each body part like below:
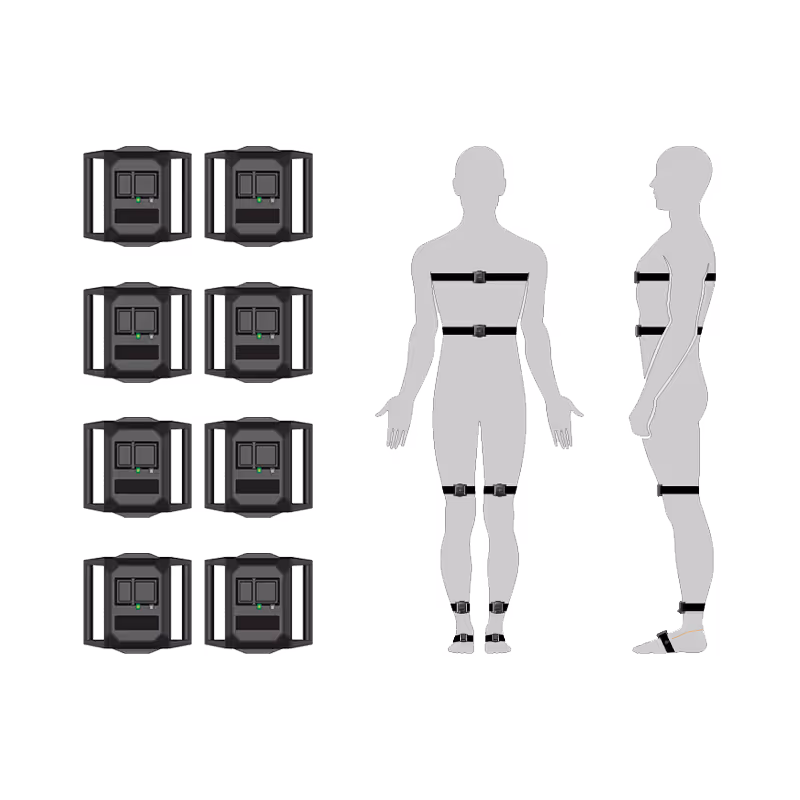
Examples I researched included SlimeVR, HaritoraX2, and Sony mocopi.
💰Cost: This was the most affordable category. SlimeVR was one of the cheapest options I found, starting around $219, while HaritoraX2 was around $299 / €299, and mocopi was around $449.99.
📦 Hardware / Setup: These systems do not require external base stations. The user wears multiple small trackers on the body, usually on the waist, legs, feet, and sometimes chest or elbows. However, they often require a phone, PC, or companion application to process tracker data before sending it to the VR application. In the case of HaritoraX2, the Shiftall VR Manager can process the tracker data and send a completed skeleton through OSC, which made it very attractive for my Unity pipeline.
🎯 Tracking Quality: The tracking is good enough for many VR full-body use cases, but it is not perfect. IMU trackers can suffer from drift, meaning the tracked body slowly becomes less accurate over time and may need recalibration. In my research, this made IMU tracking a trade-off between affordability and perfect precision.
✅ Strengths: IMU trackers are affordable, portable, lightweight, and do not suffer from camera occlusion. They also fit the SportsImproVR use case well because the company wanted a practical tracking setup, not a large studio installation. HaritoraX2 was especially useful because it already provided a software pipeline that could output skeleton position and rotation data through OSC.
⚠️ Weaknesses: The main weakness is drift. Some IMU trackers also require extra setup through a phone or PC, and cheaper tracker sets may have worse build quality, larger tracker bodies, or more frequent recalibration. For sports training, where fast movement matters, this was a serious consideration.
Electromagnetic Field — FluxPose
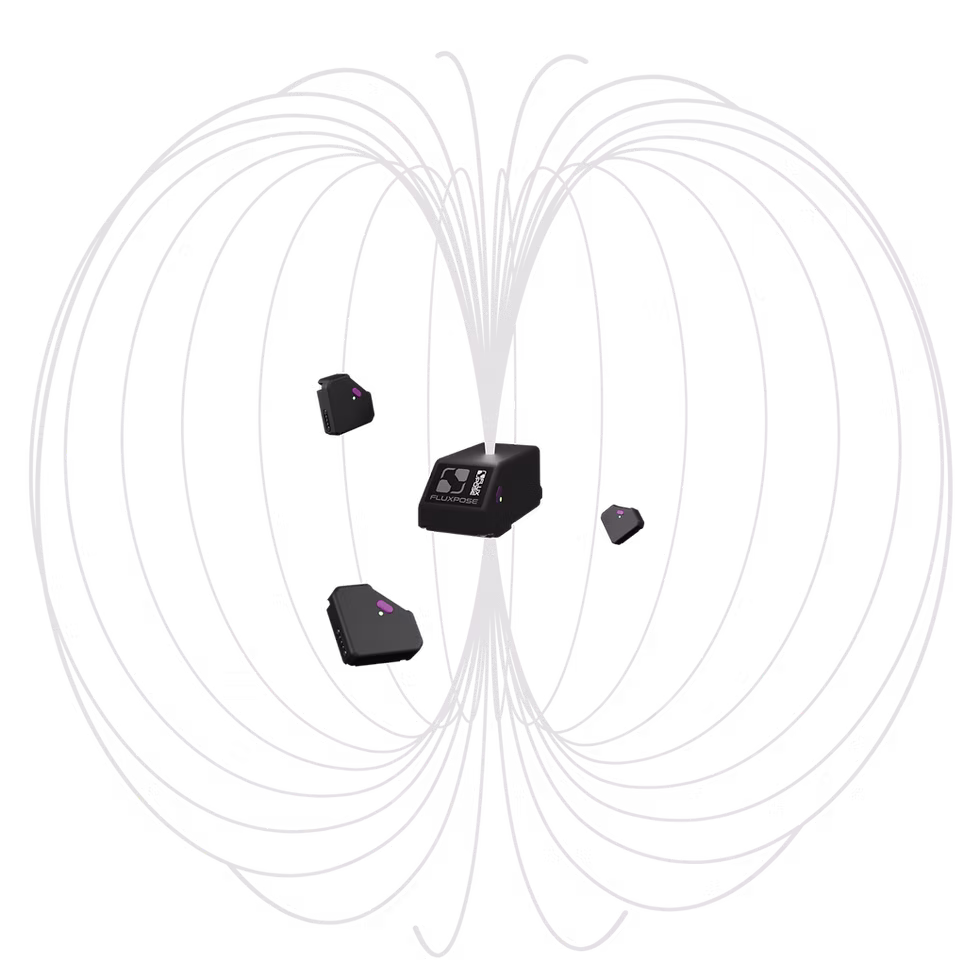
Electromagnetic field tracking uses a generated electromagnetic field to determine tracker position. The most relevant system I researched in this category was FluxPose.
💰 Cost: FluxPose looked more expensive than IMU tracking, but cheaper and more portable than a full Lighthouse setup. Public information described it as an “affordable” occlusion-free 6DOF tracking system, with early kits reported around the mid-hundreds of euros depending on the bundle.
📦 Hardware / Setup: Instead of placing external Lighthouse base stations around the room, EMF tracking uses a field source and trackers. This makes the setup more portable than Lighthouse while still aiming for absolute positional tracking.
🎯 Tracking Quality: The main promise of EMF tracking is absolute position tracking without relying only on body estimation. In theory, this makes it more precise than IMU-only systems and less prone to drift. FluxPose specifically presents itself as an occlusion-free absolute-position tracking system.
✅ Strengths: The biggest strength is that it could offer accurate 6DOF tracking without camera occlusion and without large room-mounted Lighthouse base stations. For VR sports training, this sounded very promising because the player could move naturally without worrying about cameras losing sight of the body.
⚠️ Weaknesses: At the time of my internship research, this was still a risky option because it was not the most proven or readily available solution for our production needs. It also introduced possible concerns around magnetic interference and integration maturity. Because SportsImproVR needed a practical solution I could actually test and integrate, FluxPose was interesting but not the safest choice.
Lighthouse — Vive Trackers, Tundra Labs

Lighthouse tracking uses external base stations to track devices in 3D space. This includes HTC Vive Trackers and Tundra Trackers.
💰 Cost: This was the most expensive category. Vive Trackers and Tundra Trackers require multiple trackers, dongles, straps, and Lighthouse base stations. In my learning log, I estimated a Vive setup as requiring several trackers, multiple Lighthouse base stations, a VR headset, and a powerful external PC, making it too expensive for the project’s intended use case. Current public listings show Vive Tracker 3.0 at around $149 and Tundra Tracker at around $125 per tracker, before counting base stations and accessories. ([VIVE Store | United States][4])
📦 Hardware / Setup: Lighthouse tracking needs fixed external base stations placed around the play area. This makes it powerful, but also less portable. It is much closer to a professional VR room setup than a plug-and-play standalone training setup.
🎯 Tracking Quality: This was the highest-quality option I researched. In my notes, I described Lighthouse as the industry-standard full-body tracking solution, with very accurate positional tracking and low latency.
✅ Strengths: The biggest strengths are accuracy, stability, and maturity. Vive Trackers and Tundra Trackers are proven solutions, especially for VRChat and professional VR setups. They do not have the same drift problem as IMU trackers because they use external positional tracking.
⚠️ Weaknesses: The weaknesses are cost, setup complexity, and portability. For SportsImproVR, this was a major issue: the company needed a solution that could realistically work for sports training, not only in a fixed VR lab. Lighthouse also suffers from occlusion, meaning tracking can fail if the body or equipment blocks line-of-sight to the base stations.
Kinect / Camera-Based Tracking — Amethyst
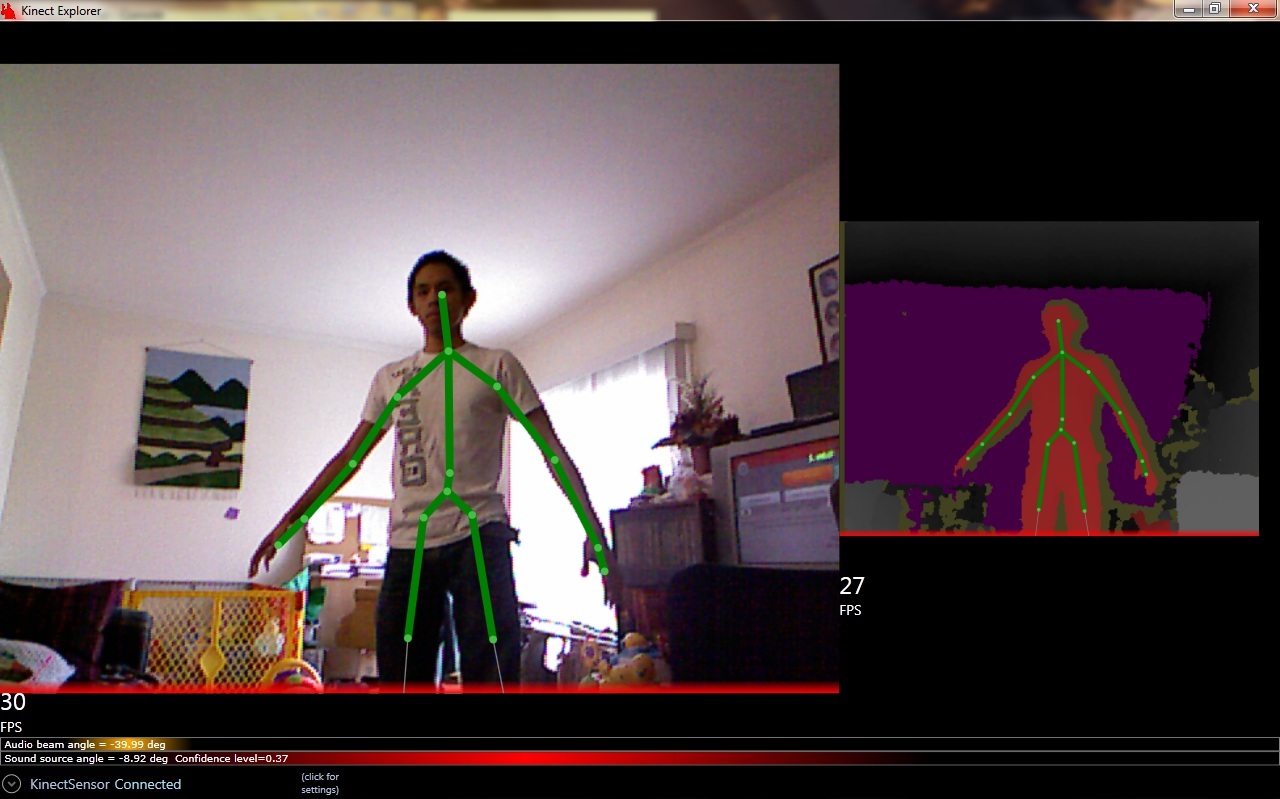
Camera-based tracking uses a camera or depth sensor to estimate the user’s body. The solution I researched here was K2VR Amethyst, which supports Kinect and other tracking plugins.
💰 Cost: This was potentially the cheapest option because it can use older hardware such as Kinect sensors, and Amethyst itself is an open-source body-tracking application.
📦 Hardware / Setup: The user does not need to wear trackers, which is a big advantage for comfort. Instead, the camera needs to see the player’s whole body. Amethyst’s documentation notes that the entire body should be visible in the tracking preview, and Kinect setups need enough room between the user and the camera.
🎯 Tracking Quality: This was the weakest option for my use case. Camera-based tracking can work for simple standing poses, but SportsImproVR’s application involves fast tennis movement, including stepping, turning, swinging, and potentially moving outside the camera’s ideal view. In my learning log, I noted that camera tracking was a poor fit because the application involves fast, jerky sports movements.
✅ Strengths: The biggest strength is convenience: the player does not need to wear trackers. It is also cheap and easy to experiment with.
⚠️ Weaknesses: The major weakness is occlusion and limited tracking volume. If the body turns sideways, moves too fast, leaves the camera view, or blocks its own limbs, tracking quality can degrade. For a sports application, this made it unreliable compared to wearable trackers.
✅ Problem Solved
![]()
After comparing the available technologies, I recommended HaritoraX2 as the best practical solution for SportsImproVR.
It was not the most accurate solution overall — Lighthouse would win on raw precision — but it had the best balance for our project:
- It was much cheaper than a full Lighthouse setup.
- It did not require external base stations.
- It was more production-ready than experimental EMF tracking.
- It avoided the occlusion problems of Kinect-style camera tracking.
- It provided a complete software pipeline through Shiftall VR Manager.
- It could send skeleton data through OSC, which I could receive and use inside Unity.
This research directly changed the direction of the project. Instead of continuing with XSens and fighting a hardware limitation that could not realistically be solved, I convinced the stakeholders to move to HaritoraX2 and then built the Unity tracking pipeline around OSC data from those trackers.
⚙️ Challenge 2: Recreating VR-Chat’s Full-Body Tracking Solution
❓ What was the Problem?
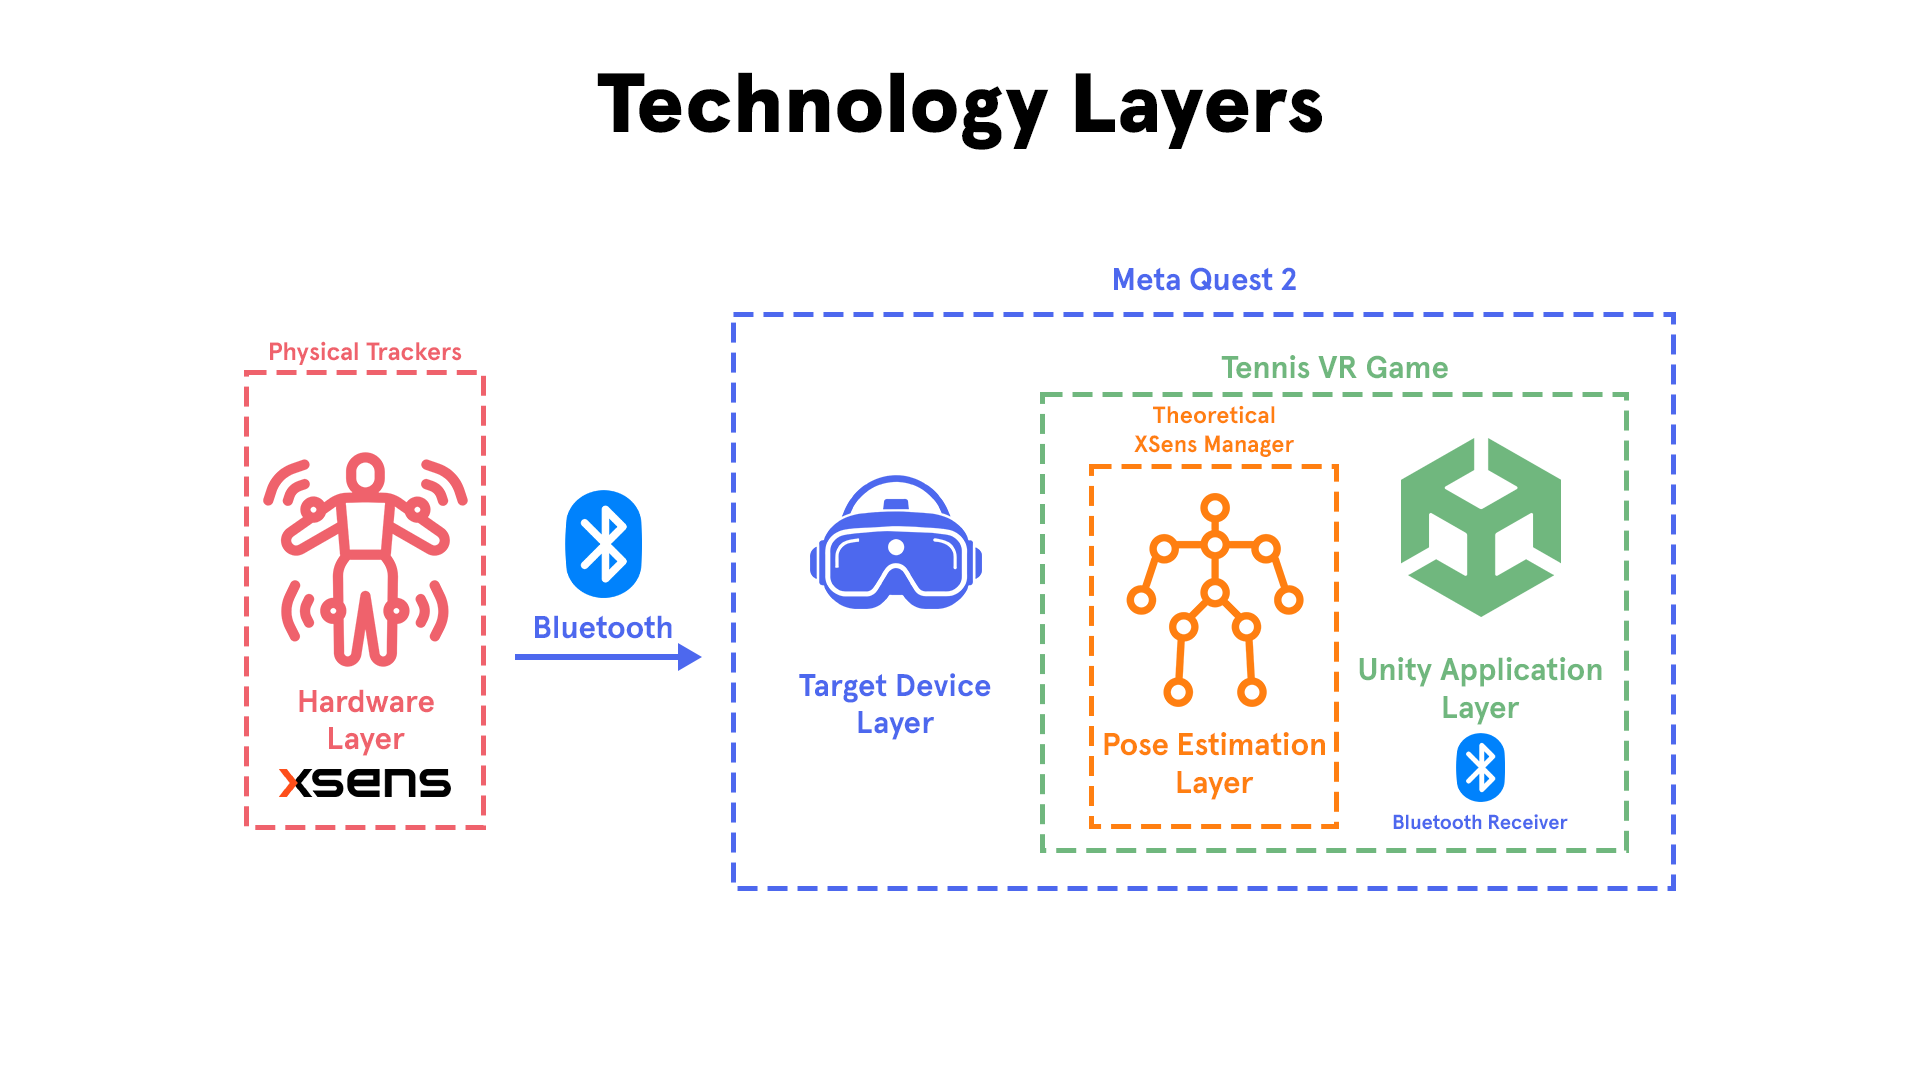
After choosing HaritoraX2 as the tracking hardware, I still had a major technical challenge: how do I actually get the tracker data into my own Unity application?
The trackers themselves were only one part of the solution. HaritoraX2 already worked with VR-Chat, but SportsImproVR did not need VR-Chat — we needed the same type of full-body tracking inside our own standalone Unity VR application.
That meant I had to reverse-engineer the general pipeline:
- Where does the tracker data come from?
- What device processes it?
- How is the data transmitted?
- What protocol does VR-Chat use?
- How can I receive that same data in Unity?
- How do I apply it to an actual character?
At this stage, I was not trying to invent a completely new full-body tracking system from scratch. Instead, my goal was to understand the working VR-Chat solution and recreate the useful parts of it inside our own Unity project.
This was difficult because the system involved several layers at once: Bluetooth trackers, a phone application, Wi-Fi networking, OSC messages, Android permissions, Meta Quest build settings, Unity packages, tracker coordinate data, and eventually inverse kinematics.
💡 Solution. How Did I Approach the Problem?
The first thing I did was test HaritoraX2 with VR-Chat.
Before building anything myself, I wanted to prove that the trackers, phone, headset and OSC pipeline were actually capable of working together. This was an important sanity check. If the trackers did not work properly in VR-Chat, then the problem would likely be hardware, calibration or tracker software. If they did work in VR-Chat, then I knew the concept was valid and the remaining task was to recreate the receiving side in Unity.
The test was successful: HaritoraX2 worked in VR-Chat and produced responsive full-body movement. This gave me a working reference point.
From there, I broke down how VR-Chat receives full-body tracking data.
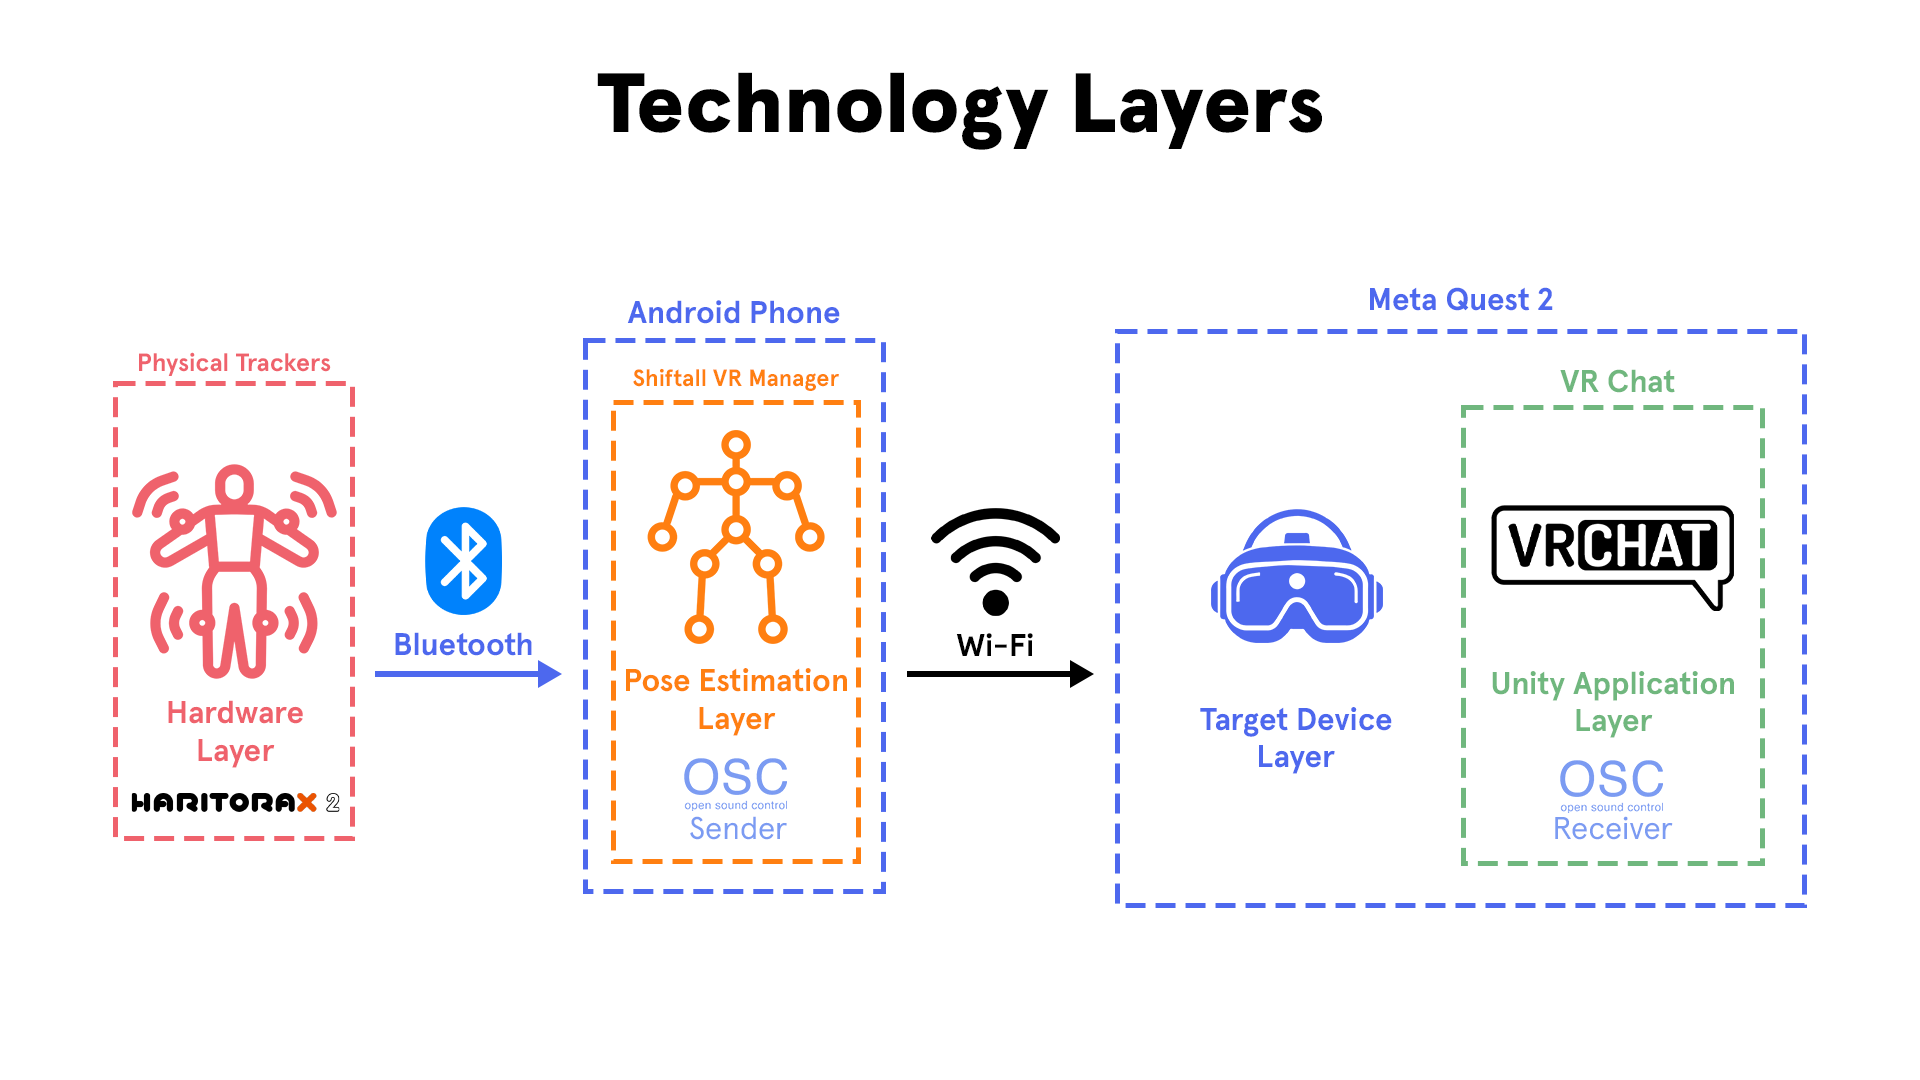
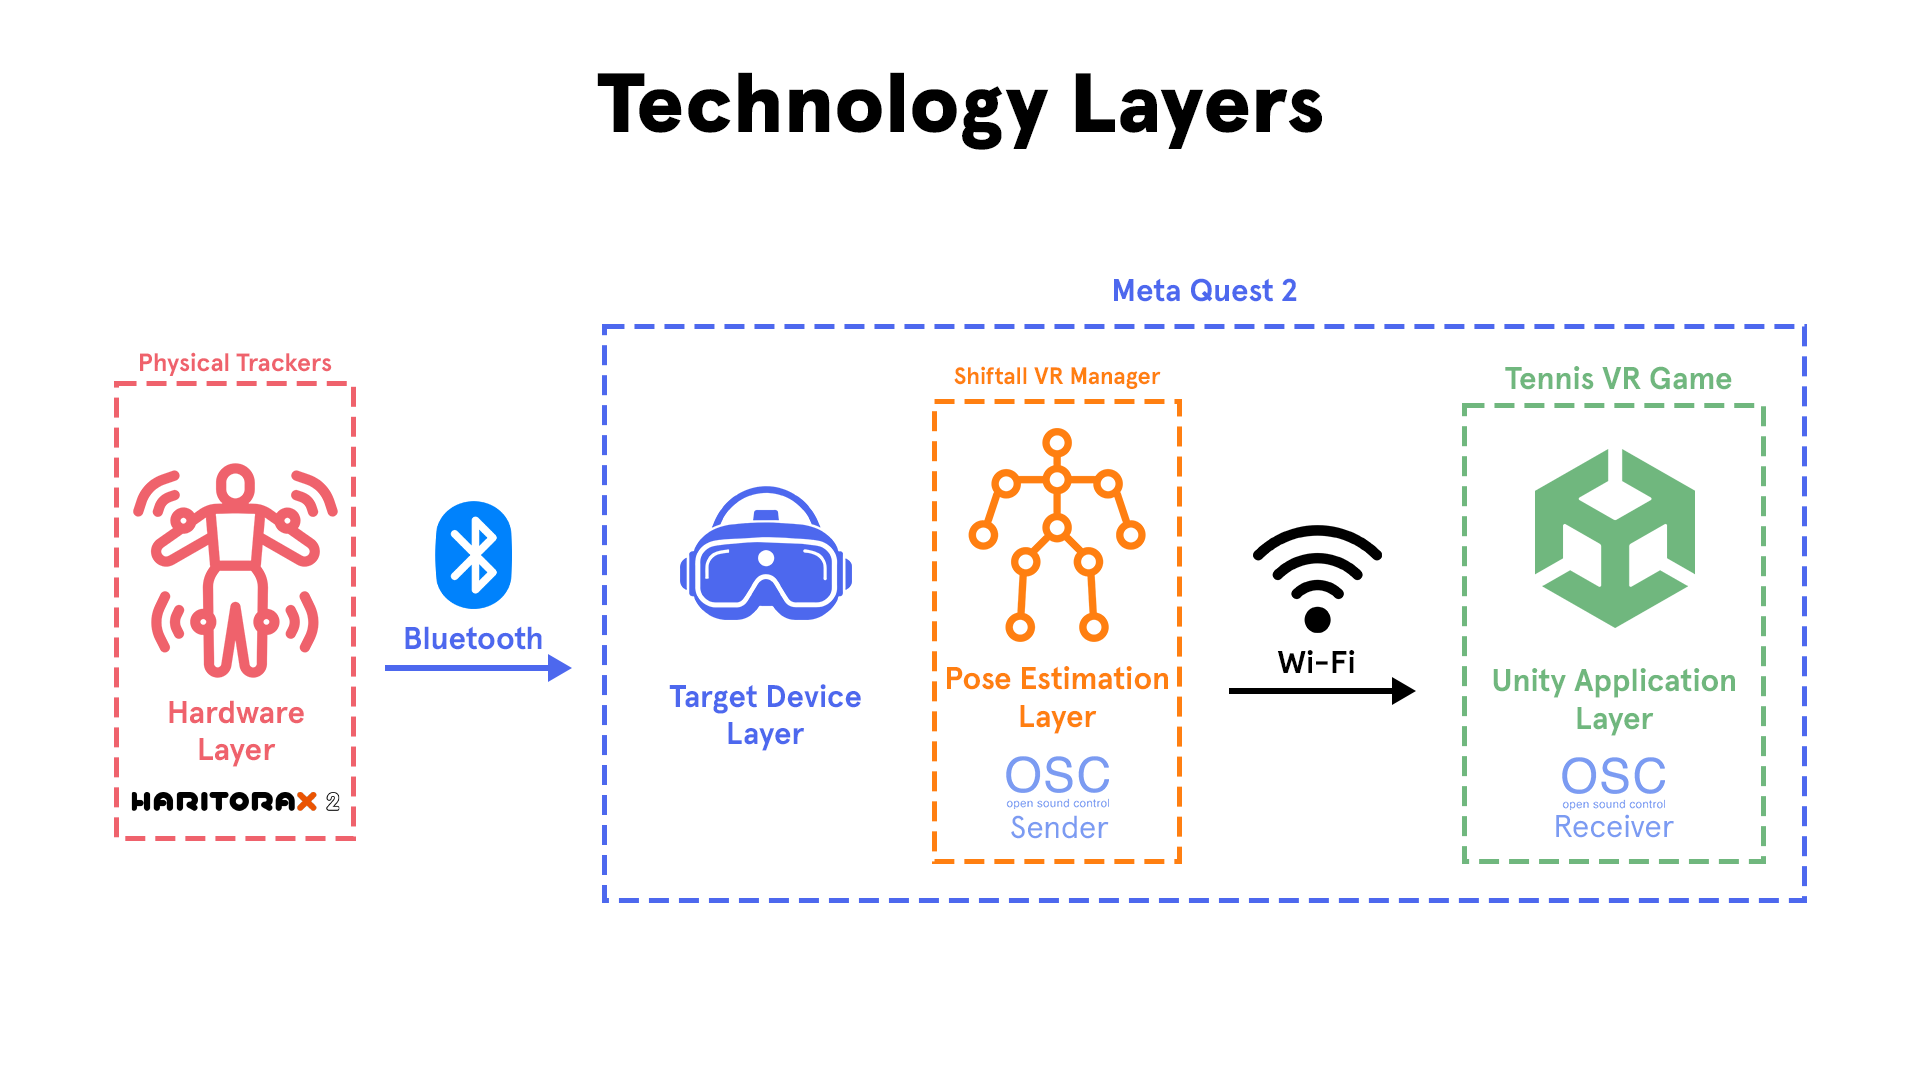
The pipeline works roughly like this:
- The HaritoraX2 trackers connect to a smartphone using Bluetooth.
- The smartphone runs Shiftall VR Manager.
- Shiftall VR Manager receives the raw tracker data and estimates a body pose.
- The phone sends the final tracking data over Wi-Fi using OSC.
- VR-Chat, running on the headset, receives those OSC messages.
- VR-Chat applies the received tracker positions and rotations to the player avatar.
The important realization here was that VR-Chat was not directly solving every part of the tracking problem itself. A lot of the difficult work — Bluetooth connection, raw tracker interpretation, pose estimation, calibration and skeleton output — was already handled by Shiftall VR Manager.
That changed the scope of my own work. I did not need to write a full Bluetooth tracker driver. I did not need to process raw IMU data myself. I did not need to solve the skeleton estimation problem from scratch.
What I needed to build was the missing link on the Unity side: an OSC receiver that could listen for the same kind of tracking data VR-Chat receives.
At first, I wanted to simplify the pipeline by removing the smartphone entirely.
Since the Meta Quest is internally an Android-based device, my idea was to install Shiftall VR Manager directly onto the headset. If that worked well, the setup would become much cleaner:
- Trackers connect directly to the headset.
- Shiftall VR Manager runs on the headset.
- The Unity application runs on the headset.
- No smartphone is needed as a middle-man.
Using APK installation, I managed to install Shiftall VR Manager onto the Quest. This proved that the idea was technically possible. However, after testing, the performance was not good enough. The VR Manager lagged heavily when running directly on the headset, especially together with VR-Chat. The tracker data arrived too slowly and the tracking responsiveness suffered.
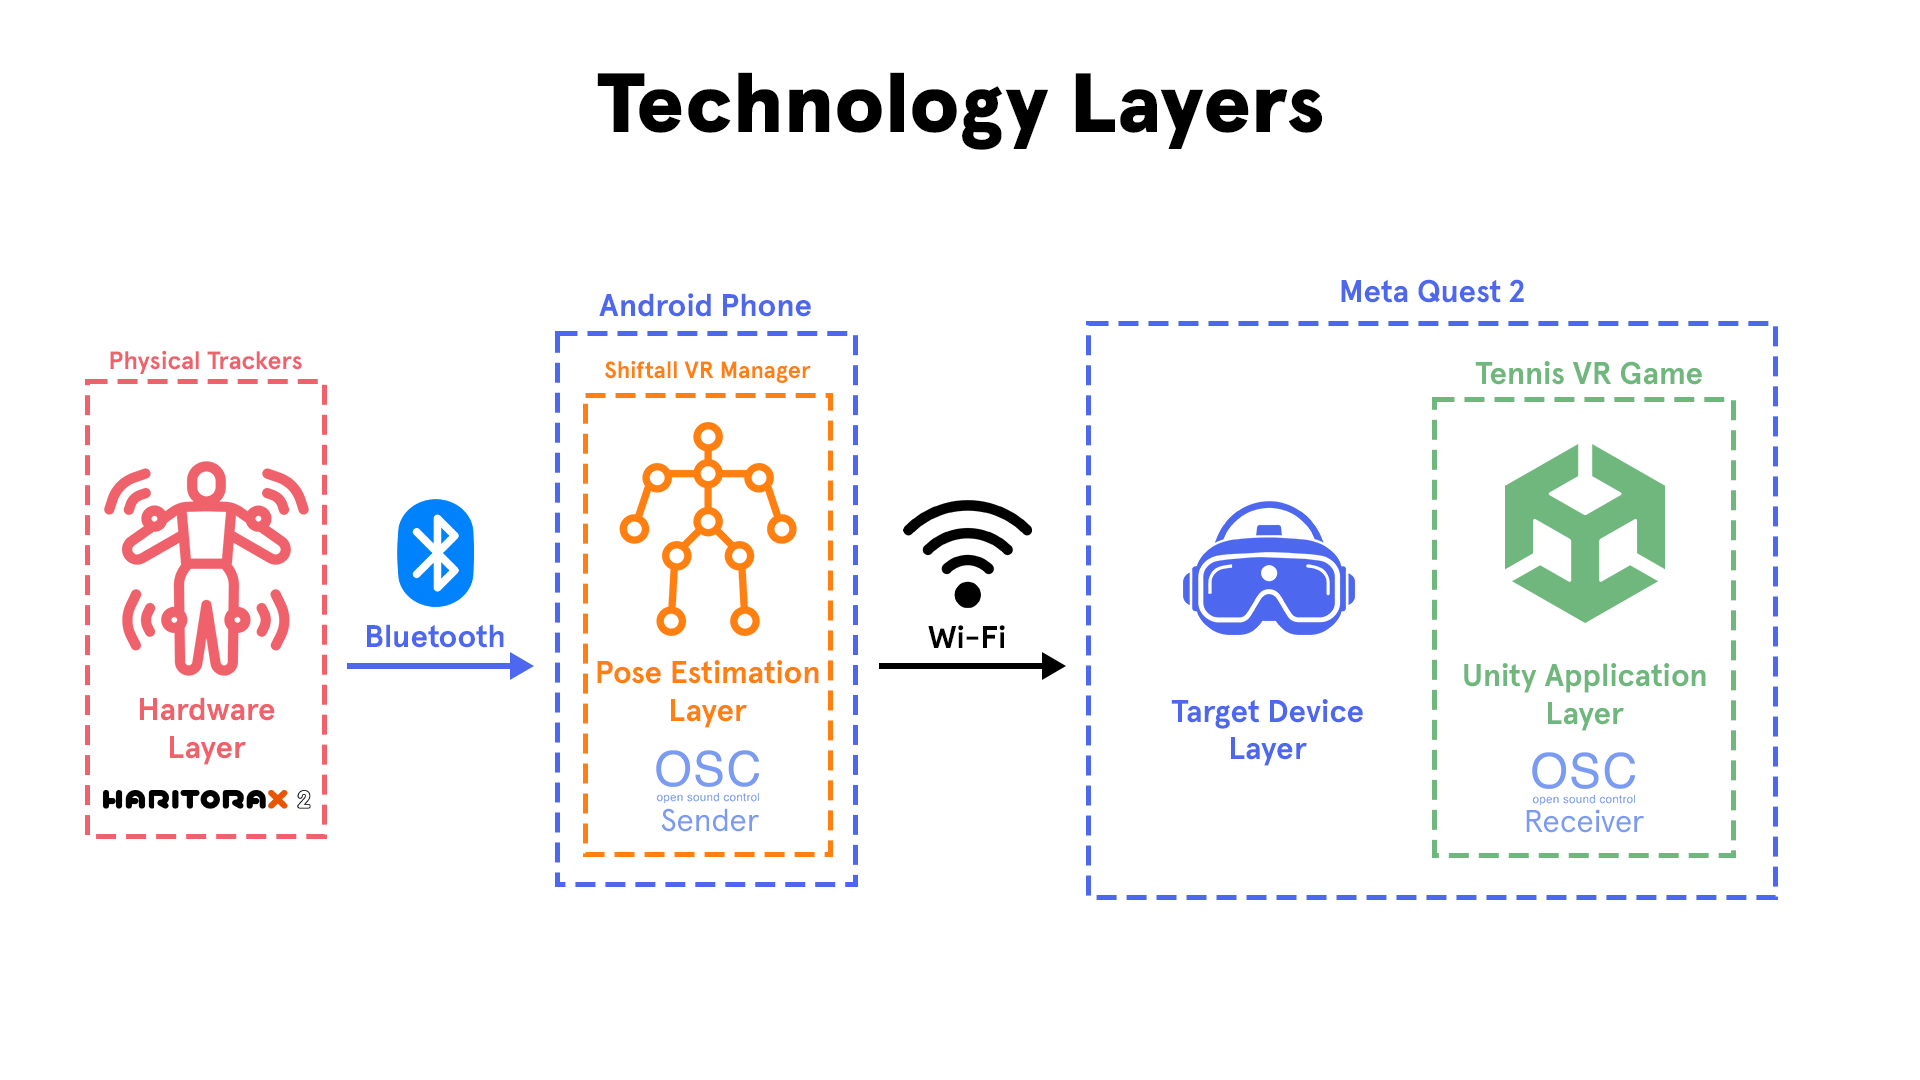
Because of that, I had to accept the more realistic setup: using the smartphone as the tracking processor.
This was not my ideal solution, but it was the correct engineering decision. The phone handled Shiftall VR Manager better, the tracking was more responsive, and it matched the pipeline HaritoraX2 was designed around.
That meant the final system became:
- Haritora trackers capture the user’s body movement.
- Shiftall VR Manager on the smartphone processes the tracker data.
- The phone sends tracking data over OSC.
- My Unity application receives that data on the Meta Quest.
- Unity applies the tracking targets to the in-game body.
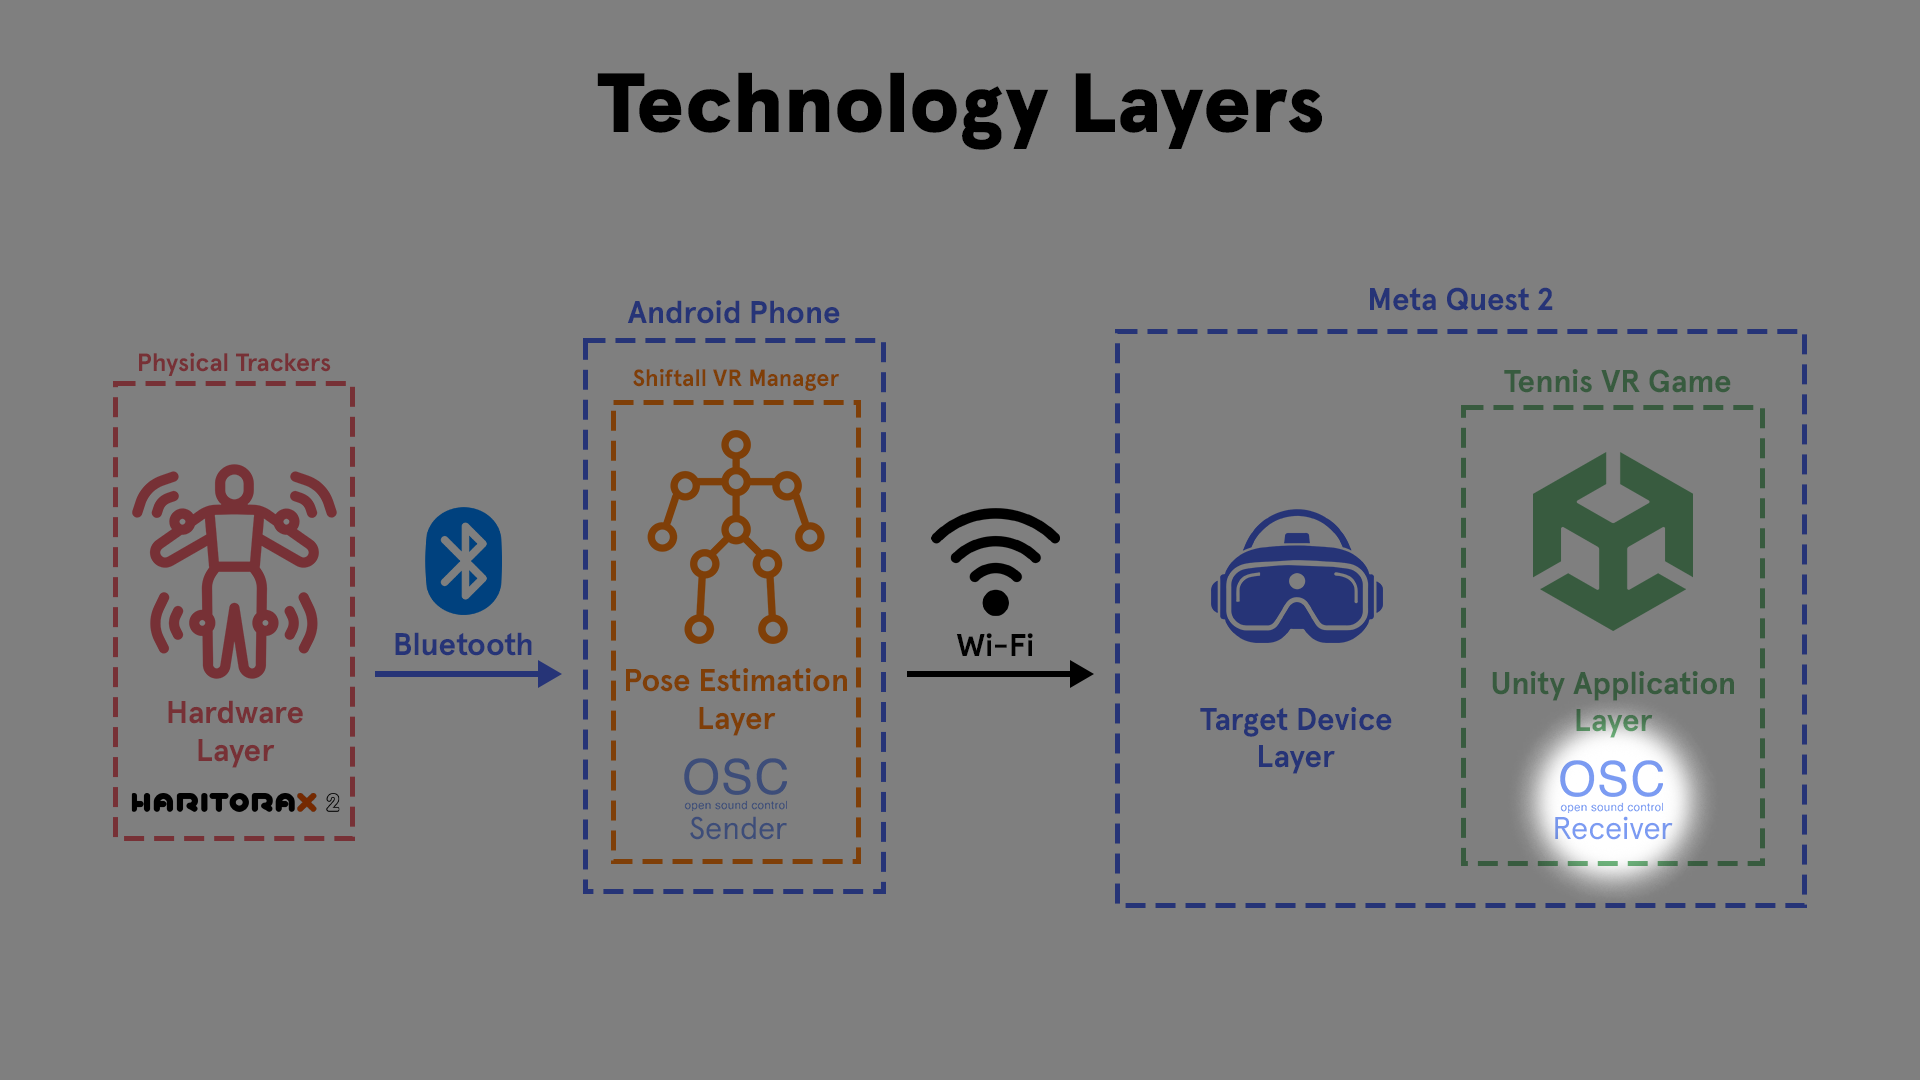
At this point, I had everything except the Unity-side receiver.
So the core of my work became:
Build an OSC Receiver.
This receiver needed to listen for incoming OSC messages over the network, read the incoming values, identify which body part each message belonged to, and apply the received position/rotation data to objects in Unity.
Step 1: Debugging OSC in Isolation
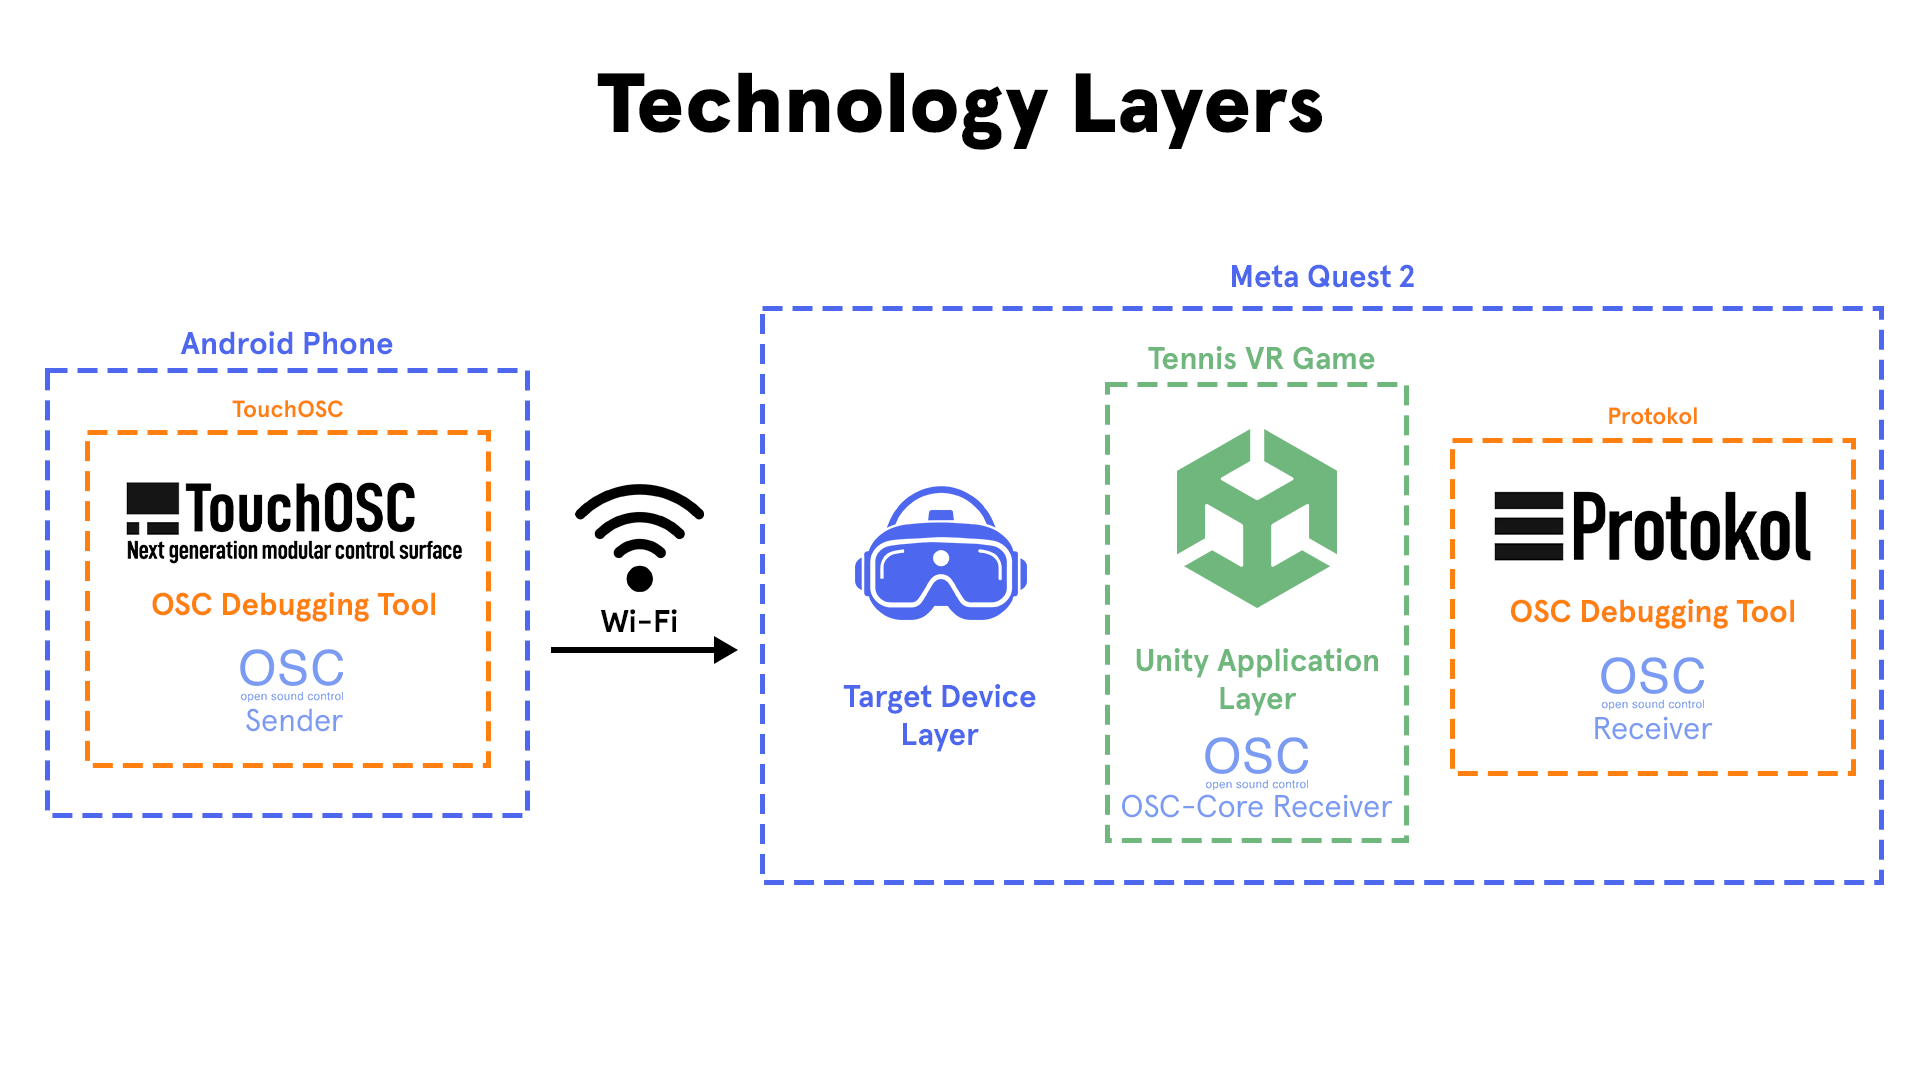
Before connecting the real trackers, I first wanted to prove that OSC worked at all.
For this, I used TouchOSC and Protokol. TouchOSC allowed me to manually send OSC messages from my phone, and Protokol allowed me to inspect OSC traffic on the network. This gave me a controlled way to test the communication layer without also having to worry about tracker calibration or body mapping.
This was useful because it separated the problem into smaller pieces. Instead of debugging “full-body tracking” as one giant system, I first debugged only the question:
Can my Unity application receive a single OSC value from another device?
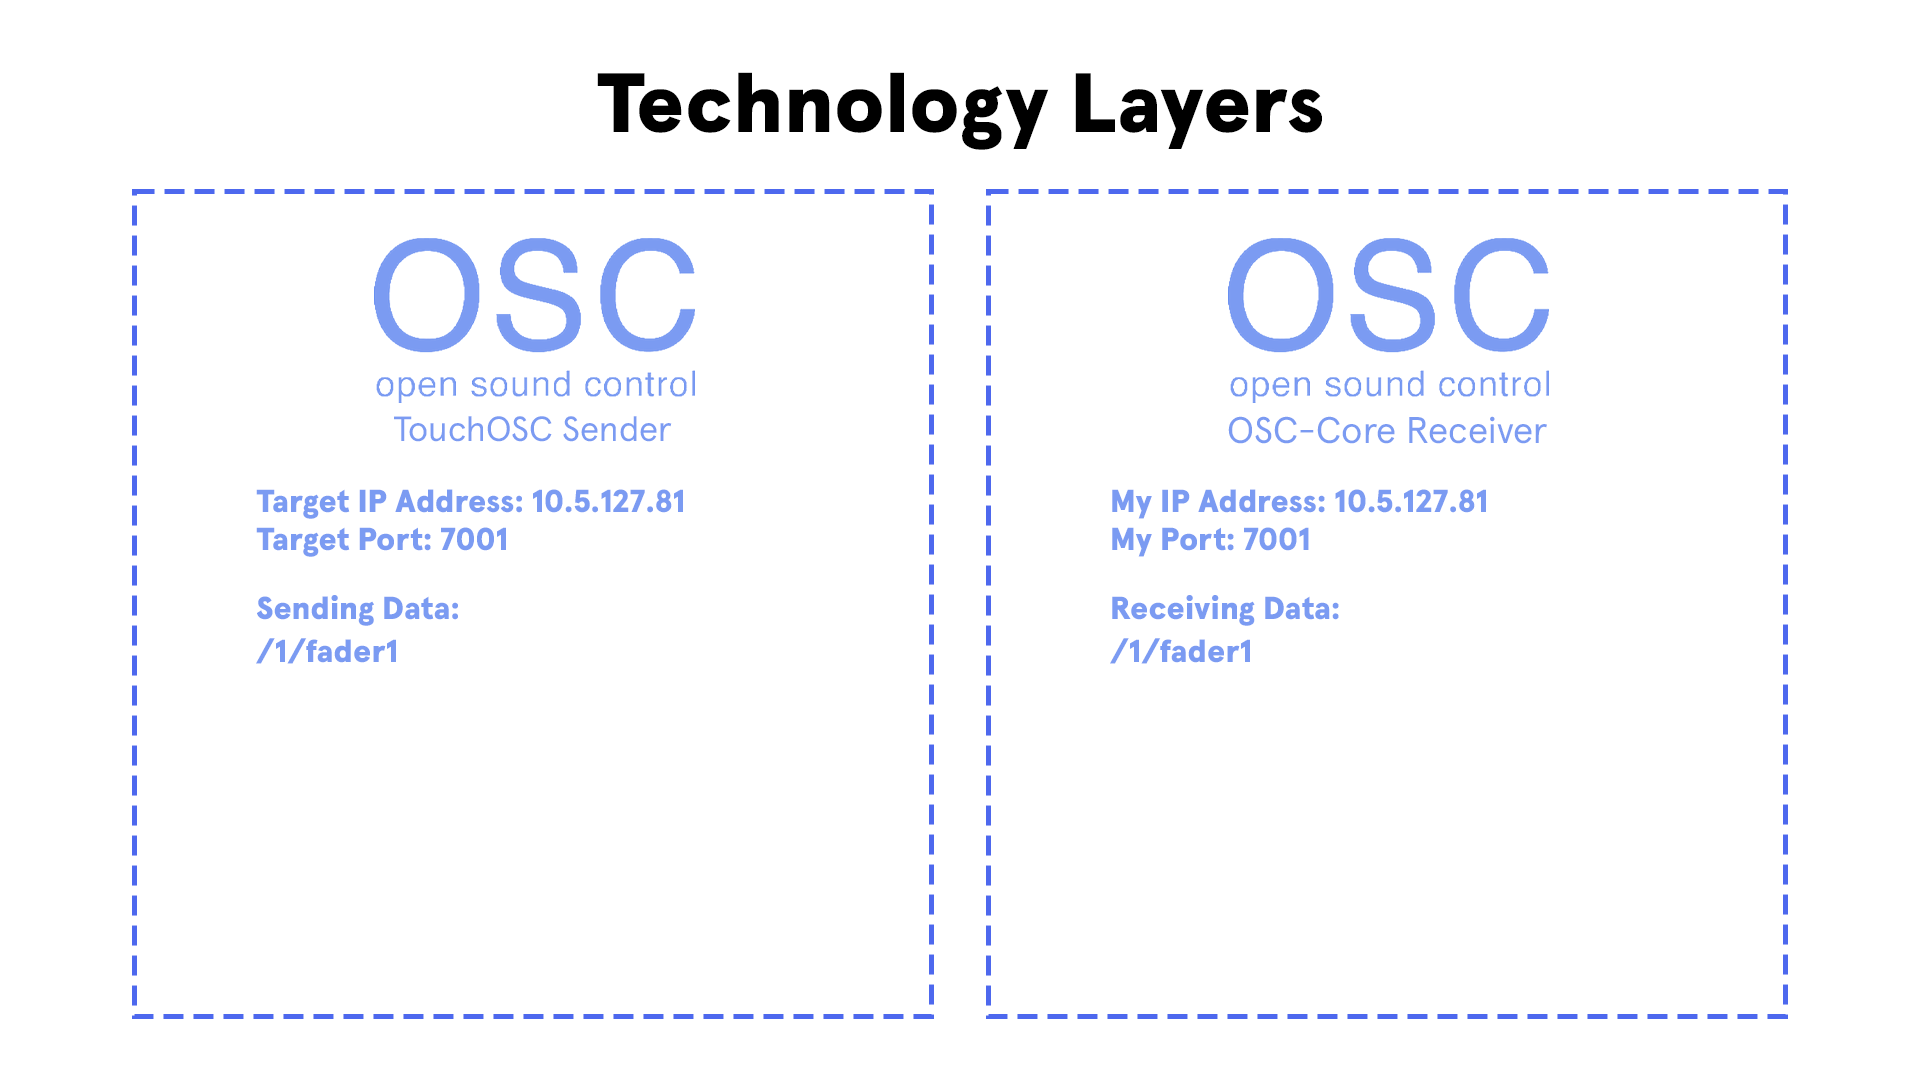
In the first test, TouchOSC sent a simple float value to a target IP address and port. My Unity OSC receiver listened on that port and received the float.
This was the smallest possible proof of communication: one sender, one receiver, one value.
I then applied that float value to a cube in Unity. Moving the slider in TouchOSC made the cube move up and down.
This was a small test, but it was an important milestone. It proved that:
- The phone and headset could communicate over the network.
- Unity could receive OSC messages.
- The OSC values could be converted into visible in-game behavior.
- My receiver was not just logging data — it could drive objects in the scene.
Step 2: Fixing Quest Networking and Android Permissions
One of the biggest hidden problems was that receiving OSC on Meta Quest was not just a Unity problem. It was also an Android permissions problem.
At one point, OSC appeared to do nothing. There were no useful incoming messages, which made it look like the network setup, OSC library, or tracker pipeline was broken. After testing further, I discovered a SocketException: Access denied error.
The issue was that the Unity Android build did not have the correct internet/network permissions.
To fix this, I had to generate a custom AndroidManifest.xml and add the required permissions:
<uses-permission android:name="android.permission.INTERNET" />
<uses-permission android:name="android.permission.ACCESS_NETWORK_STATE" />
I also had to make sure the Meta XR / OpenXR build settings were not removing internet permissions during the build. This was one of those problems where the solution was simple in code, but hard to discover because the failure looked like a completely different issue.
This step taught me an important lesson: on standalone VR hardware, networking bugs are not always inside the networking code. Sometimes the operating system or build pipeline silently blocks the application before your code even gets a chance to work.
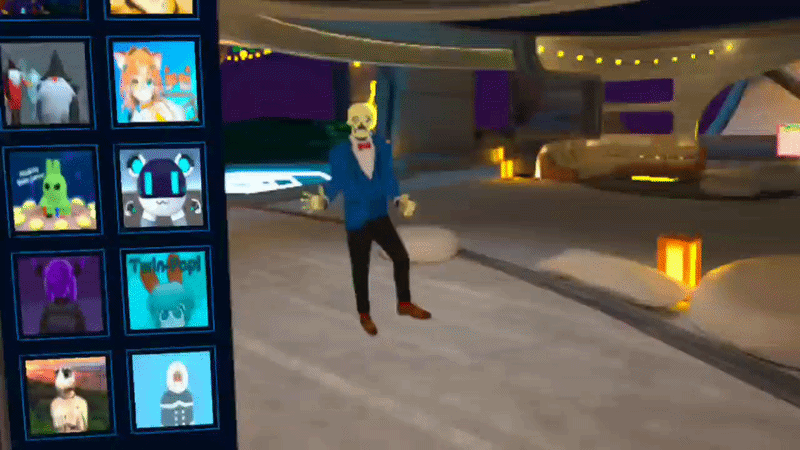
Step 3: Recreating VR-Chat’s Tracker Address Mapping
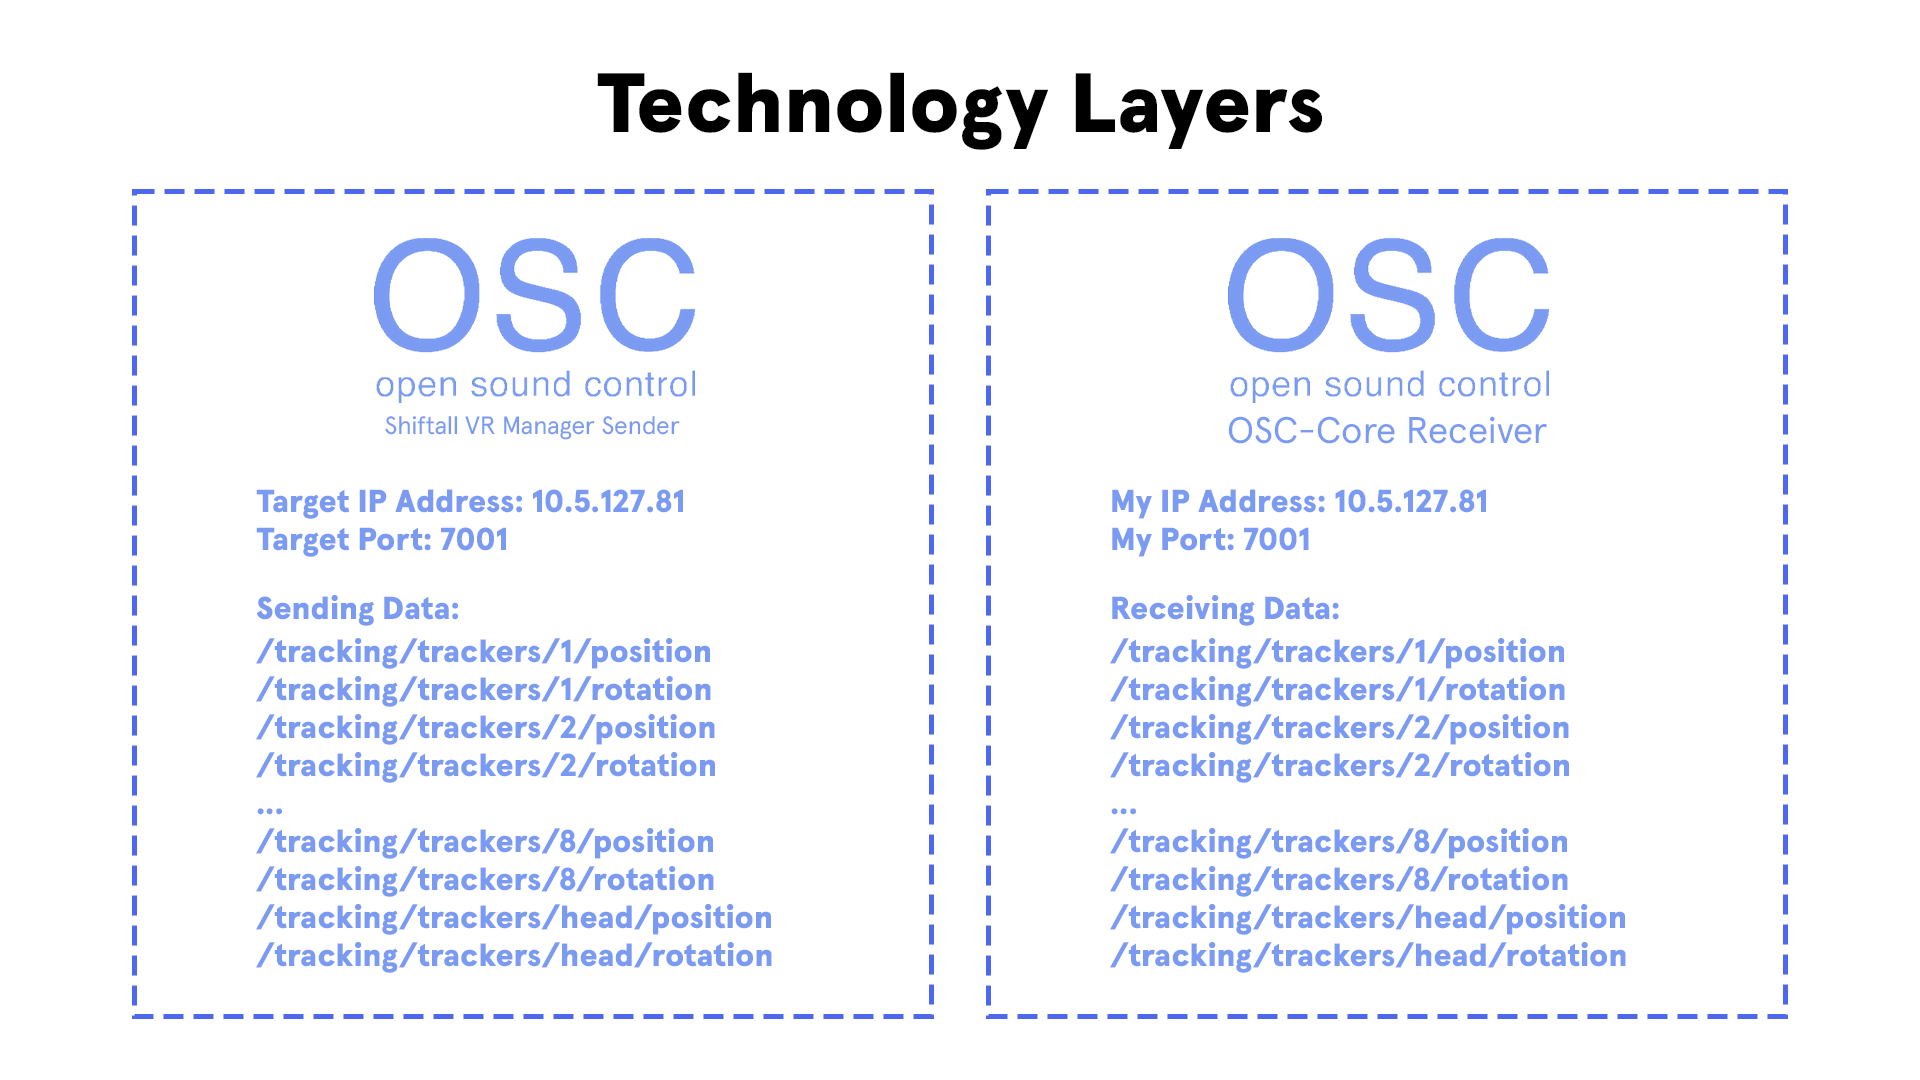
Once the basic OSC connection worked, I moved from a single test float to actual tracker-style data.
I used the same idea as VR-Chat: each tracker sends data through specific OSC addresses. Instead of treating the OSC stream as random values, I mapped incoming addresses to specific tracker targets, such as the waist, legs and feet.
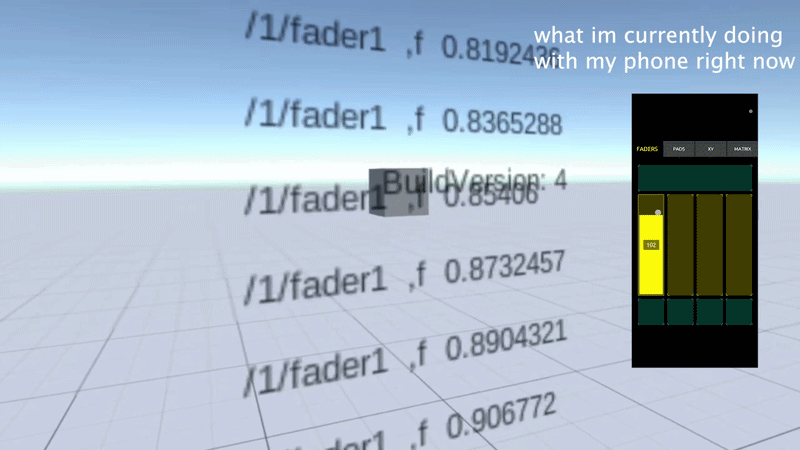
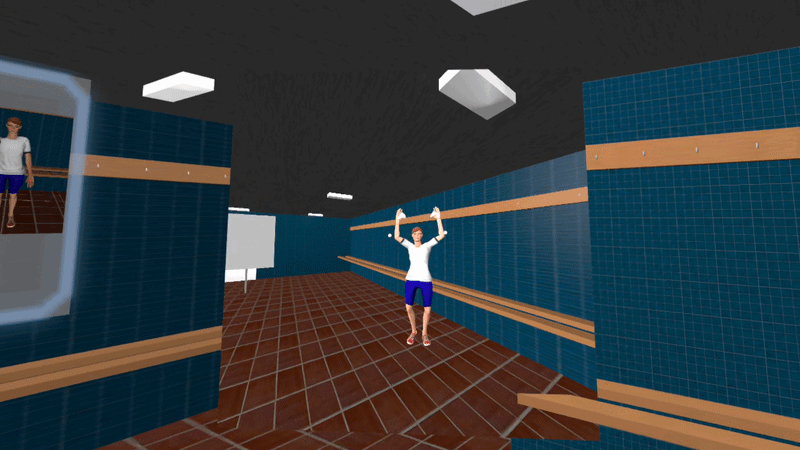
At this stage, I represented the body using cubes.
This “dancing cube man” was a deliberately simple debug visualization. I did not want to immediately connect the data to a humanoid character because that would introduce more complexity: bones, retargeting, IK, avatar proportions and animation constraints.
The cube man let me answer the most important question first:
Is the received tracker data moving correctly in Unity?
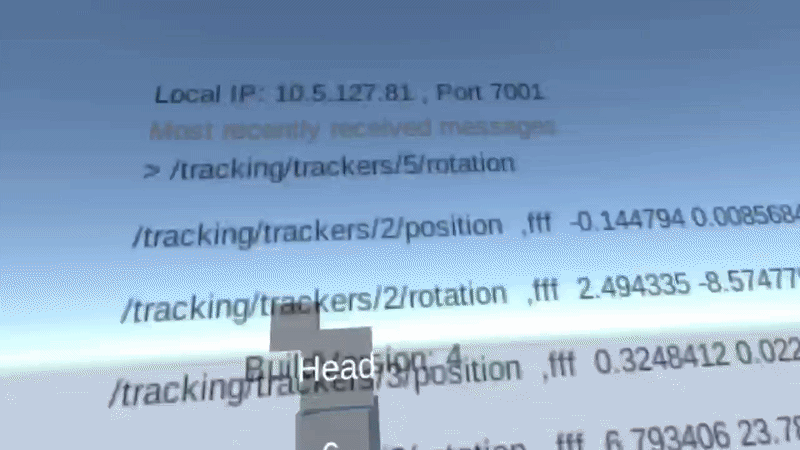
The result was a set of cubes that followed my real-life body movement. When I moved my legs, the cube legs moved in Unity.
This confirmed that the OSC connection was secured and that the tracker data was being received and interpreted correctly.
At this point, the system had successfully recreated the communication side of VR-Chat’s full-body tracking pipeline.
Step 4: Applying the Tracking Data to a Character
After the tracker data was working on simple cubes, I moved to the next stage: applying it to a character.
The challenge here is that tracker data is not the same thing as a finished character pose. A tracker can tell me where a foot, knee or waist target is, but a humanoid character still needs a believable body pose between those points. That is where inverse kinematics becomes necessary.
I used Unity’s IK tools to start connecting the received tracker targets to the character. Instead of manually rotating every bone, the tracker targets became goals for the IK system. The IK system then solved how the character’s limbs should bend to reach those targets.
This resulted in a working full-body character setup where the player’s lower-body movement could be represented inside the Unity application.
Later, I also experimented with Final IK to improve the final body mapping and make the character pose behave more naturally.
✅ Problem Solved
By the end of this challenge, I had recreated the essential parts of VR-Chat’s full-body tracking pipeline inside my own Unity project.
The final pipeline was:
- HaritoraX2 trackers captured the player’s real movement.
- Shiftall VR Manager processed the tracker data on a smartphone.
- The smartphone sent position and rotation data over OSC.
- My Unity OSC receiver listened for the incoming tracker messages.
- The received data was mapped to tracker targets in the Unity scene.
- The tracker targets were applied to a character using IK.
- The character followed the player’s real lower-body movement in VR.
The important result was that full-body tracking was no longer only working in VR-Chat. I had proven that the same idea could be recreated in a custom Unity application for SportsImproVR.
This turned the project from a hardware experiment into an actual working Unity pipeline.
📉 Cost / Limitations / Tradeoffs
The biggest tradeoff was that I could not remove the smartphone from the pipeline.
My ideal solution was to run Shiftall VR Manager directly on the Meta Quest, but in practice the performance was too poor. Using a phone as the middle-man made the setup less elegant, but it was more stable and responsive.
Another limitation was network dependency. Because OSC messages are sent over Wi-Fi, the phone and headset need to be on the same network and able to communicate with each other. On restricted networks, such as Eduroam, this can fail because devices may be blocked from talking to each other directly. This means the system may require a less restricted network or a dedicated setup for reliable use.
There was also additional setup complexity. The user needs to connect the trackers, run Shiftall VR Manager, configure OSC, make sure the headset is reachable, and calibrate the body correctly. For a developer test, this is acceptable. For a polished training product, this setup would need to be simplified or hidden behind a more user-friendly interface.
On the Unity side, the IK solution also has limitations. Tracker data gives important target points, but the final avatar pose still depends on calibration, avatar proportions, IK settings, and how well the tracker positions match the character skeleton. This means the result can work well, but it still needs tuning before it becomes production-ready for accurate sports analysis.
Even with these limitations, the solution was a success because it proved the complete technical path: real body trackers can drive a Unity character in a standalone VR sports-training application using the same OSC-based idea as VR-Chat.
💥 Impact of Contribution
Before my contribution, full-body tracking was still an unresolved research problem for SportsImproVR.
The company wanted to know whether external body trackers could be used for high-precision baseball and tennis training in VR, but the original XSens direction was uncertain. I had proven that trackers could be detected and connected, but XSens was not suitable as the final solution because its position tracking suffered from drift and was not intended for this use case. This meant that the project had a hardware problem, a pipeline problem, and an implementation problem at the same time.
My contribution changed the project from “we do not know if this is technically possible” into “we have a working Unity full-body tracking pipeline.”
The first major impact was on the project direction. Instead of continuing with XSens and trying to solve a hardware limitation that could not realistically be solved in software, I researched alternative tracking systems and recommended HaritoraX2. This gave the project a more practical route because HaritoraX2 already provided Shiftall VR Manager, which handled tracker connection, pose estimation, and OSC output. That reduced the amount of low-level tracker work we had to build ourselves.
The second major impact was technical. I recreated the core idea behind VR-Chat’s full-body tracking pipeline inside Unity. I built an OSC-based receiver, debugged the connection with TouchOSC and Protokol, mapped incoming tracker data to in-game objects, and eventually connected that data to a character through IK. This turned the tracker data into visible full-body movement inside the Unity project.
Before this, SportsImproVR’s VR application could mainly rely on headset and controller tracking. This meant the player’s lower body was either missing, estimated, or not useful for detailed sports training. After my work, the project had a path for receiving real lower-body movement from physical trackers and applying it to a virtual character.
This made several things possible that were not possible before:
- The player’s leg movement could be represented inside the VR training application.
- The project no longer depended on raw XSens data or unreliable positional estimation.
- Tracker data could be received through a reusable OSC pipeline instead of a custom Bluetooth driver.
- Full-body tracking could be tested using simple debug objects before being applied to a full character.
- The system could be extended toward tennis-specific movement analysis, such as foot placement, split-step balance, and player positioning.
The most important transformation was that full-body tracking stopped being a vague hardware experiment and became a real product feature candidate. The work created a foundation that SportsImproVR could continue building on for VR tennis training, movement feedback, and future performance analysis.
📚 What I Learned
The biggest thing I learned is that a tracking system is not just “read tracker data and move a character.” It is a full pipeline made of smaller systems:
- hardware,
- calibration,
- pose estimation,
- data transport,
- data parsing,
- coordinate mapping,
- IK,
- avatar behaviour,
- product constraints.
At the beginning, I was focused on making the trackers work directly. Over time, I learned to think more like a systems engineer. The important question was not only “can I get data from the tracker?”, but “where should each responsibility live in the pipeline?”
That mental model changed the project. Instead of trying to solve Bluetooth communication, raw IMU interpretation, pose estimation, and Unity integration all by myself, I realized that Shiftall VR Manager could own the difficult tracker-processing part. My Unity application only needed to receive the already-processed pose data through OSC and apply it correctly. That was a much better engineering decision because it reduced complexity and made the system more realistic to finish
I also learned the value of testing a system in layers.
Instead of immediately connecting the trackers to a full humanoid character, I first tested OSC with a single float value. Then I applied that value to a cube. Then I mapped tracker data to a “dancing cube man.” Only after that did I move toward IK and a real character. This made the project easier to debug because every step proved one specific part of the pipeline.
A very practical lesson was that VR development on standalone Android hardware has hidden constraints. When OSC did not work, the issue was not only my Unity code. It involved Android permissions, socket access, manifest configuration, and Meta Quest build settings. I learned that on standalone VR, networking problems can come from the operating system or build pipeline before the game code even receives anything.
I also learned to treat hardware choice as an engineering decision, not just a purchasing decision. XSens, HaritoraX2, SlimeVR, Lighthouse and camera tracking all have different tradeoffs. The “best” tracker is not automatically the most accurate one. For this project, the best tracker was the one that balanced price, setup complexity, tracking quality, OSC support, and whether it could realistically fit into SportsImproVR’s product.
Next time, I would validate the complete pipeline earlier. I would start with the smallest end-to-end test as soon as possible: one sender, one receiver, one value, one moving object. I would also check Android permissions, network restrictions, and headset performance earlier, because those constraints affected the solution just as much as the Unity code.
Most importantly, I learned that recreating an existing system like VR-Chat’s full-body tracking does not mean blindly copying it. It means understanding why the system is structured that way, identifying which parts are useful for your own product, and adapting the pipeline to your own constraints.
🎥 Video-to-FBX Converter Tool

The Video-to-FBX Converter Tool is a custom Unity editor tool that automates the process of converting video footage into FBX motion data directly from inside Unity.
The tool lets the user select one or multiple videos from the file system, send them to MoveAI for processing, track each conversion with progress feedback, and automatically import the generated FBX files back into the Unity project.
My goal was to turn a slow manual workflow into a simple one-click Unity workflow.
This tool was made for SportsImproVR’s programmers and content creators, who needed an easier way to generate motion data for VR sports training.
Before, the workflow required manually opening the MoveAI website, uploading a video, waiting for the conversion, downloading the generated files, cleaning up unnecessary temporary files, and then importing the FBX into Unity. This was slow, repetitive, blocked the developer’s workflow, and became especially painful when converting multiple videos.
Now, users can select videos, start conversion, continue working while the process runs in the background, and receive clean FBX output directly inside Unity. The tool supports multiple videos, parallel conversion, progress bars, status messages, and automatic file handling, making the workflow faster, clearer, and much easier to manage.
Challenge 1: Integrating MoveAI Into Unity
❓ What was the Problem?
SportsImproVR’s existing motion-capture workflow was manual and repetitive.
Before the tool, the senior programmer had to leave Unity, open the MoveAI website, upload a video, wait for the processing to finish, download the generated FBX file, and then manually import it back into the Unity project.
This meant the workflow looked like this:
- Record or receive a sports video.
- Open MoveAI in the browser.
- Upload the video manually.
- Wait for the conversion.
- Download the result.
- Find the correct FBX file.
- Import it into Unity.
- Clean up unnecessary temporary files.
This was especially inefficient because the final destination of the file was Unity anyway. The user was constantly switching between the browser, file explorer and Unity just to generate one animation file.
The goal was to reduce this into a much simpler workflow:
Select video inside Unity → click convert → receive FBX inside the project.
🧩 Why Was it Hard? What Struggles Did I Face?
The main difficulty was that MoveAI was not a Unity package. It was an external service with its own API, and that API was most easily accessed through Python.
This meant I had to connect several things that do not normally talk to each other directly:
- Unity editor tooling
- C# editor scripts
- an external Python script
- the MoveAI API
- local video files
- downloaded FBX output
- Unity’s asset pipeline
At the start, I did not know whether running Python from Unity would even be reliable enough for a production workflow. I first had to prove that Unity could launch a Python process, pass data into it, and receive useful output back.
I also had to think carefully about ownership. Should Unity handle the entire conversion process? Should Python handle everything? Should Unity only be the interface? If all logic lived in Unity, API integration would be more difficult. If everything lived in Python, the tool would be harder to use from the Unity editor.
💡 Solution. How Did I Approach the Problem?
I approached this by splitting the tool into two responsibilities:
- Unity owns the user workflow.
- Python owns the MoveAI API communication.
Unity became the front-end of the tool. It handled the editor window, video selection, output folder selection, validation, progress display and final import into the project.
Python became the back-end conversion layer. It handled communication with MoveAI, uploading the video, waiting for the result, downloading the output and returning the generated FBX.
The first prototype was intentionally small. Instead of immediately connecting to MoveAI, I created a test Python script that simply wrote a Hello World text file into the Unity project. This proved that Unity could run a Python script and generate files as output.
Once that worked, I replaced the test script with the real MoveAI conversion script.
A simplified version of the architecture looked like this:
// Simplified structure of how Unity launches the conversion script
ProcessStartInfo startInfo = new ProcessStartInfo
{
    FileName = pythonExecutablePath,
    Arguments = $"\"{scriptPath}\" \"{videoPath}\" \"{outputFolder}\"",
    UseShellExecute = false,
    RedirectStandardOutput = true,
    RedirectStandardError = true,
    CreateNoWindow = true
};

Process process = Process.Start(startInfo);
Explanation:
Unity does not need to understand every detail of the MoveAI API. It only needs to know:
- which video the user selected,
- where the output should go,
- when the process starts,
- what status the process is in,
- and when the FBX is ready.
This kept the Unity tool focused on workflow and usability, while the Python script handled the external API.
That decision made the system easier to reason about. Unity was not overloaded with web API logic, and Python was not responsible for the user interface.
✅ Problem Solved
The tool successfully converted video footage into FBX motion data from inside Unity.
Instead of using the MoveAI website manually, the user could select a video in the Unity editor, click a button, wait for the conversion, and receive the FBX output directly in the project.
This transformed the workflow from a manual browser-based process into a Unity-native tool.
📉 Cost / Limitations / Tradeoffs
The main tradeoff was that the tool depended on an external Python environment and the MoveAI API. This meant the tool was not completely self-contained inside Unity.
The tool also depended on MoveAI’s processing time and pricing. For example, one 31-second 1080x1920 video at 60 FPS took around 15 minutes to process and cost around $0.52. The tool improved the workflow around the conversion, but it could not remove the external processing cost or waiting time.
Another limitation is that process launching can be fragile if paths, Python versions or API keys are configured incorrectly. This meant the UI needed clear validation and error feedback so the user could understand what was missing.
Challenge 2: Keeping Unity Responsive During Long Conversions
❓ What was the Problem?
The first working version of the tool could convert a video, but the conversion process took a long time.
One test conversion took around 15 minutes. During that time, the Unity editor could become blocked if the conversion was executed too directly from the main editor thread.
This was a serious usability problem.
If the senior programmer wanted to convert several videos, Unity could become unusable for a long period of time. That meant the tool technically worked, but it still interrupted the developer’s normal workflow.
A tool that saves time should not also freeze the editor for 15 minutes.
🧩 Why Was it Hard? What Struggles Did I Face?
The difficult part was that Unity editor tools often run on the main thread. This is fine for small editor actions, but not for long-running external processes.
The conversion was not a quick calculation. It involved uploading a video, waiting for MoveAI to process it, checking the job status, downloading the result, and importing the FBX.
If this entire process ran synchronously, Unity would be stuck waiting.
I also had to think about feedback. If the conversion runs in the background, the user still needs to know what is happening. Otherwise, the tool feels broken. A silent background process is almost as bad as a frozen editor because the user has no reassurance that the conversion is still alive.
💡 Solution. How Did I Approach the Problem?
The solution was to move conversions into background tasks.
Instead of making the editor wait for the conversion to finish, the tool creates a conversion job and lets that job run separately from the main editor workflow.
A simplified version of the idea looked like this:
public class ConversionJob
{
    public string VideoPath;
    public string OutputFolder;
    public float Progress;
    public string Status;
    public bool IsCompleted;
    public bool HasError;
}
Each video became its own job object. The editor window displayed the current state of each job, while the actual conversion work happened in the background.
// Simplified idea: start conversion without blocking the editor UI
Task.Run(() =>
{
    RunMoveAIConversion(job);
});
Explanation:
This structure separated the tool into two parts:
- the background task, which performs the slow conversion work;
- the editor UI, which displays the current status of that work.
This meant Unity could remain usable while the conversion continued.
I also added per-task feedback, such as:
- current status,
- progress bar,
- last checked time,
- number of status checks,
- success or failure result.
This was important because long-running tools need to communicate. The user should never have to guess whether a tool is frozen, waiting, uploading, downloading or finished.
✅ Problem Solved
The conversion no longer blocked regular Unity editor work.
Users could start a conversion and continue using the editor while the task ran in the background. The tool also gave visible feedback for each conversion, so the user could see what was happening instead of staring at a frozen editor.
This made the tool feel much closer to a real production tool instead of a technical prototype.
📉 Cost / Limitations / Tradeoffs
The tradeoff was that background tasks made the tool more complex.
A synchronous tool is easier to write because everything happens in order. A background tool requires job state, progress tracking, error handling and UI updates.
Another limitation is that Unity APIs are generally not safe to call freely from background threads. This meant the tool had to be careful about what happened in the background and what happened back in the editor context.
The tool became more scalable and user-friendly, but the internal architecture became more complicated.
Challenge 3: Supporting Multiple Videos and Parallel Conversion
❓ What was the Problem?
After the first version worked for one video, the next problem was scale.
In a real production workflow, the user may need to convert several videos, not just one. If every video is converted sequentially, the waiting time grows quickly.
For example, if one conversion takes around 5 minutes and the user has 3 videos, sequential processing would take around 15 minutes. This is inefficient, especially when each conversion is mostly waiting for an external service.
The tool needed to support multiple videos and convert them in parallel.
🧩 Why Was it Hard? What Struggles Did I Face?
The first idea was to make the Python side handle parallel conversion. However, this was not the best approach.
If Python handled everything as one large batch process, Unity would have less control over each individual video. It would be harder to show separate progress bars, separate statuses and separate errors.
For example, if one video failed and two succeeded, the user should be able to see that clearly. If everything is hidden inside one Python process, the feedback becomes unclear.
The challenge was not only “how do I make it faster?” but also:
How do I make parallel conversion understandable to the user?
💡 Solution. How Did I Approach the Problem?
I decided that parallelism should be managed from Unity, not hidden inside Python.
Each selected video became its own conversion task.
This meant Unity could display every conversion separately:
foreach (string videoPath in selectedVideos)
{
    ConversionJob job = new ConversionJob
    {
        VideoPath = videoPath,
        Status = "Waiting",
        Progress = 0.0f
    };

    conversionJobs.Add(job);
    StartConversionJob(job);
}
Explanation:
This made every video independent.
Each job could have its own:
- input video,
- output path,
- status,
- progress,
- result,
- error message.
The benefit of this design was that one video did not hide the state of another. The user could see which videos were still processing, which were finished, and which failed.
This also made parallel conversion easier to reason about. Instead of one huge batch process, the tool managed a list of smaller jobs.
The result was a system where multiple videos could be converted at the same time using Unity’s task system.
✅ Problem Solved
The tool could convert multiple videos in parallel.
This changed the time cost significantly. Instead of converting 3 videos one after another in around 15 minutes, the tool could convert them in parallel in around 5 minutes, depending on MoveAI processing and external limits.
This was not just a performance improvement. It also improved the user experience because every video had its own visible status and progress.
The tool became much more practical for real production use.
📉 Cost / Limitations / Tradeoffs
Parallel conversion increases complexity.
The tool now had to manage multiple jobs at the same time, which introduced more possible failure cases:
- one job may fail while others succeed,
- multiple downloads may finish at similar times,
- progress needs to update independently,
- external API limits may affect how many conversions can run at once.
There is also a practical limit to how many conversions should run in parallel. Running too many at once could make the tool harder to manage, hit API limitations, or create too much network/file-system activity.
Because of that, a future version should include a configurable maximum number of parallel jobs.
Challenge 4: Making the Tool Usable for a Real Production Workflow
❓ What was the Problem?
The first version of the tool proved that conversion worked, but it still needed to behave like a real production tool.
My supervisor gave several important pieces of feedback:
- videos should be selectable from the file system, not only from Unity assets;
- the original video should not be overwritten;
- unnecessary files should not clutter the project;
- only the final FBX output should remain;
- the editor should not freeze;
- multiple conversions should run in parallel.
This feedback revealed that the technical prototype was not enough. The tool had to fit the way the team actually worked.
🧩 Why Was it Hard? What Struggles Did I Face?
This was difficult because usability problems are not always obvious when you are focused on making the core feature work.
From a programmer’s perspective, the first milestone was simple: “Can I convert a video to FBX?”
From a user’s perspective, the real question was different:
Can I use this tool repeatedly without it wasting my time, cluttering my files or interrupting my work?
That required thinking beyond the core algorithm. I had to consider file selection, validation, warnings, icons, layout, output folders, temporary files and error states.
This was my first professional tool, so I had to learn that production tools are not only judged by whether they work. They are judged by how safely, clearly and comfortably they fit into the user’s workflow.
💡 Solution. How Did I Approach the Problem?
I improved the tool interface and file handling based on the feedback.
The tool was updated so users could select videos directly from the file system instead of needing to copy them into the Unity project first. This removed an unnecessary step and avoided filling the project with source video files that were no longer needed after conversion.
I also improved the UI so it communicated missing requirements clearly.
For example, the tool could show warnings when:
- no API key was provided,
- no videos were selected,
- no output folder was selected,
- or a conversion was already running.
The interface was also changed to support multiple selected videos. Instead of a single input field, selected videos appeared as a list. When many videos were selected, the UI could scroll instead of becoming unusable.
The main actions were placed at the top of the window, making the workflow clearer:
- select videos,
- select output folder,
- start conversion,
- monitor progress,
- receive FBX output.
This made the tool easier to understand at a glance.
✅ Problem Solved
The tool became much more user-friendly and production-ready.
Users no longer had to copy videos into Unity before converting them. They could select files directly, see what was missing, start conversions from a clear interface, and track the status of each video.
The tool also reduced clutter by focusing on the final FBX output instead of leaving unnecessary temporary files around.
The result was not just a working converter, but a workflow tool that was easier and safer to use repeatedly.
📉 Cost / Limitations / Tradeoffs
Improving usability required more editor code.
A simple prototype could have been much smaller, but a production-oriented tool needed UI state, validation, feedback boxes, file selection logic, lists, icons and layout decisions.
Another limitation is that custom editor UI needs maintenance. If the workflow changes, the UI must also be updated. However, this was worth it because the improved usability directly affected how useful the tool was to the team.
💥 Impact of Contribution
Before my contribution, converting a video into motion data was a manual, multi-step workflow. The user had to leave Unity, open MoveAI in a browser, upload the video, wait for the conversion, download the generated FBX, clean up unnecessary files, and then manually import the result back into Unity.
After my contribution, the conversion process could be started directly from Unity.
The tool turned MoveAI from a separate external website into part of the Unity workflow. Instead of moving between MoveAI, the browser, the file system, and Unity, the user could select videos, start conversion, monitor progress, and receive the final FBX output from one editor window.
The tool also improved the workflow beyond just convenience. Conversions could run in the background, so the Unity editor was no longer blocked during long processing times. This meant the user could continue working while the conversion was happening.
The biggest improvement came from parallel conversion. Before, multiple videos had to be converted one after another. If three videos each took around five minutes, the full process could take around fifteen minutes. After implementing parallel conversion, those same videos could be processed at the same time, reducing the waiting time to around five minutes, depending on MoveAI processing and external limits.
The tool also gave the user clearer feedback. Each video had its own task state, progress bar, status message, and result. This made the process easier to trust because the user could see what was happening instead of guessing whether the tool was frozen, uploading, waiting, downloading, or finished.
Overall, the contribution transformed a slow and repetitive production task into a Unity-integrated internal tool. It removed manual friction, reduced waiting time, supported batch work, and made the workflow clearer, faster, and more practical for real use.
📚 What I Learned
The biggest thing I learned is that a good tool does not always need to solve the entire technical problem by itself. Sometimes the best tool is a bridge between existing systems.
In this case, MoveAI already solved the difficult motion-capture problem. My job was to make that power accessible from the team’s actual working environment: Unity. That changed how I thought about tool development. I was not trying to replace MoveAI; I was trying to remove the friction between MoveAI and the Unity project.
I also learned the value of proving the riskiest part of a system with the smallest possible prototype. Before attempting the full MoveAI integration, I first tested whether Unity could run a simple Python script and generate an output file. That small test proved the foundation of the tool before I committed to building the full workflow.
Another important lesson was that editor tools need to respect the user’s time. A tool can technically work and still be frustrating if it freezes the editor, gives no feedback, or forces the user to wait without knowing what is happening. This is why background processing, task status, and progress feedback became just as important as the conversion itself.
I also learned to think about long-running operations as jobs, not simple button clicks. Once I started treating each video conversion as a job, the structure became much clearer. Each job had an input video, output path, current status, progress value, result, and possible error state. This made the tool easier to expand into multiple videos and parallel conversion.
Parallelism also taught me that speed is not the only concern. A naive implementation could simply start multiple processes at once, but that would not automatically make the tool understandable. Parallel systems need clear state. Each task needs to communicate what it is doing, otherwise the tool becomes faster but more confusing.
Finally, I learned that user feedback can reveal problems that are invisible in a technical prototype. My first goal was simply to make video-to-FBX conversion work. But after feedback, I realized that the tool also needed file-system selection, warnings, clean output handling, background tasks, parallel conversion, and a clearer interface. Those details are what moved the tool from a prototype into something closer to a real internal production tool.
🔄 Future Improvements
Future improvements could include:
- automatic Python environment detection,
- clearer installation instructions,
- built-in API key management,
- drag-and-drop video selection,
- saved presets for output folders,
- automatic cleanup settings,
- better error reporting when MoveAI fails,
- detailed conversion logs,
- automatic retry logic for failed conversions,
- cancellation support per conversion job,
- pause and resume support,
- a persistent job history,
- a configurable limit for maximum parallel conversions,
- automatic queueing for extra videos,
- estimated time remaining per task,
- and a cleaner separation between Unity UI code and the conversion service logic.
The biggest architectural improvement would be to make the system more modular. The Unity editor window should only be responsible for displaying the interface and user feedback, while the conversion logic, job management, Python execution, MoveAI communication, and file handling should each be separated into their own systems.
That would make the tool easier to maintain, easier to debug, and easier to expand if the company later wanted to support more file formats, different motion-capture services, or a more advanced production pipeline.
👤 Zhangir After the Project
By the end of the internship, I had gone from having no VR experience to building real Unity tools and XR prototypes for SportsImproVR.
I created my first professional Unity tools, including the Video-to-FBX converter, and later worked on a full-body tracking solution for VR tennis training. I researched tracking hardware, tested different technical pipelines, worked with Meta Quest, Android builds, Bluetooth LE, OSC networking, tracker calibration, Unity IK, and Final IK.
The original goal was to investigate whether full-body tracking could work for SportsImproVR’s VR training applications. I achieved that goal. I did not just research the topic theoretically; I built a working pipeline that received tracker data, mapped it into Unity, and used it to drive a character.
What I am most proud of is that I managed to turn a very unfamiliar and uncertain problem into something concrete. At the start, I did not know how VR-Chat’s full-body tracking worked, how Haritora trackers sent data, how OSC communication worked on Quest, or how to connect that data to a Unity character. Step by step, I broke the problem down until it became understandable and solvable.
This project changed how I think as an engineer.
Before, I mostly thought about programming as implementing features. After this project, I started thinking more in terms of systems and pipelines. I learned to ask: where should each responsibility live? What should be handled by hardware? What should be handled by external software? What should Unity receive? What should my code actually own?
That mindset helped me make better decisions. Instead of trying to solve raw tracker processing myself, I identified that Shiftall VR Manager could handle pose estimation, while my Unity project only needed to receive and apply the OSC data. That was a more realistic, maintainable and production-focused solution.
This project also proved to me that I can handle unfamiliar technology under real-world conditions. I had to learn fast, test constantly, debug across multiple devices, deal with hardware limitations, and communicate my findings clearly enough for the company to make decisions.
The biggest transformation is that I started as a student who had only made tools in university, and ended as someone who had built professional Unity tools, researched XR hardware, and developed a working VR full-body tracking prototype.
This project shows that I am not only able to write code, but also able to investigate unclear technical problems, compare solutions, make engineering tradeoffs, and build practical tools that move a project forward.