Deliverables
- (Week 1) Particle system that uses EnTT to handle entities; Fixed and dynamic timestep loop
- (Week 2) GUI in the form of the editor, hierarchy and inspector.
- (Week 3) Serialization / Deserialization for entities and its components using the
cereallibrary. - (Week 4) Resource Manager that can load and unload resources, it keeps track of:
xsr::mesh_handle,xsr::texture_handle,tinygltf::Model - (Week 5) Tile Map Editor
Engine.cpp [Week 1]
Purpose
The engine class owns the game loop. It provides a single place that advances time, updates systems, and renders frames consistently.
The engine class serves as the head for other systems and simulation control: Systems can access other systems through the engine class.
The engine class is responsible for the lifecycle of the engine. It initializes and shuts down core services in a specific order.
Implementation
The engine class contains the main game loop which has an important order of execution. The execution is repeated indefinitely in a while loop until the user closes the application.
First, we compute delta time for a dynamic time-step loop
Everything in this frame (simulation, animation, particle updates) uses the same dt, avoiding drift/inconsistencies.
We calculate the elapsed time since the last frame (delta time) so that our game can be executed at the same speed regardless of FPS.
auto current = clock::now();
std::chrono::duration<float> frameTime = current - previous;
float dt = frameTime.count();
Then, we compute the logic.
We capture a coherent input snapshot for this frame before game logic runs, so systems read a stable “this frame’s” input state.
After this, we run all of the simulation logic in the subsystems using the fresh input snapshot and the current dt.
Deferred Deletion [🟢 Evidence for “Good”]
We use deferred deletion: systems mark entities for removal during update; we actually destroy them after all systems finish to avoid invalid iterators/references mid update.
m_input->Update();
m_ECS->UpdateSystems(dt);
m_ECS->RemovedDeleted();
After this, we begin our rendering phase.
We begin our frame by setting up the render target. Everything drawn between Begin/End belongs to this frame.
Then we renders the world from the simulation state we just computed. By rendering after update you guarantee visuals match the latest state.
Then we render the inspector UI after world rendering so gizmos & panels appear on top.
We finalize and finish our frame and complete our render.
// Rendering phase
m_device->BeginFrame();
m_ECS->RenderSystems();
m_inspector->Inspect(dt);
m_device->EndFrame();
After rendering, we update the device to present our final render to the screen.
m_device->Update();
This concludes the main game loop.
Relation to Other Systems
The engine class serves as the head for other systems. All systems can access the engine and use its API to access relevant systems.
// Using the engine, you can access relevant systems.
Engine.ECS().GetSystem<SomeSystem>();
Engine.Serializer().LoadScene(directory, path);
Engine.Inspector().SetVisible(false);
ParticleSystem.cpp [Week 1]
Purpose
- Configurable particle effects (confetti/sparks/fire) that are easy to spawn, tune, and debug in-editor.
- Deterministic simulation under a fixed time step (so behavior isn’t frame-rate dependent), with an option to run dynamically.
- Clean ECS integration: particles are just entities with components; emitters describe behavior, systems do the work.
- Real-time tooling: debug visuals (cone volumes, velocity arrows) and inspector controls so designers can iterate quickly.
Below is a short video demo of a few particle types: Confetti, Sparks, and Fire. These particle types can be loaded in the engine.
Implementation
In the engine, particles are represented as a simple struct with a reference to its emitter.
// Each particle points to its emitter entity, so it can read shared settings.
struct Particle { entt::entity emitterEntity{}; };
And the emitter describes how particles should behave in the simulation. They contain many settings and variables: colors, shape, speed, lifetime, and much more.
// Emitter describes how particles are created and evolve.
struct ParticleEmitter {
    enum COLOR_MODE { GRADIENT, SINGLE, RANDOM };
    enum PARTICLE_SHAPE { Cube, Cylinder, Sphere };

    int   m_emissionRate   = 1;     // spawns per second
    int   m_poolSize       = 100;   // soft cap
    int   m_currentPoolCount = 0;

    PARTICLE_SHAPE m_particleShape = PARTICLE_SHAPE::Cube;
    COLOR_MODE     m_colorMode     = COLOR_MODE::GRADIENT;
    glm::vec4      m_startColor{1,0,0,1}, m_endColor{1,1,1,1};

    float m_minInitialMagnitude = 0.0f, m_maxInitialMagnitude = 1.0f;
    float m_minParticleMass = 0.1f,     m_maxParticleMass     = 1.0f;
    float m_gravity         = 9.8f;

    float m_minLifeTime = 0.1f, m_maxLifeTime = 1.0f;
    // … other knobs as needed
};
The ParticleSystem class by default updates in a dynamic time-step (due to the main game loop updating in dynamic time-step), but it has an option to update in a fixed time-step.
The fixed time-step works in the following way:
- Accumulate leftover time: Each frame, you add the real elapsed time (dt) into the accumulator.
- Process as many fixed steps as possible: While there’s at least one full m_fixedDt chunk available, run the simulation once with that exact step.
- Subtract and keep remainder: After simulating, subtract the fixed steps from the accumulator.
m_accumulator += dt;
while (m_accumulator >= m_fixedDt)
{
    //... Updates
    m_accumulator -= m_fixedDt;
}
As a result, over time, the simulation always advances in equal, deterministic chunks (m_fixedDt).
The ParticleSystem has the responsibilities to update 4 functions:
- Particle and emitter lifetimes
- Spawning particles from emitters
- Particle colors over time
- Particle physics
Lifetime
The lifetime is updated very straightforwardly.
Particles have a Lifetime component which has the total lifespan and the lifetime passed as a percentage.
struct LifeTime
{
    float m_timeAsPercentage{};
    float m_lifeSpan{};
};
We keep the lifetime as a percentage as it allows us to calculate the current delta time as a percentage of the total lifespan and add it to our lifetime passed percentage, as below.
const float totalLifeSpan = lifetime.m_lifeSpan;
const float dtAsPercentageOfLifeSpan = dt / totalLifeSpan;

lifetime.m_timeAsPercentage += dtAsPercentageOfLifeSpan;
This allows us to easily check if the particle has exceeded its lifetime by simply checking if the percentage is more than one.
After this, we delete the particle and using the reference to its particle emitter we subtract from its pool count.
if (lifetime.m_timeAsPercentage > 1.0f)
{
    if (auto* emitter = ecs.Registry.try_get<ParticleEmitter>(particle.emitterEntity))
    {
        emitter->m_currentPoolCount--;
    }
    ecs.DeleteEntity(e);
    continue;
}
Spawning Particles
To spawn particles, emitters have a ConeShape component which allows us to define the location and velocity of spawning particles.
The radius helps us define the circular area in which particles spawn.
The angle helps us define the angle at which the particles will shoot out.
struct ConeShape
{
    float m_angle = 30.0f;
    float m_radius = 1.0f;
};`
To spawn a particle in the circle:
- Create a
Transformfor the particle. - Calculate a random point on a circle with a emitter radius
- Set the particle
Transformto the emitter’s position + the random point
auto& transform = ecs.CreateComponent<Transform>(particleEntity);

transform.SetTranslation(RandomPointOnCircle(coneShape.m_radius) + emitterTransform.GetTranslation());
To spawn a particle with a random velocity (direction and magnitude) in a set cone angle:
- Create a
Bodyfor the particle - Calculate a random direction in the emitter cone
- Apply the direction to the particle
Bodywith the set magnitude
auto& body = Engine.ECS().CreateComponent<Body>(particleEntity);

glm::vec3 direction = RandomDirectionInCone(UP * emitterTransform.GetRotation(), coneShape.m_angle);

float magnitude = GetRandomNumber(emitter.m_minInitialMagnitude, emitter.m_maxInitialMagnitude);

body.m_velocity = direction * magnitude;
Particle Colors
For the particle colors, we use the XSR’s tint variable which is linearly interpolated based on the start/end color and the lifetime passed.
model.Tint = lerp(emitter->m_startColor, emitter->m_endColor, lifetime.m_timeAsPercentage);
For any other color mode that is not gradient, the linear interpolation is skipped.
if (emitter->m_colorMode != ParticleEmitter::COLOR_MODE::GRADIENT) continue;
Particle Physics
Particle physics are quite basic.
Particles have a Body component which simply contains the mass and velocity of the particle.
struct Body
{
    float m_mass{};
    glm::vec3 m_velocity{glm::vec3(0.0f)};
};
We then simply translate the particle by the velocity for it to move.
particleTransform.SetTranslation(particleTransform.GetTranslation() + body.m_velocity);
If the particle has any special gravity settings from its emitter, the particle’s velocity is updated as intended.
body.m_velocity += DOWN * emitter->m_gravity * dt * body.m_mass;
Relation to Other Systems
The ParticleSystem is tangentially related to RendererXSR and Transform.
In relation to RendererXSR, it accesses the particle’s models to tint them in accordance to the emitter.
In relation to the Transform, it accesses the particle’s transforms when spawning and moving the particles.
Inspector.cpp [Week 2]
Purpose
The inspector’s main purpose is to display the editor user interface.
It gives you a single place to interact with the running game: viewport, scene hierarchy, selection, and per-entity details.
It allows for live introspection & editing by letting you view/edit component data while the simulation is running.
It hooks into the engine frame without leaking into simulation logic. Systems expose UI voluntarily through Inspect() functions.
In the short video demo, you will see debug visualizations, the inspector, and an editor for the emitters. You can spawn an emitter with a button.
Implementation
The inspector uses ImGui to display the user interface.
Upon initialization and destruction, the inspector is responsible for creating and destroying the ImGui context.
In the inspector loop, the Inspector is responsible for drawing:
- The main dockspace
- The toolbar
- The scene hierarchy
- The game viewport & gizmo
- Properties of the selected entity
- Panels of other systems
Scene Hierarchy
To create a scene hierarchy, we need to visit all existing root objects (and their children) in the scene to draw their ImGui node.
We define ‘existing root objects’ as:
- Entities with a
Transform - Entities which don’t have a parent.
- Entities which are not marked as hidden.
To get this collection, we ask our register to get all entities with a Transform which don’t have a HideTransform tag:
Engine.ECS().Registry.view<Transform>(entt::exclude<HideTransform>)
In this collection, we want to iterate through every root entity and visit their every child once.
To make sure that we don’t visit a node twice, we keep track of the entities we already inspected using an entity set std::set<Entity> inspected.
if (!transform.HasParent())
{
    InspectHierarchy(entity, transform, inspected);
}
From here, we inspect the hierarchy node recursively.
The recursion logic is as follows:
- If the node has been inspected before -> return.
- If the node has children -> draw node, then recurse through every child.
- If the node has no children -> draw node, then return.
First, we check if we inspected the node before if we can find it in our inspected entity set:
if (inspected.find(entity) != inspected.end()) return;
We check our Transform if it has any children.
If it doesn’t have children, we simply draw the tree node, then leave.
ImGui::TreeNodeEx(...); // Pass in relevant flags
if (ImGui::IsItemClicked()) m_selectedEntity = entity;
If it does have children, we draw the tree node…
const bool nodeOpen = ImGui::TreeNodeEx(...);
if (ImGui::IsItemClicked()) m_selectedEntity = entity;
…then we see if the node was opened.
If the node was opened, we recurse through all of its children and draw them.
for (auto child : transform)
{
    if (Engine.ECS().Registry.valid(child))
    {
        auto& childTransform = Engine.ECS().Registry.get<Transform>(child);
        Inspect(child, childTransform, inspected);
    }
}
ImGui::TreePop();
If the node was not opened, we don’t draw any of the children and simply just mark all children as inspected.
for (auto child : transform)
{
    AddToInspected(child, inspected);
}
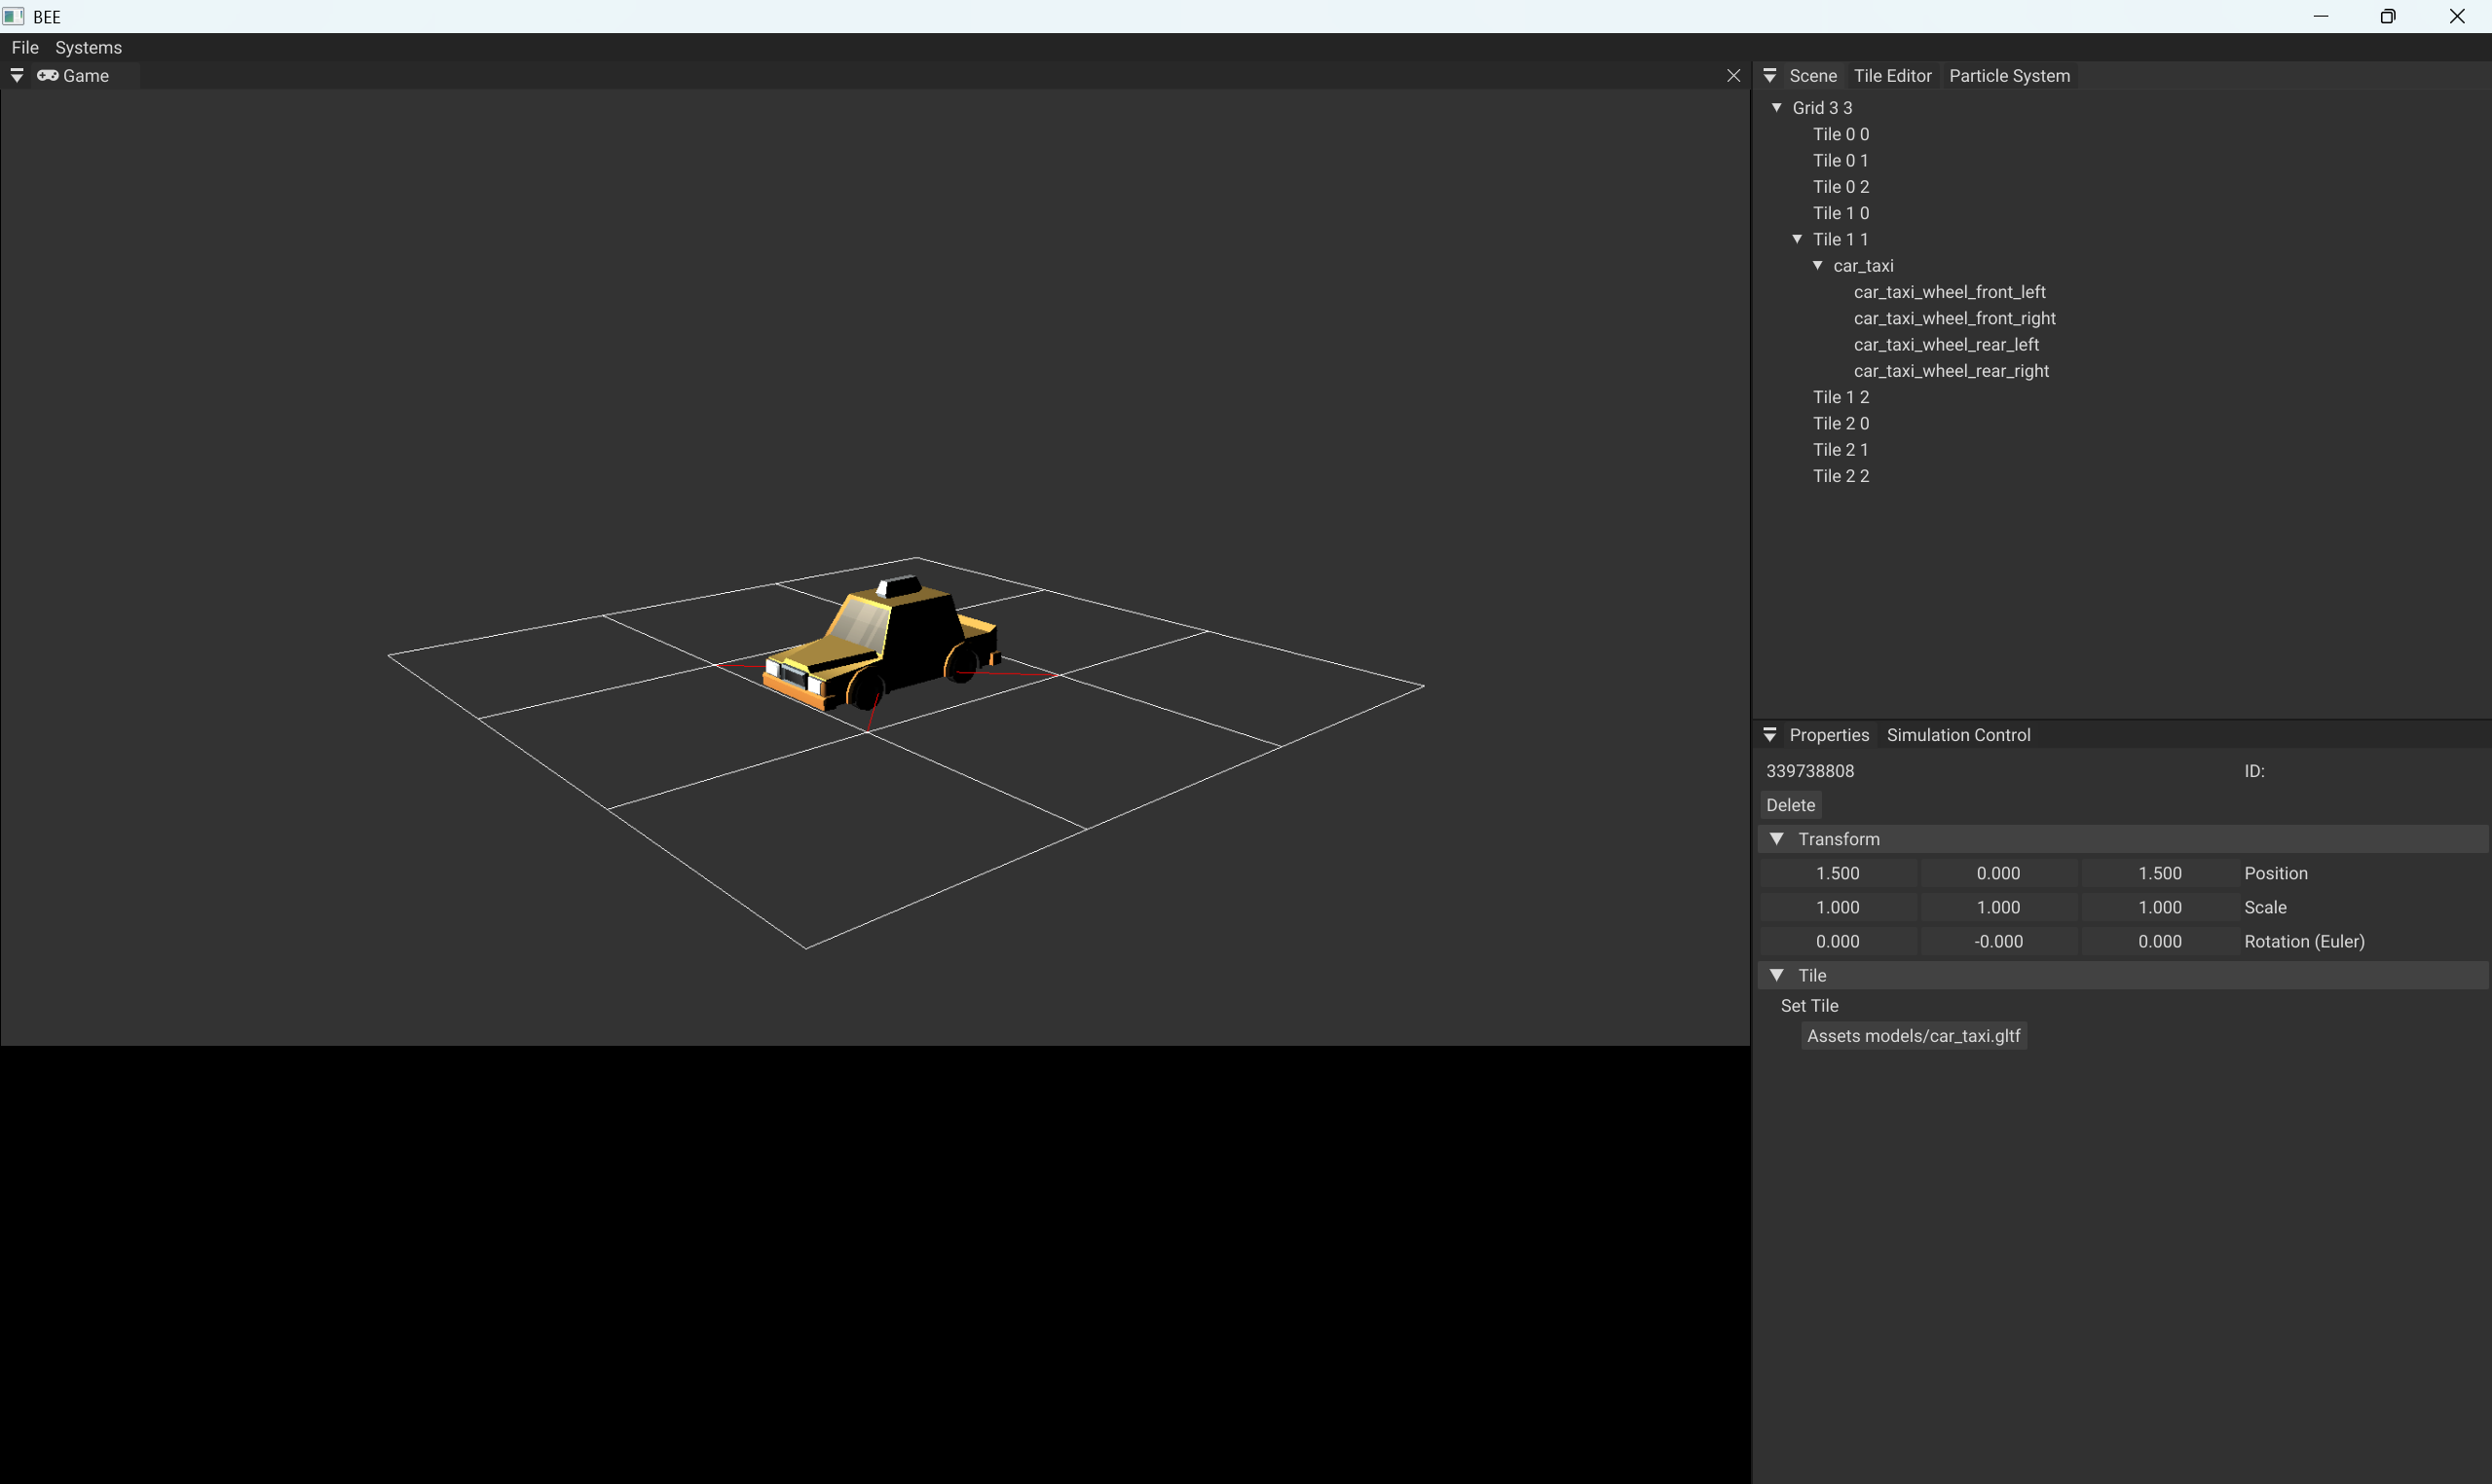
Here is how the scene hierarchy tree is rendered in the engine. Notice how the taxi has several wheels which are its children.
Properties
The properties show all of the components of the currently selected entity.
One of the ways the entity is selected is based on what node we clicked in the scene hierarchy.
In the case we don’t have a selected entity (or the selected entity is invalid), nothing is drawn.
Otherwise, we draw each of the components.
Each of our systems is responsible for drawing it’s own components properties.
For example, ParticleSystem is responsible for drawing the particle emitter properties.
The inspector accesses each system through Inspect(selectedEntity), passing the currently selected entity.
for (auto* s : systems)
{
    s->Inspect(m_selectedEntity);
}
As an example, here is how ParticleSystem inspects its currently selected entity for a ‘ConeShape’.
void bee::ParticleSystem::Inspect(Entity e)
{
    if (ImGui::CollapsingHeader("Cone Shape"))
    {
        auto& coneShape = Engine.ECS().Registry.get<ConeShape>(e);

        ImGui::InputFloat("Angle", &coneShape.m_angle);
        ImGui::InputFloat("Radius", &coneShape.m_radius);
    }
}
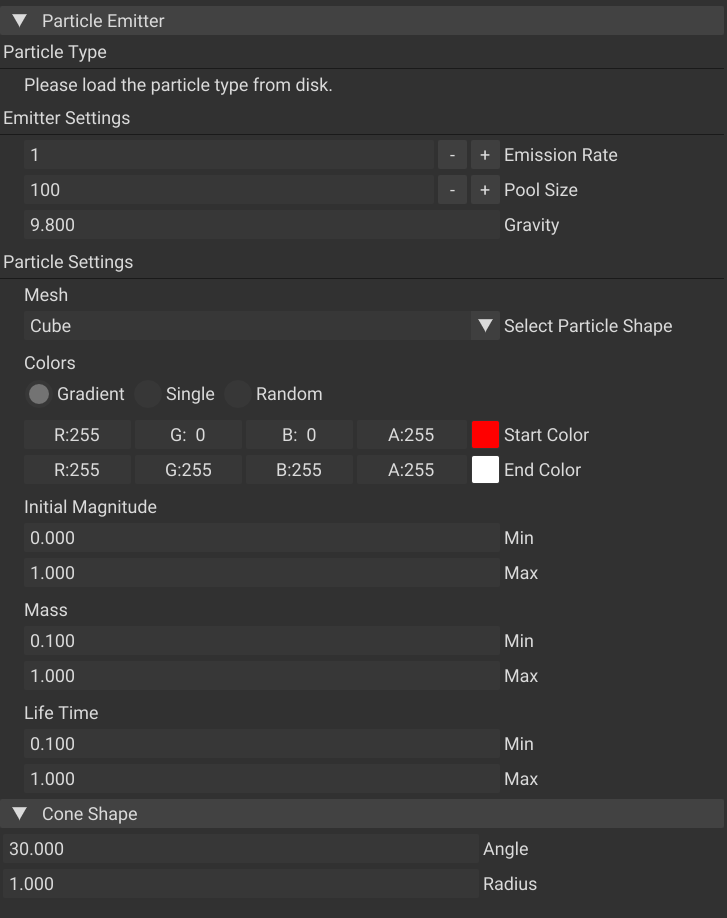
Here is how the final ParticleSystem components’ properties are rendered like
Gizmo
The gizmo allows us to move a selected entity directly in the viewport.
We set up the gizmo by defining the viewport bounds (where the viewport is on the screen). This is important because we need to know where the game viewport is, otherwise the gizmo would be in an incorrect position from the selected entity.
ImGuizmo::SetRect(m_gameViewportBounds.GetMin().x,
                  m_gameViewportBounds.GetMin().y,
                  m_gameViewportBounds.GetMax().x,
                  m_gameViewportBounds.GetMax().y);
We then can interact with the gizmo. We pass through a few important information:
- The camera’s view and projection
- The entity’s world transform (model)
- The gizmo mode and operation (translate, rotate, scale)
By default, the gizmo operates with the assumption that we manipulate in world space.
ImGuizmo::Manipulate(glm::value_ptr(view),
                     glm::value_ptr(projection),
                     m_gizmoOperation,
                     m_gizmoMode,
                     glm::value_ptr(model));
If we have used the gizmo, we set the matrix transformations to the entity’s transform.
In the case our transform is parented to another object, that means all of our gizmo manipulations must be converted from world space to local space.
if (transform->HasParent())  // transform to local space
{
    auto& parentTransform = Engine.ECS().Registry.get<Transform>(transform->GetParent());
    model = glm::inverse(parentTransform.World()) * model;
}
transform->SetFromMatrix(model);
Here is how gizmos look like in the engine:

Panels of Other Systems
In order for other systems to implement their own user interface panels, System has a special Inspect() function.
The inspector is able to access and draw their panels.
for (auto* const s : systems)
{
    s->Inspect();
}
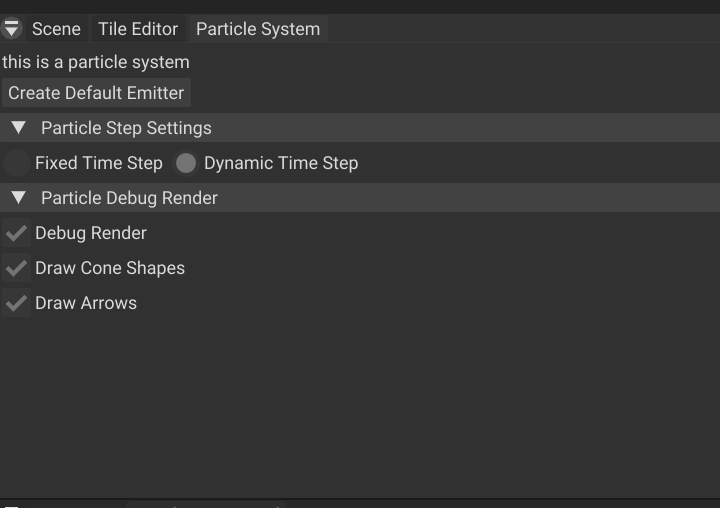
As an example, the ParticleSystem has a panel from which you can create a default emitter, access particle time-step settings, and toggle particle debug rendering.
Here is how one of the sections called “Particle Debug Render” is rendered using a set of checkboxes.
if (ImGui::CollapsingHeader("Particle Debug Render"))
{
    ImGui::Checkbox("Debug Render", &m_debug_render);
    if (m_debug_render)
    {
        ImGui::Checkbox("Draw Cone Shapes", &m_debug_render_cones);
        ImGui::Checkbox("Draw Arrows", &m_debug_render_arrows);
    }
}
Here is how the final ParticleSystem panel is rendered like
Simulation Controls
The inspector accesses the simulation controls through the Engine class.
Depending if the engine is playing or not, we display different buttons:
- “Pause” when the simulation is playing.
- “Play” & “Step” when the simulation is paused.
if (Engine.IsPlaying())
{
    ImGui::Text("The simulation is playing.");
    if (ImGui::Button("Pause"))
    {
        Engine.TogglePlay();
    }
}
if (!Engine.IsPlaying())
{
    ImGui::Text("The simulation is paused.");
    if (ImGui::Button("Play"))
    {
        Engine.TogglePlay();
    }
    ImGui::SameLine();
    if (ImGui::Button("Step"))
    {
        Engine.ToggleStep();
    }
}
This allows us to pause, play, and step through the simulation as seen below

Relation to Other Systems
All Systems
Due to being responsible for drawing all of the user interface, the inspector closely works with all systems in the engine.
Every System in the engine has Inspect() functions which allow the Inspector to hook into them and display their user interface.
This allows the systems to be encapsulated: every system implements its own user interface.
Engine
The inspector also accesses the simulation controls in the Engine class, allowing the user to pause/play the main game loop.
Transform
The inspector also closely works with the Transform class. Scene tree is built from Transform hierarchy (HasParent, iterator over children).
The Gizmo reads/writes world matrices through Transform::World() and SetFromMatrix(), respecting parent space when present.
Serializer / FileIO / Resource Manager
The inspector is able to call Serializer functions such as saving and loading game objects. This in turn also uses FileIO and Resource Manager to facilitate the functionality.
RendererXSR.cpp [Week 2]
Purpose
RendererXSR’s main purpose is to render 3D meshes to the screen. It utilizes the xsr renderer given by the university.
Implementation
To render meshes, I have created a component called MeshRendererXSR.
In itself, it contains a MeshResource and TextureResource, both of which contain a xsr::mesh_handle and a xsr::texture_handle.
It also contains a few simple variables allowing for simple color manipulation.
struct MeshRendererXSR
{
    std::shared_ptr<bee::MeshResource> Mesh;
    std::shared_ptr<bee::TextureResource> Texture;

    glm::vec4 Tint = glm::vec4(0.0f);
    glm::vec4 Multiplier = glm::vec4(1.0f);
};
To render a single frame, we do the following:
- Bind the main framebuffer. This lets OpenGL know to which buffer to draw to.
- Iterate and draw all meshes
- Render the final image using the camera’s position and projection.
- Unbind the main framebuffer. This signals to OpenGL that we have finished drawing.
In the main render loop, we iterate over every MeshRendererXSR and render them using xsr::render_mesh().
for (const auto& [entity, model, transform] : Engine.ECS().Registry.view<MeshRendererXSR, Transform>().each())
{
    xsr::render_mesh(glm::value_ptr(transform.World()),
                        *model.Mesh->GetHandleXSR(),
                        *model.Texture->GetHandleXSR(),
                        glm::value_ptr(model.Multiplier),
                        glm::value_ptr(model.Tint));
}
We render the final image by calling xsr::render(), passing relevant camera position and projection.
xsr::render(glm::value_ptr(inverse(cameraTransform.World())), glm::value_ptr(camera.Projection));
As a result of all of the above, we are able to render 3D models, such as the taxi below. Notice that the taxi consists of several meshes such as wheels and chassis.
XSR also has special debug render functionality. This debug render is implemented per system in their respective Render() functions.
As an example, here is how in ParticleSystem we render the cone shapes and arrows.
To draw the cones, I have written my own debug draw tools cones for me based on its position, up direction, radius, and angle.
for (auto [e, transform, emitter, coneShape] : ecs.Registry.view<Transform, ParticleEmitter, ConeShape>().each())
{
    debug_draw_tools::draw_cone(transform.GetTranslation(),
                                UP * transform.GetRotation(),
                                coneShape.m_radius,
                                coneShape.m_angle);
}
To draw arrows, I have written my own debug draw tool which draws arrows for me.
For debug rendering of particles and emitters
for (auto [e, transform, particle, body] : ecs.Registry.view<Transform, Particle, Body>().each())
{
    if (auto* emitter = ecs.Registry.try_get<ParticleEmitter>(particle.emitterEntity))
    {
        float t = (glm::length(body.m_velocity)) / (emitter->m_maxInitialMagnitude);
        debug_draw_tools::draw_arrow(transform.GetTranslation(),
                                        body.m_velocity,
                                        1.0,
                                        lerp(debug_draw_tools::Colors::Green, debug_draw_tools::Colors::Red, t));
    }
    else
    {
        debug_draw_tools::draw_arrow(transform.GetTranslation(), body.m_velocity, 1.0, debug_draw_tools::Colors::Green);
    }
}
The above debug drawing allows us to draw cones and velocity arrows for particles as seen below
Relation to Other Systems
The RendererXSR is called during the render phase in the Engine class in between BeginFrame() and EndFrame().
It requires Transform to understand where the mesh is supposed to drawn in the world.
It tangentially relies on the Resource Manager. MeshRendererXSR holds MeshResource and TextureResource that come from the Resource Manager; GLTF scenes created by ModelResource::Instantiate attach these components so they render automatically.
Serializer.cpp [Week 3]
Purpose
The Serializer’s main purpose is to save and load objects and scenes from JSON files. This includes all of the component data (such as particle emitters, transform, mesh renderers, and tile grids)
The Serializer utilizes the Cereal library.
In the short video demo, you will see an emitter saved to disk and loaded from disk:
Implementation
Initialization
The first thing the Serializer does upon initialization is register all components for serialization.
void bee::Serializer::RegisterAllComponents()
{
    internal::RegisterComponentForSerialization<Transform>();
    internal::RegisterComponentForSerialization<Grid>();
    internal::RegisterComponentForSerialization<Tile>();
    internal::RegisterComponentForSerialization<ParticleEmitter>();
    internal::RegisterComponentForSerialization<ConeShape>();
}
We register our components using EnTT Meta’s runtime reflection. It attaches two function pointers — SaveType and LoadType. This lets the serializer call the right method for any registered type at runtime.
template <typename Type>
[[maybe_unused]] void internal::RegisterComponentForSerialization()
{
    entt::meta_factory<Type>()
        .type(entt::type_hash<Type>::value())
        .template func<&internal::SaveType<Type>>("SaveType"_hs)
        .template func<&internal::LoadType<Type>>("LoadType"_hs);
}
From here, the serializer can now successfully call the save and load methods for components.
Saving and Loading Methods
The SaveType function calls the ‘Save’ method present in each registered component.
template <typename Type>
void internal::SaveType(cereal::JSONOutputArchive& archive, const Entity entity, const std::string& variableName)
{
    Type& component = Engine.ECS().Registry.get<Type>(entity);

    component.Save(archive, entity, variableName);
}
The LoadType function calls the ‘Load’ method present in each registered component.
When we load from a JSON file, we check if we can load a certain component or not.
If the certain component is present in the JSON file, we just add it and move on. If it is not, we just ignore it and move on. We remove the component if the JSON didn’t have this component.
template <typename Type>
void internal::LoadType(cereal::JSONInputArchive& archive, const Entity entity, const std::string& variableName)
{
    Type& component = Engine.ECS().CreateComponent<Type>(entity);
    try
    {
        component.Load(archive, entity, variableName);
    }
    catch (...)
    {

        Engine.ECS().Registry.remove<Type>(entity);
    }
}
From here, the given component type implements its Save and Load methods.
As an example, lets take a look at how the particle emitter is saved and loaded.
Below, we call the archive function on the ParticleEmitter object, naming it appropriately as “ParticleEmitter” along with a number. This number is important so that we can differentiate between two or more entities with a particle emitter in a JSON file.
void bee::ParticleEmitter::Save(cereal::JSONOutputArchive& archive, const entt::entity, const std::string& number)
{
    archive(cereal::make_nvp("ParticleEmitter_" + number, *this));
}

void bee::ParticleEmitter::Load(cereal::JSONInputArchive& archive, const entt::entity, const std::string& number)
{
    archive(cereal::make_nvp("ParticleEmitter_" + number, *this));
}
In order to be able to call the archive function on ParticleEmitter, we need to define what information it must serialize upon call.
In our case, we simply save our relevant variables, such as emission rate.
template <class Archive>
void bee::ParticleEmitter::serialize(Archive& ar)
{
    ar(cereal::make_nvp("Emission Rate", m_emissionRate));
    ar(cereal::make_nvp("Pool Size", m_poolSize));
    ar(cereal::make_nvp("Particle Shape", m_particleShape));
    ar(cereal::make_nvp("Color Mode", m_colorMode));
    ar(cereal::make_nvp("Start Color", m_startColor), cereal::make_nvp("End Color", m_endColor));
    ar(cereal::make_nvp("Min Initial Magnitude", m_minInitialMagnitude),
       cereal::make_nvp("Max Initial Magnitude", m_maxInitialMagnitude));
    ar(cereal::make_nvp("Min Particle Mass", m_minParticleMass), cereal::make_nvp("Max Particle Mass", m_maxParticleMass));
    ar(cereal::make_nvp("Gravity", m_gravity));
    ar(cereal::make_nvp("Min Life Time", m_minLifeTime), cereal::make_nvp("Max Life Time", m_maxLifeTime));
}
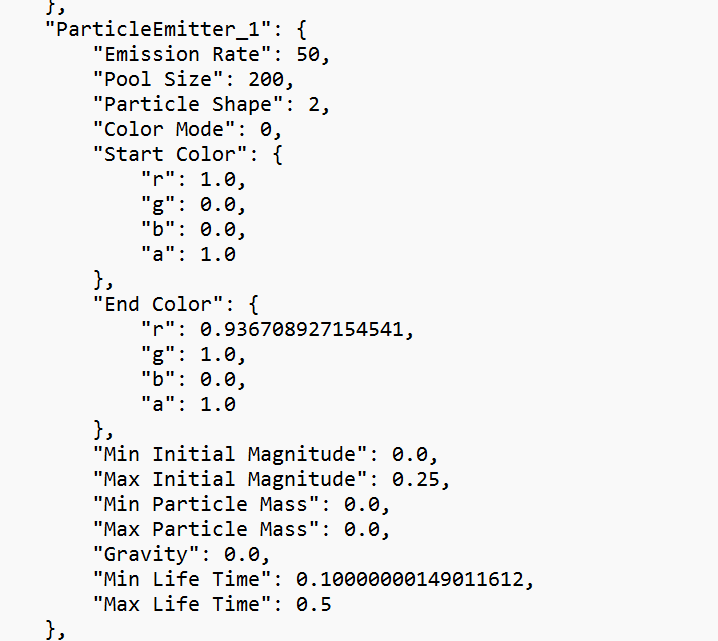
As an end result, here is how the particle emitter data is serialized into a JSON file, as seen below
Saving a Game Object
The game engine has the ability to save an entire game object into a JSON file, allowing us to save an entire scene of objects and loading them at a later time.
To save a game object, we need an entity we wish to save, the directory to save to, and a file path.
bool bee::Serializer::SaveGameObject(Entity e, FileIO::Directory directory, const std::string& name)
The algorithm for saving a game object is a recursion which steps through the parent and all of its children.
The algorith is as follows:
- Enter the node.
- Record the node’s current index.
- Record the amount of children the node has.
- Record each component the node owns.
- Enter the node’s children and repeat steps 1-5 until there are no more children left.
- At the end, record the total node count.
The order of nodes is important because during loading, the current node’s children count dictate how many of the next nodes in the save file belong to the current node. This allows us to save the parent-child relationship information.
We count the amount of children the node has and serialize it’s index and children count.
for (auto child : childTransform)
{
    node.childrenCount++;
}

archive(cereal::make_nvp(std::to_string(counter), node));
After this, we go through all of our registered components.
for (auto&& [id, type] : entt::resolve())
We check if our current entity has a specific component. If it doesn’t have it, we continue to the next component.
auto* storage = Engine.ECS().Registry.storage(id);
if (!storage || !storage->contains(childEntity))
{
    continue;
}
If the current entity does have the component, we check if the component has a proper SaveType method.
entt::meta_func saveFunction = type.func("SaveType"_hs);
if (!saveFunction)
{
    continue;
}
Once all is verified, we can now safely serialize the component, passing in the node’s index for identification purposes.
saveFunction.invoke({},
                    entt::forward_as_meta<cereal::JSONOutputArchive&>(archive),
                    entt::forward_as_meta<bee::Entity&>(childEntity),
                    entt::forward_as_meta<std::string>(std::to_string(counter)));
After all of our components were recorded, we repeat the process with all the current node’s children.
if (childTransform.HasChildren())
{
    for (auto childChildEntity : childTransform)
    {
        internal::StepThroughHierarchy(childChildEntity, archive, counter);
    }
}
All of this allows us to save a game object to a JSON file as seen below. In the gif below, I save my scene as test.json, then show the contents of the save file.

Loading a Game Object
The game engine has the ability to load an entire game object from a JSON file, allowing us to load an entire scene of objects.
To load a game object, we need a directory to load from, a file path, and a game object to parent to. We can also load directly to scene without a parent game object.
bool bee::Serializer::LoadGameObject(FileIO::Directory directory, const std::string& name, Entity e)
The algorithm for loading a game object works as follows:
- Keep track of the current parent node and how many children it has left to load.
- Start by loading the total number of nodes N.
- For each node index from 1 to N:
- Load all components attached to the current node.
- Load the number of children the current node has.
- If there is a current parent, attach the current node as its child.
- Once the current parent has no remaining children to load, remove it from consideration.
- If the current node has children, it becomes the new current parent.
We load the total scene node count, a total of N.
archive(cereal::make_nvp("NodeCount", nodeCount));
We use a deque which keeps track of the current parent entity and the amount of children it has.
Once the child count has been depleted, we simply pop back the deque and move on to the previous parent.
// This helps us keep track on to whom we should parent the node to.
std::deque<std::pair<entt::entity, int>> currentParent;
If we have a game object we want to parent, we simply add it to our deque with a child count of -1. This allows it to be always be at the back of the deque and not be deleted.
if (parentEntity != entt::null)
{
    currentParent.push_back(std::make_pair(parentEntity, -1));
}
Because we saved all of our nodes labelled from 1 to N, this allows us to easily iterate through all of them.
for (int i = 1; i <= nodeCount; i++)
In the for loop, we create the child entity…
auto childEntity = ecs.CreateEntity();
…and begin loading all of its components.
We first go through all of our registered components.
for (auto&& [id, type] : entt::resolve())
We check if the specific component has a proper SaveType method.
entt::meta_func loadingFunction = type.func("LoadType"_hs);
if (!loadingFunction)
{
    continue;
}
Once all is verified, we can now safely serialize the component, passing in the node’s index for identification purposes.
loadingFunction.invoke({},
    entt::forward_as_meta<cereal::JSONInputArchive&>(archive),
    entt::forward_as_meta<bee::Entity&>(childEntity),
    entt::forward_as_meta<std::string>(std::to_string(i)));
After all components are loaded, we move our focus on parenting.
First, we check if we have a current parent. If we have no current parent, we just move forward.
if (!currentParent.empty())
If we have a parent, we make the current node its child.
auto& childTransform = Engine.ECS().Registry.get<Transform>(childEntity);
childTransform.SetParent(currentParent.back().first);
Then we deplete the current parent’s child count.
currentParent.back().second--;
If we have completely depleted the current parent’s child count, we remove it and move onto the previous parent.
if (currentParent.back().second == 0)
{
    currentParent.pop_back();
}
After all of this, we check if the current node has any children.
If it does, we add it to the deque, making the current node the new current parent.
if (node.childrenCount != 0)
{
    currentParent.push_back(std::make_pair(childEntity, node.childrenCount));
}
All of this allows us to load a game object from a JSON file as seen below. In the gif below, I load a traffic_road.json scene, a scene which contains a small diorama consisting of a few cars, a road, and trees on the side.

Relation to Other Systems
The serializer works very closely with Transform to save and load the hierarchy correctly: roots are top-level entries and children are serialized under their parents.
The serializer also works with Inspector: The editor triggers Save/Load via menu action and the serializer handles the work.
ResourceManager.cpp [Week 4]
Purpose
Single source of truth for assets. Centralizes loading/creation of meshes, textures, and models so that each asset is loaded exactly once and then shared.
Stable identity & deduplication. Computes a type-directed, stable key (usually a path) so repeated requests return the same std::shared_ptr
Clear ownership & lifetime. Assets are owned by std::shared_ptr in the manager’s cache. Systems/components keep shared refs; no manual new/delete.
Separation of concerns. Loading/instantiation logic lives in resources (e.g., ModelResource, MeshResource, TextureResource), while the manager only handles identity + caching.
Runtime resource manager:
- Resource loading / unloading ✅
- Reference counting ✅
a runtime resource manager capable of loading GLTF files
In the short video demo below, you will see a GLTF file being loaded with the correct hierarchy, meshes, and textures.
Implementation
Resource
The resource manager holds within itself a singular cache consisting of keys and resources.
Type-Directed Key [🟢 Evidence for “Good”]
Every resource is identified using a std::string key (e.g., file path, or file path + sub-index for GLTF).
std::unordered_map<std::string, std::shared_ptr<Resource>> m_resources;
All concrete resources derive from Resource which is able to identify itself to the Resource Manager using a key.
The base class contains book-keeping fields (such as file path and directory) and a way to compute a stable key for its identity. This is surfaced as T::GetPath(args...), which the Resource Manager uses uniformly.
As an example, by default, T::GetPath(args...) takes in a directory and a path, which returns the file path as its key.
static std::string GetPath(FileIO::Directory directory, const std::string& path)
{
    return Engine.FileIO().GetPath(directory, path);
}
Some resources, such as MeshResource can also define additional T::GetPath(args...), which returns the file path + sub-index for GLTF as its key.
static std::string MeshResource::GetPath(const ModelResource& model, int index)
{
    const auto& mesh = model.GetDocument().meshes[index];
    return model.GetPath() + " | Mesh-" + std::to_string(index) + ": " + mesh.name;
}
This allows the manager to stay generic (no giant switch). Each resource type defines what “identity” means (file path, plus subresources).
The net effect is that the manager doesn’t know how to load a mesh, texture, or a model. It only knows how to identify them and cache them. Each resource implements its own loading and instantiation.
Loading a Resource
When loading, we get the pass in arguments. The arguments depend on the implementation of the resource’s T::GetPath(args...) and constructors.
As an example:
- Models are loaded with directory and filename. In this case, the key returned is the filepath
- Meshes and textures can be loaded with a model reference and an index. In that case, the key returned is the filepath + GLTF sub-index.
auto model_example = Engine.Resources().Load<ModelResource>(directory, filename);

auto mesh_example = Engine.Resources().Load<MeshResource>(model, index);

auto texture_example = Engine.Resources().Load<TextureResource>(model, index);
First, we identify if we already have the resource in cache so that we avoid duplicants.
We get the resource’s key.
const std::string path = T::GetPath(args...);
Then we try to find it in our memory. If we do, we return the resource.
auto resource = Find<T>(path);
if (resource) return resource;
Second, if we didn’t find it, we construct the resource and store it in our cache.
m_resources[path] = std::make_shared<T>(std::forward<Args>(args)...);
Finally, we return the resource.
return std::dynamic_pointer_cast<T>(m_resources[path]);
Model, Mesh, and Texture Resources
Based on the base Resource, I have created a few concrete classes, namely for 3D models, their meshes, and their textures.
From the bottom up, if we look at MeshResource and TextureResource, they only contain xsr::mesh_handle and xsr::texture_handle respectively.
On the other hand, the ModelResource consists of a tinygltf::Model, an vector of MeshResource, and an vector of TextureResource.
Loading a GLTF Model
When we call to load a GLTF model…
auto model = Engine.Resources().Load<ModelResource>(directory, filename);
…inside, we use tinygltf loader, which loads all of the model information into m_model.
res = loader.LoadASCIIFromFile(&m_model, &err, &warn, fullFilename);
After this, we load meshes and populate the MeshResource array…
for (int i = 0; i < static_cast<int>(m_model.meshes.size()); i++)
{
    auto mesh = Engine.Resources().Load<MeshResource>(*this, i);
    m_meshes.push_back(mesh);
}
…and then, we load textures and populate the TextureResource array.
// Load textures
for (int i = 0; i < static_cast<int>(m_model.images.size()); i++)
{
    auto image = Engine.Resources().Load<TextureResource>(*this, i);
    m_textures.push_back(image);
}
As a result, our ModelResource is now complete and is ready to be used in-game.
Instatiating a Model
To instatiate the model into the scene, we call
model->Instantiate(parentEntity);
Inside, we go over each root node and instatiate them, going into a recursion to instatiate all of its children.
for (const uint32_t node : m_model.scenes[0].nodes)
{
    InstantiateNode(node, parent);
}
Per node, we do the following algorithm:
- Create the node’s
Transform - Create the node’s
MeshRendererXSR - Repeat step 1-2 for all of the node’s children
First, we create the Transform component and name it
auto& transform = Engine.ECS().CreateComponent<Transform>(entity);
If we have the node’s parent, we set the Transform its parent accordingly to prsserve the hierarchy.
if (parent != entt::null) transform.SetParent(parent);
When setting the Transform values, we can use two methods:
- Use the matrix from the node
- Use the scale, rotation, and translation from the node
We use the first method by default. If the matrix isn’t available for some reason, we use the second method.
The first method:
glm::mat4 transformGLM = glm::make_mat4(node.matrix.data());
transform.SetFromMatrix(transformGLM);
The second method:
transform.SetScale(to_vec3(node.scale));
transform.SetRotation(to_quat(node.rotation));
transform.SetTranslation(to_vec3(node.translation));
After the Transform, we load the MeshRendererXSR.
First, we ensure that the mesh has primitives…
const auto& mesh = m_model.meshes[node.mesh];
assert(!mesh.primitives.empty());
…after which we get the mesh itself.
const auto& osmMesh = m_meshes[node.mesh];
Second, we ensure that the texture exists…
const auto& textureIndex = GetTextureIndex(node.mesh);
assert(textureIndex != -1);
Due to how XSR is formed, we need to write a bypass to directly access the texture information: we only need the image source.
int bee::ModelResource::GetTextureIndex(const int& meshIndex) const
{
    const auto gltfMaterialIndex = m_model.meshes[meshIndex].primitives[0].material;
    if (gltfMaterialIndex == -1)
    {
        return -1;
    }

    const auto baseColorTextureIndex = m_model.materials[gltfMaterialIndex].pbrMetallicRoughness.baseColorTexture.index;
    if (baseColorTextureIndex == -1)
    {
        return -1;
    }

    const auto imageSourceIndex = m_model.textures[baseColorTextureIndex].source;
    if (imageSourceIndex == -1)
    {
        return -1;
    }

    return imageSourceIndex;
}
After this, we can access the texture.
const auto& osmTexture = m_textures[textureIndex];
After successfully getting the meshes and texture, we can finally create a MeshRendererXSR.
const auto& osmTexture = m_textures[textureIndex];
Engine.ECS().CreateComponent<MeshRendererXSR>(entity, osmMesh, osmTexture);
Then, we repeat the same process for all children nodes.
// Load children
for (auto childNode : node.children)
{
    InstantiateNode(childNode, entity);
}
The result is that now we can instatiate the models into the game scene, such as this taxi. Notice how the taxi has 4 wheels as its children.
Relation to Other Systems
The resource manager tangentially works with the renderer, particularly MeshRendererXSR. It loads and instantiates GLTF models which consist of mesh and texture resources.
Transform.cpp [Week 4]
Purpose
Transform’s main purpose is to provide the translation, rotation, and scale of a given game object.
It also preserves the scene hierarchy. It lets any entity be a parent/child of another entity and ensures transforms propagate correctly through the graph.
Implementation
Translation, Rotation, Scale, Parent-Child Hierarchy
Most simply, the Transform struct contains the translation, scale, and rotation.
glm::vec3 m_translation{0.0f, 0.0f, 0.0f};
glm::vec3 m_scale{1.0f, 1.0f, 1.0f};
glm::quat m_rotation{1.0f, 0.0f, 0.0f, 0.0f};
To store hierarchical information, we use a vector array for children and a reference to the parent.
Entity m_parent{entt::null};
std::vector<Entity> m_children{};
For the above variables, I have written a variety of user-friendly API, allowing us to easily understand and modify the current state of a given Transform. For example:
- Get/Set Translation, Rotation, Scale
- Get/Set Parent
- Get Children
Setting a Parent
When we want to parent a game object to another one, we can call
transform.SetParent(parentEntity);
When setting a new parent to a game object, we make sure to:
- Remove the game object from the old parent
- Add the game object to the new parent
Then we remove the game object from the old parent.
if (m_parent != entt::null && Engine.ECS().Registry.valid(m_parent))
{
    auto& oldParent = Engine.ECS().Registry.get<Transform>(m_parent);
    oldParent.RemoveChild(thisEntity);
}

//...

void Transform::RemoveChild(Entity child)
{
    assert(Engine.ECS().Registry.valid(child));
    auto it = std::find(m_children.begin(), m_children.end(), child);
    if (it != m_children.end()) m_children.erase(it);
}
Then we add the game object to the new parent
// Attach to new parent if any
if (parent != entt::null && Engine.ECS().Registry.valid(parent))
{
    auto& newParent = Engine.ECS().Registry.get<Transform>(parent);
    newParent.AddChild(thisEntity);
}

//...

void Transform::AddChild(Entity child)
{
    assert(Engine.ECS().Registry.valid(child));

    // Avoid duplicates while keeping insertion order stable
    if (std::find(m_children.begin(), m_children.end(), child) == m_children.end())
    {
        m_children.push_back(child);
    }
}
Then we set the game object’s parent as the new parent.
m_parent = parent;
World Matrix Caching [🟢 Evidence for “Good”]
To avoid calculating the world matrix excessively, we can cache the world matrix and calculate it only when we know it had changed.
To ensure this, upon using Set on translation, rotation, and scale, we can call SetMatrixDirty().
This propagates the change to all of its children.
void Transform::SetMatrixDirty()
{
    m_worldMatrixDirty = true;

    // Propagate to descendants
    for (auto child : *this)
    {
        auto& ct = Engine.ECS().Registry.get<Transform>(child);
        ct.SetMatrixDirty();
    }
}
The next time when we call for the world matrix, we can check if it was modified from last time. If it didn’t, we can use the cached world matrix.
if (!m_worldMatrixDirty) return m_worldMatrix;
If it did, we can calculate it again.
m_worldMatrix = TranslationMatrix * RotationMatrix * ScaleMatrix;

OR

m_worldMatrix = parent.World() * (TranslationMatrix * RotationMatrix * ScaleMatrix);
The result of all of this is that now we have a Transform which can define where our game object is and it’s hierarchy in relation to other objects. Notice how the taxi has 4 wheels which are its children.
Relation to Other Systems
The Transform connects with a lot of systems due to its fundamental nature as a definition as a point in space.
The RendererXSR reads Transform::World() for each renderable. The lazy cache keeps this hot path cheap while remaining correct under hierarchy edits.
The Inspector viewport gizmo manipulates world matrices; Inspector converts to/from local using the parent’s world, then calls SetFromMatrix. Selection and scene tree traversal are built by recursing Transform children.
The Serializer saves scenes walking root Transforms and visiting children; on load, parents are created first so that world matrices are valid by the time components/components’ Save/Load run.
TileEditor.cpp [Week 5]
Purpose
The Tile Editor’s main purpose is to create scenes in a grid of tiles.
It allows for fast level block-out. It lets you paint a grid of tiles directly in the editor to prototype levels without bespoke meshes.
It allows for consistent placement. It enforces grid-aligned placement/selection so tiles line up perfectly and transforms stay clean.
It allows for data-driven content. It stores tiles as ECS entities with lightweight components, so they serialize cleanly and render through the normal pipeline.
In the short video demo below, you will see a grid on which you can select tiles from viewport, an imported GLTF tile and assign it to a grid tile, and the level being saved and loaded.
Implementation
Grid and Tiles
In the engine, a tile is defined as a position on a grid (X and Y) with 3D model information.
struct Tile
{
    int X;
    int Y;
    std::pair<FileIO::Directory, std::string> m_modelPath;
};
And a grid is a parent of tiles of a X by Y formation. The grid defines the tile size and the size of the grid.
struct Grid
{
    float m_tile_size;
    glm::ivec2 m_size;
};
For example, a grid of 3x3 in the scene hierarchy will look like
Grid:
- 1x1 Tile
- 1x2 Tile
- 1x3 Tile
- 2x1 Tile
- ...
- 3x2 Tile
- 3x3 Tile
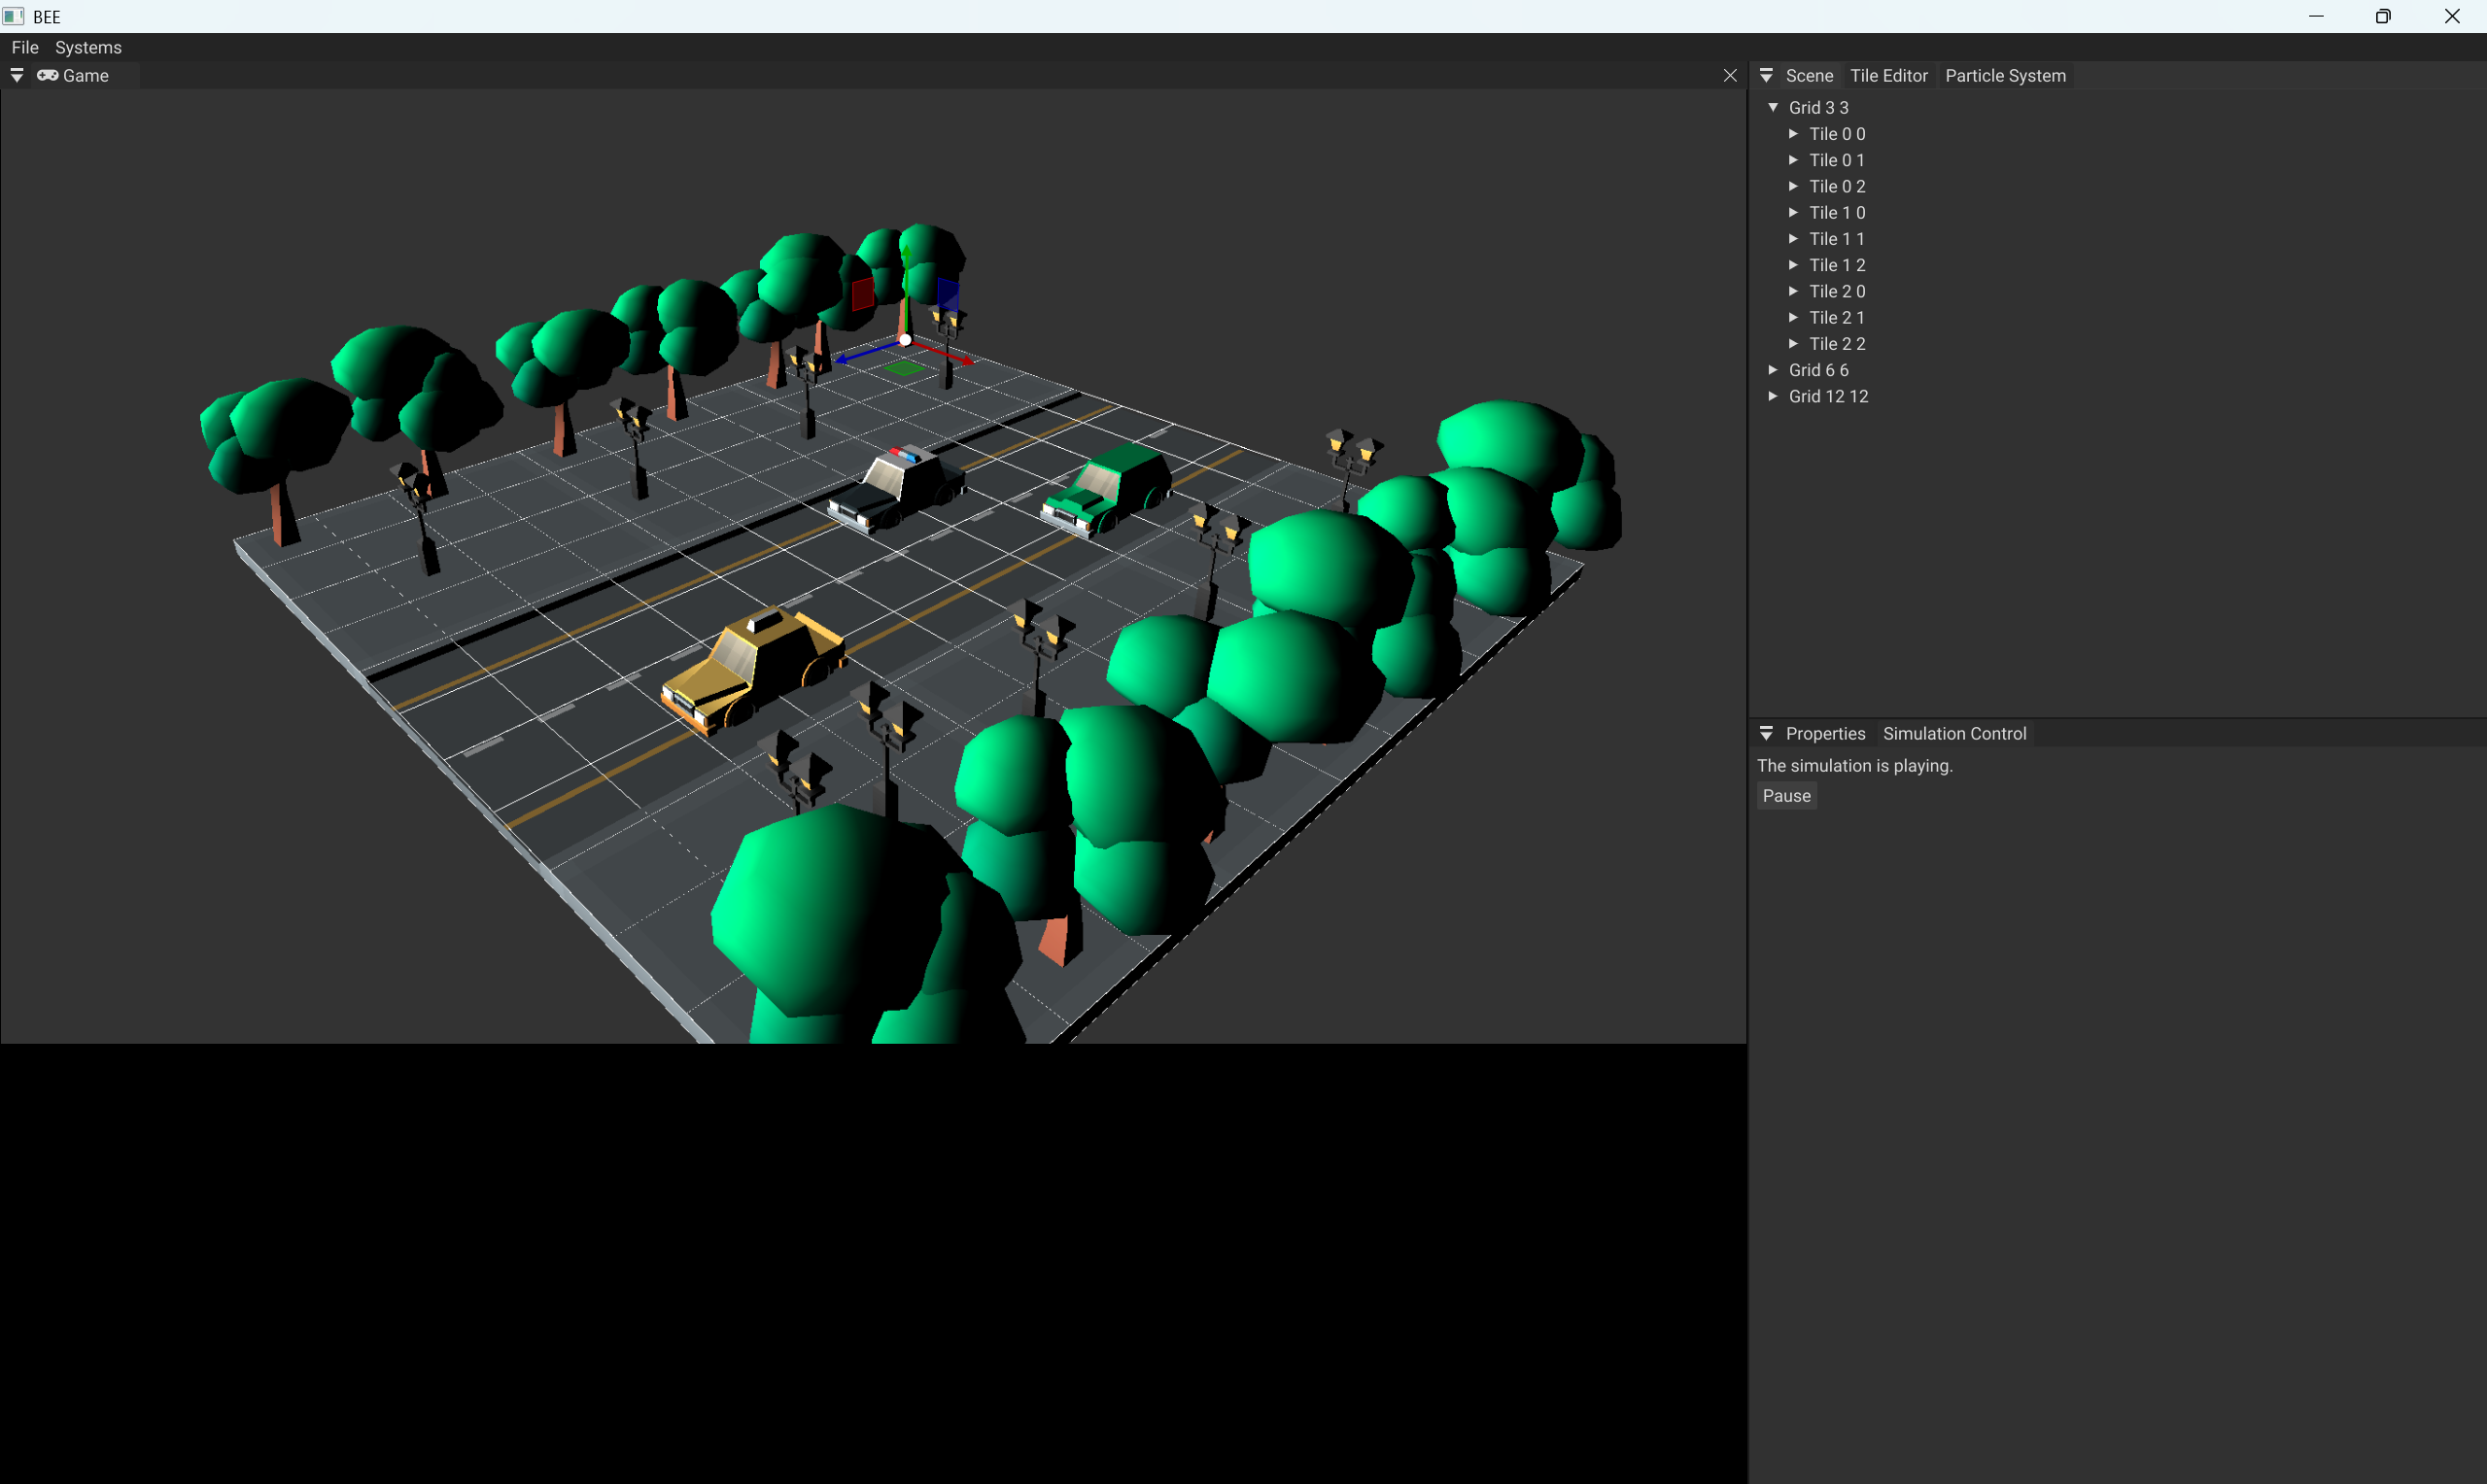
As an example, here is how a simple street diorama looks like in the engine. Notice the use of several grids of different sizes (3x3, 6x6, 12x12)
Selecting a Grid Size
In the engine, when you select a grid size, we:
- Delete the old size grid and tile children.
- Create the new size grid and tile children.
We delete the old grid entirely since its formation can vastly differ from the new grid: it can have more or less tiles in a combination of different X and Y sizes.
if (transformGrid.HasChildren())
{
    for (auto child : transformGrid)
    {
        Engine.ECS().DeleteEntity(child);
    }
}
When creating a new grid, we loop through a X by Y area…
for (int x = 0; x < gridParent.m_size.x; x++)
{
    for (int y = 0; y < gridParent.m_size.y; y++)
    {
        //...
    }
}
… Correctly setting the tile position…
// The top corner position of the tile
glm::vec3 topCornerPosition = glm::vec3(x * gridParent.m_tile_size, 0.0f, y * gridParent.m_tile_size)

// Offset by half so that the position is in the tile's center.
glm::vec3 centerOffset = glm::vec3(gridParent.m_tile_size / 2.0f, 0.0f, gridParent.m_tile_size / 2.0f));

transform.SetTranslation(topCornerPosition + centerOffset)

transform.SetParent(gridEntity);
…and setting the tile coordinates.
auto& tile = ecs.CreateComponent<Tile>(entity);
{
    tile.X = x;
    tile.Y = y;
}
Importing a GLTF Tile
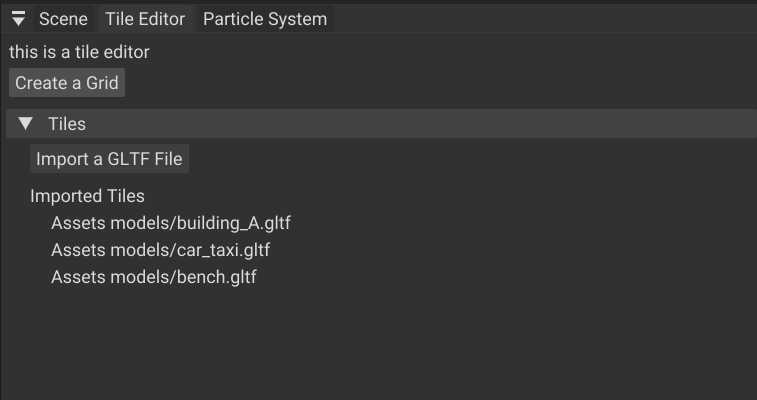
To successfully import a GLTF tile, I have used an external library Native File Dialogue (NFD) to allow me to open Windows native file dialogue to select and return a filepath and directory.
auto result = Engine.FileIO().OpenDialogue();
m_importedModelPaths.push_back(result);
Using ImGui, you can successfully import GLTF models. The imported models are listed as seen below.
Grid Debug Rendering
For each tile on the grid, I draw a square to show where it is.
debug_draw_tools::draw_square(
    tileTransform.GetTranslation() + gridTransform.GetTranslation(),
    grid.m_tile_size,
    debug_draw_tools::Colors::White);
To show which tile is currently selected, I draw a red cross.
if (m_selectedTile == tileEntity)
{
    debug_draw_tools::draw_cross(
        tileTransform.GetTranslation() + gridTransform.GetTranslation(),
        grid.m_tile_size,
        debug_draw_tools::Colors::Red
    );
}
The result is as seen below. Notice the red cross in front of the police car to show the selected tile and the grid drawn in white.

Selecting a Tile from Viewport
The engine allows the tile from a grid to be selected from viewport:
- Select the grid from the scene hierarchy.
- Click on the tile in the viewport you wish to select.
Selecting a grid first is important because we can have several different layers of grids of different sizes, such as in the traffic street example.
if (!Engine.ECS().Registry.valid(m_selectedGrid) || m_selectedGrid == entt::null)
{
    return;
}
We then verify that the user has clicked with a mouse inside the viewport. After this, we get our selected tile.
if (Engine.Input().GetMouseButtonOnce(Input::MouseButton::Left) && Engine.Input().IsMouseInViewport())
{
    auto result = camera_tools::GetTileOnGrid(m_selectedGrid);

    m_selectedTile = result.second;
    if (result.first)
    {
        Engine.Inspector().SetSelectedEntity(m_selectedTile);
    }
}
Upon further inspection of GetTileOnGrid(), we look through our camera to get the ray direction the camera was looking at.
We then check with our grid if the ray has intersected it. If it did, we return the tile.
auto ray = GetRayFromScreenToWorld(cam_transform, camera.Projection);

foundTile = FindIntersection(cam_transform.GetTranslation(), ray, gridEntity);

if (foundTile != entt::null)
{
    return std::make_pair(true, foundTile);
}
Upon even further inpsection, to get the ray from screen to world, we do the following…
glm::vec3 camera_tools::GetRayFromScreenToWorld(bee::Transform& cameraTransform, const glm::mat4& cameraProjection)
{
    const glm::vec2 mousePosition = bee::Engine.Input().GetMousePositionInViewport();

    // Derive the view matrix from camera transform (assuming it's a world transform)
    const glm::mat4 viewMatrix = inverse(cameraTransform.World());  // Convert world-space transform to view matrix

    // Compute the inverse of the View-Projection matrix
    const glm::mat4 invVP = inverse(cameraProjection * viewMatrix);

    // Unproject near and far points
    const glm::vec4 farPoint = invVP * glm::vec4(mousePosition, 1.0f, 1.0f);

    const glm::vec3 nearPos = cameraTransform.GetTranslation();
    const glm::vec3 farPos = glm::vec3(farPoint) / farPoint.w;

    // Compute ray direction
    const glm::vec3 dir = normalize(farPos - nearPos);

    return dir;
}
… and to find an intersection:
entt::entity camera_tools::FindIntersection(const glm::vec3& rayOrigin, const glm::vec3& rayDirection, entt::entity gridEntity)
{
    // Check if the ray is parallel to the plane
    if (glm::abs(rayDirection.y) < 1e-6f)
    {
        // Ray is parallel to the plane
        return entt::null;
    }

    auto& gridTransform = bee::Engine.ECS().Registry.get<bee::Transform>(gridEntity);
    auto& grid = bee::Engine.ECS().Registry.get<bee::Grid>(gridEntity);

    // Solve for t
    float t = (gridTransform.GetTranslation().y - rayOrigin.y) / rayDirection.y;

    if (t < 0)
    {
        // Intersection is behind the ray's origin
        return entt::null;
    }

    // Calculate the hit point
    glm::vec3 hit = rayOrigin + t * rayDirection;

    for (auto child : gridTransform)
    {
        auto& tileTransform = bee::Engine.ECS().Registry.get<bee::Transform>(child);

        glm::vec3 position = tileTransform.GetTranslation() + gridTransform.GetTranslation();

        if ((position.x - grid.m_tile_size / 2.0f < hit.x && hit.x < position.x + grid.m_tile_size / 2.0f) &&
            (position.z - grid.m_tile_size / 2.0f < hit.z && hit.z < position.z + grid.m_tile_size / 2.0f))
        {
            return child;
        }
    }

    return entt::null;
}
All of this allows us to safely find the tile from a click in the viewport.
Assigning an Imported Model to a Tile
To assign a mesh to selected tile, you simply need to click the desired imported tile in the properties menu.

When a new mesh is assigned we need to
- Delete the entire tile completely
- Load the 3D model using the Resource Manager
- Instatiate the 3D model
We delete the tile and all of its children, cleaning it up for the new upcoming tile.
if (transform.HasChildren())
{
    for (auto child : transform)
    {
        Engine.ECS().DeleteEntity(child);
    }
}
We then load in the 3D model using the Resource Manager.
auto model = Engine.ResourceManager().Load<ModelResource>(directory, filepath);
And then we instatiate it.
We update the tile
model->Instantiate(tileEntity);
This allows us to instatiate models into the scene, such as this yellow taxi.
Serialization of Grid
The grid has a slightly unique serialization, specifically upon loading.
When we save, it is straigthforward: we simply save all of the information.
void bee::Tile::Save(cereal::JSONOutputArchive& archive, const entt::entity, const std::string& number)
{
    archive(cereal::make_nvp("Tile_" + number, *this));
}

template <class Archive>
void bee::Tile::serialize(Archive& ar)
{
    ar(cereal::make_nvp("X", X),
       cereal::make_nvp("Y", Y),
       cereal::make_nvp("Directory", m_modelPath.first),
       cereal::make_nvp("FilePath", m_modelPath.second));
}
Upon loading, we actually instatiate the model immediately
void bee::Tile::Load(cereal::JSONInputArchive& archive, const entt::entity entity, const std::string& number)
{
    archive(cereal::make_nvp("Tile_" + number, *this));

    auto& tile = bee::Engine.ECS().Registry.get<bee::Tile>(entity);

    if (tile.m_modelPath.first == FileIO::Directory::None) return;

    auto model = bee::Engine.Resources().Load<ModelResource>(tile.m_modelPath.first, tile.m_modelPath.second);

    model->Instantiate(entity);
}
Relation to Other Systems
The tile editor works with the Inspector to allow us to select a tile through the viewport. Most of the commands to control the grid come from the Inspector.
The tile editor works closely with the Transform. Tiles are ordinary entities under a grid root; Transform hierarchy (parent = grid) keeps spatial ops simple. Changing Grid.CellSize recomputes tile local positions and marks transforms dirty.
The tile editor also works with the ResourceManager, specifically when loading and instatiating new tiles.
The tile grid can be serialized by Serializer. It stores Grid, Tile, and renderable keys which makes tilemaps fully portable; scenes reopen faithfully with deduplicated resources.